Needle Felting — Sculpting Wool with Barbed Needles
Needle felting is a dry felting technique that uses a sharp, barbed needle to tangle wool fibers into a solid shape without water, soap, or agitation. The felting needle — a long, thin steel needle with tiny downward-facing barbs cut into its shaft — is repeatedly stabbed into a mass of loose wool. Each stab pushes fibers deeper into the mass, and the barbs catch and drag surface fibers downward, entangling them with fibers below. After hundreds of stabs, the loose wool compresses into a dense, firm shape that holds its form permanently.
The felting needle was invented in the 1850s for industrial needle-punch machines — large machines that drive hundreds or thousands of barbed needles through layers of fiber simultaneously to produce nonwoven industrial fabrics (carpet underlay, insulation, geotextiles). The craft application — using a single needle by hand to sculpt small objects — emerged in the 1980s among fiber artists who recognized that the industrial needle could be used as a sculpting tool. The technique requires no equipment beyond needles, foam, and wool, making it one of the most accessible fiber arts.
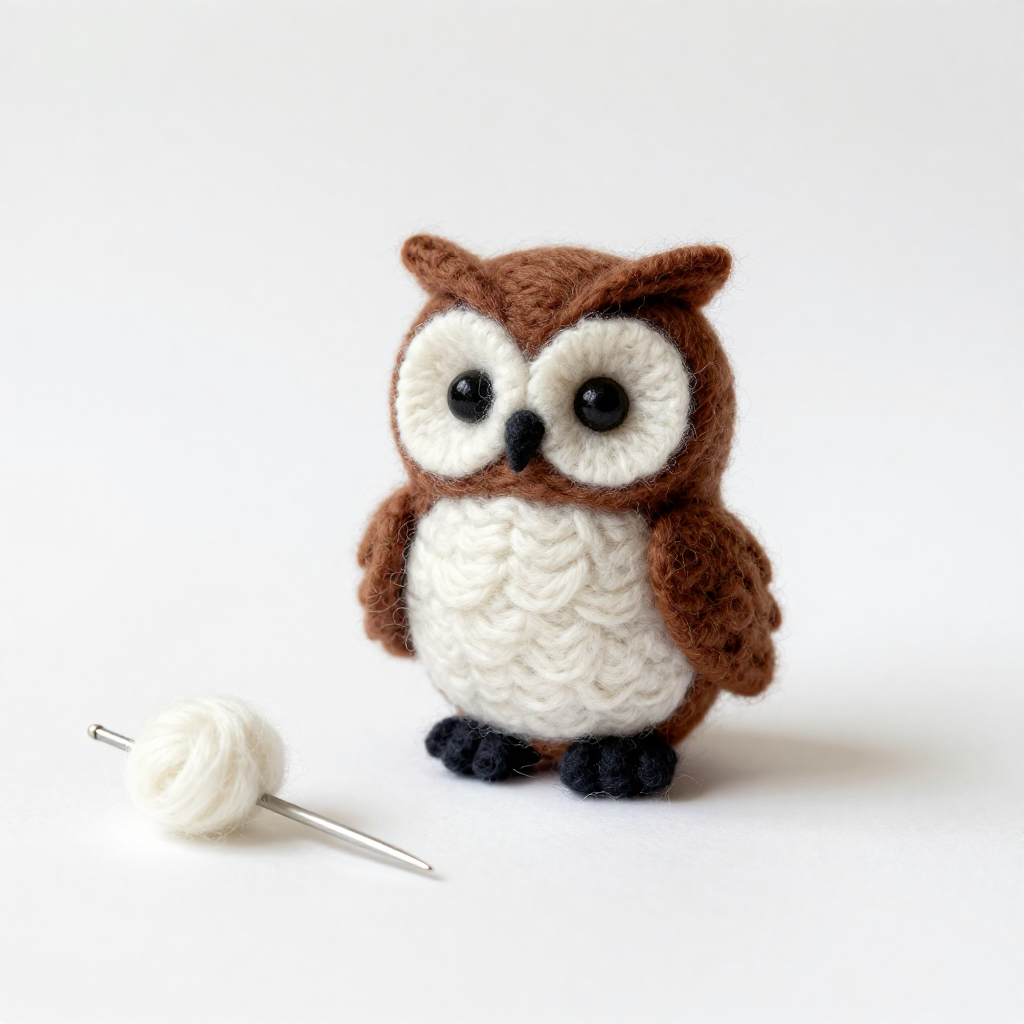
Needle felting produces three-dimensional objects rather than flat fabric — animals, figures, ornaments, and decorative forms. The sculptor builds shape by adding wool in layers, stabbing each addition until it bonds to the surface, gradually refining the form. The process is closer to clay sculpture than to any textile technique: you add material where you want volume and compress it where you want density. Fine details — eyes, ears, noses, surface texture — are added last with tiny wisps of coloured wool felted into the surface.
Instructions
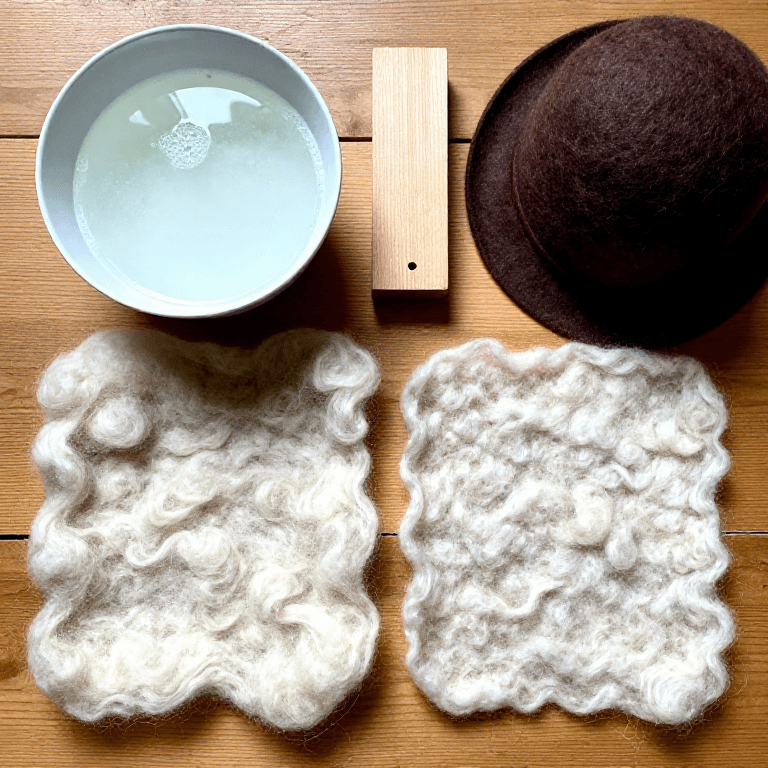
Gather materials — wool, needles, and foam
Gather materials — wool, needles, and foam
You need carded wool roving (Corriedale or Romney work well — not superwash, which cannot felt), felting needles in at least two gauges (a coarse 36-gauge for initial shaping and a fine 40-gauge for surface finishing), and a dense foam pad at least 5 cm thick (high-density upholstery foam or a purpose-made felting mat). The foam protects your work surface and your fingers — the needle passes through the wool and into the foam. Never felt on a hard surface — the needle will break. Start with about 30 grams of wool in a neutral colour for a small practice shape.
Materials for this step:
 Raw Wool Fleece30 g
 Felting Needle Kit1 kit
Understand the felting needle
Understand the felting needle
Examine a felting needle closely. It is a long steel needle (7-9 cm) with a triangular or star-shaped cross-section and tiny barbs cut into the edges near the tip. The barbs face downward (toward the tip) — when the needle enters the wool, the barbs catch fibers and push them deeper into the mass. When the needle withdraws, the barbs release. This one-way action tangles fibers progressively with each stab. Coarser needles (lower gauge number, 36) have larger barbs that move more fiber per stab — fast but rough. Finer needles (higher gauge, 40-42) have smaller barbs for smooth finishing. The needles are brittle — they snap if bent sideways. Always stab straight in and straight out.
Form a basic ball shape
Form a basic ball shape
Pull off a handful of wool roving (about 15 grams) and roll it loosely into a ball between your palms. Place it on the foam pad. Using the coarse needle (36-gauge), begin stabbing the wool ball repeatedly — push the needle in about 2 cm deep, pull it straight out, rotate the ball slightly, stab again. Work systematically around the entire surface, rotating the ball frequently so it felts evenly. The ball will shrink and firm up as the fibers entangle. After 3-5 minutes of steady stabbing, the ball should feel noticeably firmer and hold its round shape when you set it down. If one side is flat, add a small tuft of wool and felt it into the flat area.
Control density with stab depth
Control density with stab depth
The depth of each stab determines where the fibers tangle. Shallow stabs (1 cm) compress the surface — the outside becomes firm while the inside stays soft. Deep stabs (2-3 cm) tangle fibers throughout the core — the entire ball becomes uniformly dense. For a solid sculpture, use deep stabs first to build core density, then switch to shallow stabs to smooth the surface. For a soft, squishy object (like a pincushion), use mostly shallow stabs. You can test density by squeezing — a well-felted piece feels like a firm rubber ball, not a soft cotton ball.
Add wool to build volume
Add wool to build volume
To make the ball larger or to build a shape, wrap additional wool around the existing felted core and stab it in. The new fibers bond to the felted surface — the barbs push fresh fibers into the already-tangled base, locking them together. This additive process is how needle felting builds complex shapes: start with a simple core, add wool where you want more volume, and felt each addition until it is firmly attached. If you add too much at once, the surface becomes lumpy — add thin layers and felt thoroughly before adding more.
Shape an egg — controlled form
Shape an egg — controlled form
Starting from your ball, elongate it into an egg shape. To do this, concentrate your stabs on two opposite sides of the ball — the compressed areas flatten while the unstabbed areas bulge outward. Roll the forming egg on the foam, stabbing along the length to define the elongated shape. Needle felting is subtractive in this way: you cannot remove felted material, but you can compress areas to change the proportions. Work slowly, rotating the piece frequently and checking the shape from multiple angles. An egg shape is the starting point for most animal bodies — birds, mice, rabbits, and cats all begin as an egg.
Attach separate pieces
Attach separate pieces
Make a second small ball (about 3 cm diameter) for a head. To attach it to the egg body: hold the head against the body and stab repeatedly through both pieces at the join — the needle pushes fibers from the head into the body and vice versa, creating a permanent bond. Stab from multiple angles around the join to ensure a strong connection. If the join feels weak, wrap a thin wisp of wool around the seam and felt it over both pieces to reinforce the bond. Large or heavy attachments (legs, arms) may need a wire armature inside for structural support — but for small figures, the felted wool bond is sufficient.
Add surface detail with fine needles
Add surface detail with fine needles
Switch to the fine needle (40-gauge). Take a tiny wisp of coloured wool — just a few fibers — and lay it on the surface where you want colour. Stab gently and shallowly until the coloured fibers bond to the surface without poking through to the other side. This is how you add eyes, noses, spots, stripes, or any surface pattern. The fine needle makes small, precise holes that do not disturb the underlying shape. For eyes, roll a tiny ball of black wool and felt it into a shallow depression. For whiskers, twist a few fibers into a thin strand and felt one end into the face, leaving the rest free.
Smooth the surface
Smooth the surface
The surface of a needle-felted piece shows tiny needle holes and may be slightly uneven. To smooth it: use the finest needle available (42-gauge if you have one) and stab very shallowly across the entire surface at a slight angle — almost parallel to the surface rather than perpendicular. This pushes the topmost fibers sideways, filling the needle holes and creating a smoother finish. Some felters finish by lightly steaming the piece (holding it over a kettle) — the steam relaxes the surface fibers and the holes close as the fibers bloom. Do not soak the piece — water felting would change the shape.
Understand what needle felting cannot do
Understand what needle felting cannot do
Needle felting is irreversible — once fibers are tangled, they cannot be untangled. You cannot undo a mistake, only cover it with more wool. The technique works only with animal fibers that have surface scales (wool, alpaca, mohair) — cotton, acrylic, and silk do not felt with needles. Needle-felted objects are not washable in the way wet-felted objects are — agitation in water will continue the felting process and shrink the piece. Needle-felted pieces are also more fragile than wet-felted ones because the entanglement is localized to the needle paths rather than uniform throughout. For functional items that will see wear (hats, bags), wet felting produces a stronger fabric. Needle felting excels at decorative sculpture where appearance matters more than durability.
Materials
2- 30 gPlaceholder
- 1 kitPlaceholder
Connected Blueprint Materials


Related Blueprints
These blueprints share knowledge with this one — techniques, materials, or principles that connect them in the learning graph.

CC0 Public Domain
This blueprint is released under CC0. You are free to copy, modify, distribute, and use this work for any purpose, without asking permission.
Support the Maker by purchasing products through their Blueprint where they earn a Maker Commission set by Vendors, or create a new iteration of this Blueprint and include it as a connection in your own Blueprint to share revenue.