ART
BEAUTY & WELLNESS
CRAFT
CULTURE & HISTORY
ENTERTAINMENT
ENVIRONMENT
FOOD & DRINKS
REVERSE ENGINEERING
SCIENCES
SPORTS
TECHNOLOGY
WEARABLES
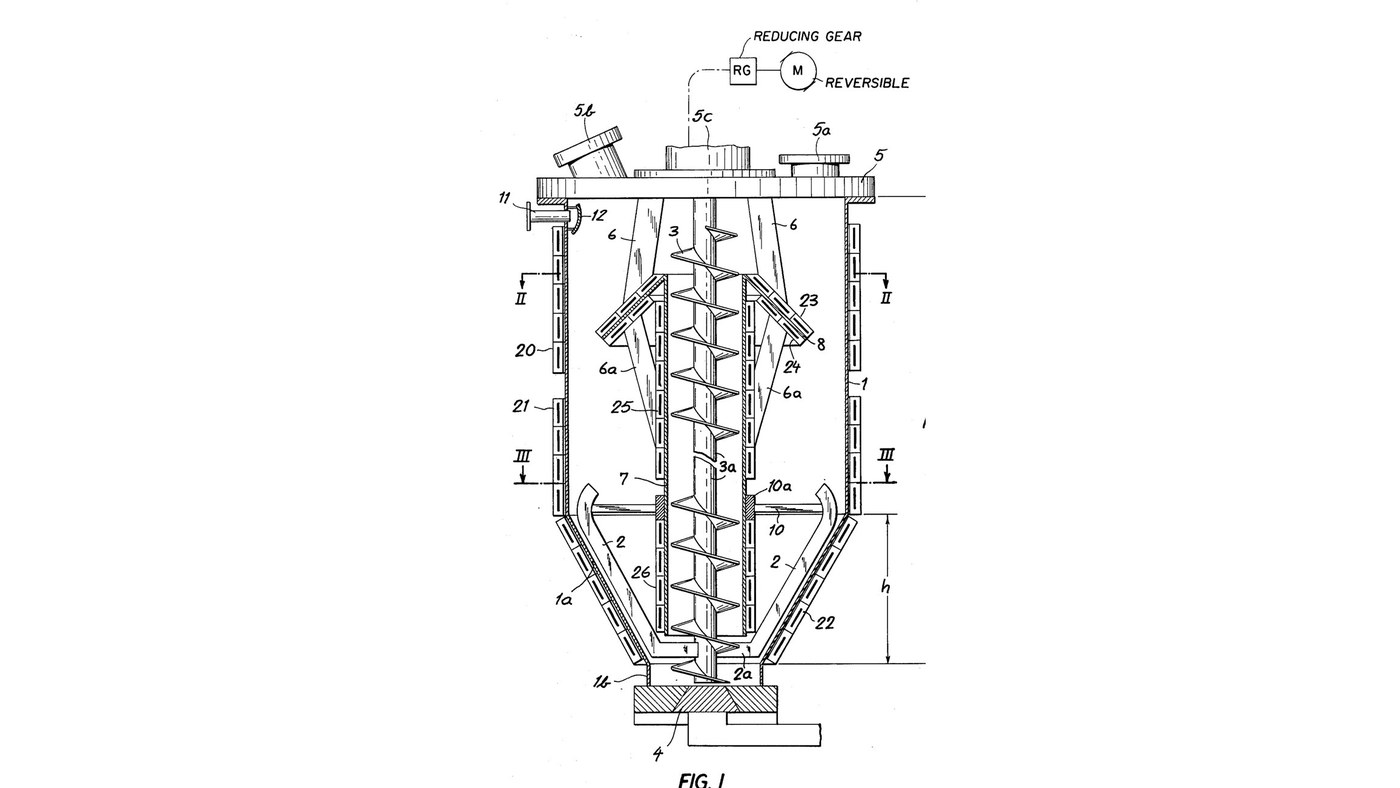


Resin Mixing and Degassing Station: Vacuum Vessel with Worm and Apron
W. Hedrich's mixer (US 4,049,244, 1977) for reactive resins that must be mixed and freed of gas before they set. In a vessel under vacuum a worm lifts the resin up a central tube and spills it over a cone-shaped apron in a thin layer, where the gas escapes; vanes on the worm sweep the funnel bottom and keep it circulating. Peltier elements on the vessel, tube and apron heat or cool each zone. Reversed, the worm drives the batch out through the bottom valve.
The patent gives no sizes, vacuum, speeds or temperatures; it describes an industrial vessel. The picture: the patent's Fig. 1.
Advanced
5 days
Instructions
1
1
Fit the vessel's neck valve and vacuum pipe
Fit the vessel's neck valve and vacuum pipe
Use a metal vessel, cylindrical above with a funnel bottom about one third of its height, ending in a short neck. Fit the discharge valve (4) on the neck, and a side vacuum pipe (11) near the top with a baffle plate (12) inside to keep solids out of the vacuum line. Ours: TIG welder.
Materials for this step:
 Mixing Vessel1 piece
 Ball Valve1 piece
 Stainless Steel Tube1 piece
 Stainless Steel Sheet1 piece
Tools needed:
 TIG Welder
 Adjustable Wrench
2
2
Make the mixing tube and apron
Make the mixing tube and apron
Join a downward-flaring cone apron (8) to the upper end of a tube (7), braced by struts (6a). Hang the tube on struts (6) from the cover.
Materials for this step:
Stainless Steel Tube1 pieceStainless Steel Sheet1 pieceTools needed:
TIG Welder3
3
Fit the cover's inlet, window and bearing
Fit the cover's inlet, window and bearing
Fit the removable cover (5) with an inlet fitting (5a) that seals vacuum-tight, a viewing window (5b) with a watch glass to watch the degassing, and a bearing (5c) for the worm shaft; seal it to the vessel.
Materials for this step:
 Vessel Cover1 piece
 Hose Nipple1 piece
 Watch Glass1 piece
 Ball Bearing1 piece
 Gasket1 piece
Tools needed:
Adjustable Wrench4
4
Fit the worm and its vanes
Fit the worm and its vanes
Pass the worm (3) down through the tube so it just sticks out at the top and reaches into the neck close to the valve. Below the tube, fix agitating vanes (2) on arms (2a) so they sweep close to the funnel wall, steadied by struts (10) on a bearing (10a) riding on the tube.
Materials for this step:
 Conveyor Worm1 piece
 Agitator Vane2 pieces
 Metal Bushing1 piece
Tools needed:
Adjustable Wrench5
5
Mount the reversible drive on the cover
Mount the reversible drive on the cover
Mount a reversible variable-speed motor (M) with reduction gearing (RG) on the cover, driving the worm shaft: one way lifts resin up the tube, the other drives it out of the valve.
Materials for this step:
 Electric Motor1 piece
 Gearbox1 piece
Tools needed:
Adjustable Wrench6
6
Fit the Peltier elements
Fit the Peltier elements
Fit Peltier elements in electrical contact with the metal in separately switched sets: round the top of the vessel (20), its lower cylinder (21) and its funnel (22), and along the tube and on the apron (23-26), best on the apron's upper face. Reversing a set's polarity swaps heating for cooling.
Materials for this step:
 Peltier Element1 piece
Tools needed:
Adjustable Wrench7
7
Connect the vacuum and run a batch
Connect the vacuum and run a batch
Connect the vacuum pipe to a vacuum pump. With the vessel under vacuum, add the resin components one after another through the inlet; the worm lifts the mix over the apron in a thin layer, and the funnel stays full while it circulates. Reverse the worm with the valve open to empty it.
Tools needed:
 Vacuum Pump
Materials
15- 1 piecePlaceholder
- 1 piecePlaceholder
- 1 piecePlaceholder
- 1 piecePlaceholder
- 1 piecePlaceholder
- 1 piecePlaceholder
- 1 piecePlaceholder
- Placeholder
- 1 piecePlaceholder
- 1 piecePlaceholder
- 2 piecesPlaceholder
- 1 piecePlaceholder
- 1 piecePlaceholder
- 1 piecePlaceholder
- 1 piecePlaceholder
This blueprint makes

CC0 Public Domain
This blueprint is released under CC0. You are free to copy, modify, distribute, and use this work for any purpose, without asking permission.
Support the Maker by purchasing products through their Blueprint where they earn a Maker Commission set by Vendors, or create a new iteration of this Blueprint and include it as a connection in your own Blueprint to share revenue.