ART
BEAUTY & WELLNESS
CRAFT
CULTURE & HISTORY
ENTERTAINMENT
ENVIRONMENT
FOOD & DRINKS
REVERSE ENGINEERING
SCIENCES
SPORTS
TECHNOLOGY
WEARABLES
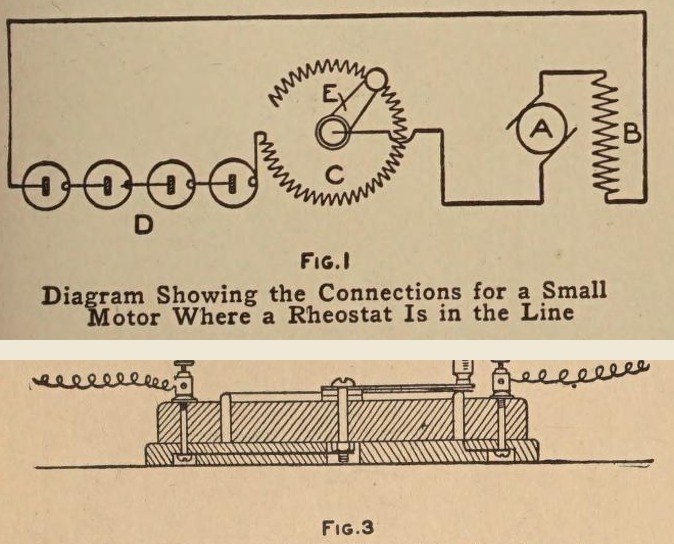


Rheostat: a Small Ring Rheostat for Toy Motors (Boy Mechanic, 1915)
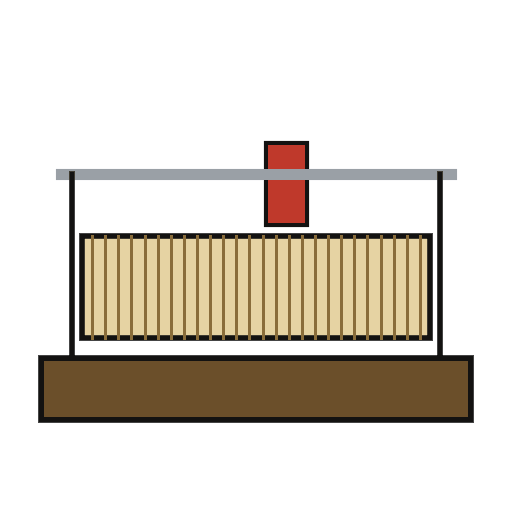
A small variable resistor to set the speed of a toy motor: resistance wire wound on a fibre strip bent into a ring, set in a groove in a hardwood base, with a brass arm that slides round the bared top of the winding.
Wired in series with the motor, it works like a valve in a water pipe.
Source: The Boy Mechanic, Book 2 (1915), pp. 393-394. Unknown: wire alloy. Picture: Figs. 1 and 3 of the book.
Intermediate
Unknown
Instructions
1
1
Wind the resistance strip
Wind the resistance strip
Smooth a strip of thin fibre about 1/16 in thick, 1/2 in wide and 10 in long. Wind it with No. 22 cotton-covered resistance wire, close turns from 1/4 in from one end to 1/4 in from the other, securing the ends through small drilled holes and leaving 3 to 4 in free. Bend the strip into a ring round a round object, winding outward, and note its inside and outside diameters.
Materials for this step:
 Unknown Material1 fibre strip
 German Silver Resistance Wire1 No. 22
Tools needed:
 Hand Drill
2
2
Make the base
Make the base
Round the corners and top edges of a seasoned hardwood block 1/2 x 4 1/2 x 4 1/2 in, mark the ring's two diameters from the centre, and saw out the circles so the ring fits between them. Screw this onto a second board 1/4 x 4 3/4 x 4 3/4 in from below with countersunk screws. Drill a hole for one wire end, fit two back-connected binding posts in the corners, and cut grooves underneath for the leads; one post goes to the winding, the other to the centre bolt.
Materials for this step:
 Hardwood Board2 1/2 and 1/4 in
 Wood Screws1 piece
 Binding Post2 pieces
Tools needed:
 Dividers
 Tenon SawHand Drill
 Screwdriver - Flat
3
3
Make and mount the arm
Make and mount the arm
Cut the arm from 1/16 in sheet brass, 2 in long, 1/2 in wide at one end and 1/4 in at the other. Under the narrow end solder thin spring brass to bear on the ring; fit a small handle on top. Mount it on a 1/8 in brass bolt about 1 in long through the centre, with washers under it, the base hole countersunk underneath 1/2 in wide and 1/4 in deep. Solder a short brass strip to the nut, set in a recess, and lock with a second nut or a spring washer.
Materials for this step:
 Brass Sheet1 arm, spring
 Unknown Metal1 1/8 in brass bolt
 Flat Washer3 pieces
 Spring Washer1 piece
 Tin-Lead Solder1 piece
Tools needed:
 Tin SnipsHand Drill
 Electric Soldering Iron
4
4
Bare the track and finish
Bare the track and finish
Set the ring in its groove. Sand the insulation off the top edge of the winding so the spring contact touches the wire. Give the wood a coat of shellac.
Materials for this step:
 Shellac Varnish1 piece
Tools needed:
 Fine Sandpaper
 Fine Brushes
Materials
11- 1 fibre stripPlaceholder
- 1 No. 22Placeholder
- 2 1/2 and 1/4 inPlaceholder
- 1 piecePlaceholder
- Placeholder
- 1 arm, springPlaceholder
- 1 1/8 in brass boltPlaceholder
- 3 piecesPlaceholder
- 1 piecePlaceholder
- 1 piecePlaceholder
- 1 piecePlaceholder
This blueprint makes
CC0 Public Domain
This blueprint is released under CC0. You are free to copy, modify, distribute, and use this work for any purpose, without asking permission.
Support the Maker by purchasing products through their Blueprint where they earn a Maker Commission set by Vendors, or create a new iteration of this Blueprint and include it as a connection in your own Blueprint to share revenue.