
Collaboration
ART
BEAUTY & WELLNESS
CRAFT
CULTURE & HISTORY
ENTERTAINMENT
ENVIRONMENT
FOOD & DRINKS
REVERSE ENGINEERING
SCIENCES
SPORTS
TECHNOLOGY
WEARABLES
Small Series-Wound Electric Motor with Laminated Field and 12-Slot Ring Armature (Robertson, Boy Mechanic 1913)
Volt

Created by

Volt

14. November 2026SE
2
0
0
0
0

Small Series-Wound Electric Motor with Laminated Field and 12-Slot Ring Armature (Robertson, Boy Mechanic 1913)

A real workshop-built DC motor: a field of riveted sheet-iron plates bored to 2-3/4 in, a 12-slot laminated ring armature on a brass spider, a 12-segment brass commutator insulated with mica, gauze brushes, and series windings of cotton-covered magnet wire.
Advanced
Several weekends

Instructions

1

Read the Boy Mechanic

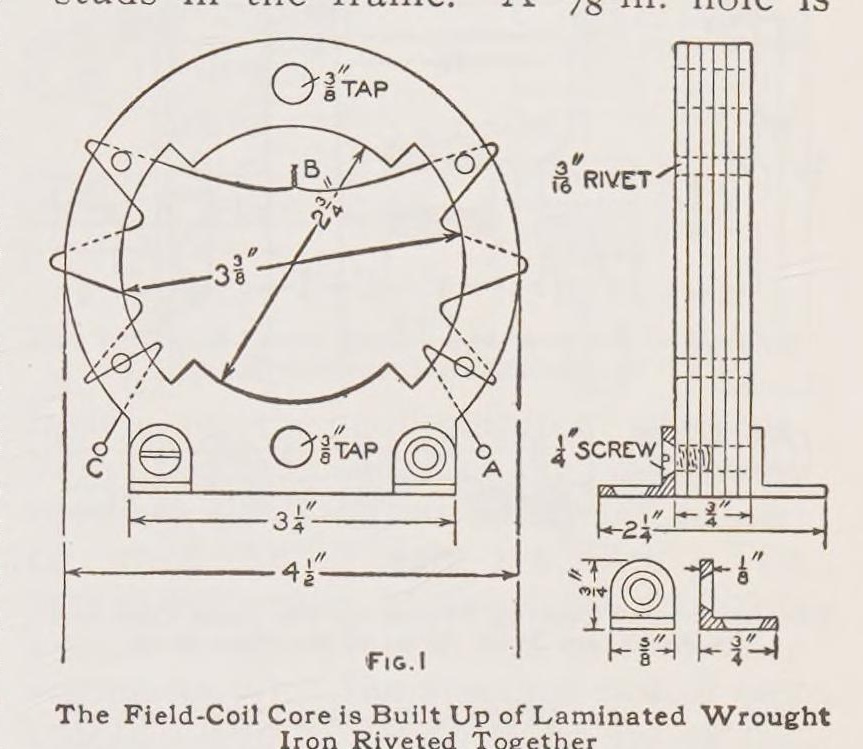
"The field frame of the motor, Fig. 1, is composed of wrought sheet iron."
2

Field frame

Mark a template 1/16 in larger than Fig. 1, cut enough sheet-iron plates to make 3/4 in, drill four rivet holes and rivet them. Mark the bore with dividers set at 1/8 in, drill 1/4 in holes round it and file to shape. Bore to 2-3/4 in on a lathe; mark the field core at 3-3/8 in and the outside at 4-1/2 in and finish to the marks.

Materials for this step:

Mild Steel SheetMild Steel Sheet1 piece
Steel RivetsSteel Rivets1 piece

Tools needed:

ScriberScriber
DividersDividers
Hand DrillHand Drill
Files (Hand File)Files (Hand File)
Metal LatheMetal Lathe
HammerHammer
3

Studs, lugs and bearings

Drill and tap two 3/8 in holes 3-5/8 in apart for the bearing studs (Fig. 2) and 1/4 in holes for feet bent from 1/8 in brass or iron. Make the bearing supports from 1/8 in brass with a 5/8 in hole and a 5/8 in brass rod soldered in and drilled for the shaft. Fit them after the armature is made: wrap paper round the armature, set it in the field, slip the bearings on and solder them, then check it turns freely.

Materials for this step:

Brass SheetBrass Sheet1 piece
Brass RodBrass Rod1 piece
Mild Steel Round BarMild Steel Round Bar1 piece
Tin-Lead SolderTin-Lead Solder1 piece

Tools needed:

Tap and Die SetTap and Die Set
Metal LatheMetal Lathe
Soldering IronSoldering Iron
Hand DrillHand Drill
4

Armature core

Cut two 1/8 in wrought-iron outer plates and enough No. 24 sheet iron to make over 3/4 in (Fig. 5), drill six 1/8 in holes and rivet. Anneal at cherry red and cool in ashes. Bore to 1-11/16 in, fit a brass spider turned from 3/4 in brass on the machine-steel shaft with a setscrew, solder, turn the outside and face it to 3/4 in. File 12 slots 1/4 in deep and 7/16 in wide.

Materials for this step:

Mild Steel SheetMild Steel Sheet1 piece
Steel RivetsSteel Rivets1 piece
Brass RodBrass Rod1 piece
Mild Steel Round BarMild Steel Round Bar1 piece

Tools needed:

Blacksmith ForgeBlacksmith Forge
Metal LatheMetal Lathe
Files (Hand File)Files (Hand File)
Hand DrillHand Drill
5

Commutator

Turn a piece of 3/4 in i.d. brass pipe to 3/4 in long, chamfer both ends at 60 deg, divide into 12, drill and tap a 1/8 in hole in each segment for a brass pin, turn the pins to 1-1/4 in outside and slit them for the wires. Saw it into 12 bars, fit them on turned fibre ends with 12 mica strips between, clamp with the nut and true up.

Materials for this step:

Brass TubeBrass Tube1 piece
Brass RodBrass Rod1 piece
Vulcanized Fibre SheetVulcanized Fibre Sheet1 piece
Mica SheetMica Sheet1 piece

Tools needed:

Metal LatheMetal Lathe
Tap and Die SetTap and Die Set
HacksawHacksaw
6

Brushes

Make the brush holder of fibre (Fig. 8) and studs of 5/16 in brass rod (Fig. 9). Roll brass or copper wire gauze and flatten it to 1/8 x 1/4 in, solder one end, and fit the holder on the bearing with a setscrew.

Materials for this step:

Vulcanized Fibre SheetVulcanized Fibre Sheet1 piece
Brass RodBrass Rod1 piece
Wire Mesh / ScreenWire Mesh / Screen1 piece
Tin-Lead SolderTin-Lead Solder1 piece

Tools needed:

Soldering IronSoldering Iron
Files (Hand File)Files (Hand File)
7

Wind the field

Insulate the field cores with 1/64 in fibre and end washers 1-1/8 x 1-1/2 in (softened in warm water, then glued). Wind each side with four layers (about 50 ft) of No. 18 double-cotton-covered wire, A to B and C to B, and join the ends at B.

Materials for this step:

Vulcanized Fibre SheetVulcanized Fibre Sheet1 piece
Enamelled Copper WireEnamelled Copper Wire1 piece
Wood GlueWood Glue1 piece
8

Wind the armature

Line the ring and spider with 1/16 in fibre and the slots with 1/64 in fibre channels. Wind each slot with about 12 ft of No. 21 wire, 40 turns in four layers of 10, shellacking each layer, leaving 2 in ends. Join each coil's start to the next coil's finish and solder the joints to the commutator pins.

Materials for this step:

Vulcanized Fibre SheetVulcanized Fibre Sheet1 piece
Enamelled Copper WireEnamelled Copper Wire1 piece
Shellac VarnishShellac Varnish1 piece
Tin-Lead SolderTin-Lead Solder1 piece

Tools needed:

Soldering IronSoldering Iron
9

Mount and wire

Screw the motor to a wood base 8 x 6 x 1 in with two terminals and a switch. Wire it in series: field end A to a terminal, field end C to one brush stud, the other brush through the switch to the other terminal.

Materials for this step:

Hardwood BoardHardwood Board1 piece
Binding PostBinding Post1 piece
Toggle SwitchToggle Switch1 piece
Wood ScrewsWood Screws1 piece

Tools needed:

Brace and BitBrace and Bit
10

Troubleshooting

Motor troubleshooting.

Flow

Loading...
11

History and honest limits

From W. A. Robertson in **The Boy Mechanic, Book 1** (Popular Mechanics, 1913), pp. 345-347 (checked on the archive.org scan boymechanic0000unse_n5a8). Sizes not in the text are in his Figs. 1-9; enamelled wire for cotton-covered and the low-voltage advice are ours.

Materials

17

Tools Required

11

Related Blueprints

These blueprints share knowledge with this one โ€” techniques, materials, or principles that connect them in the learning graph.
CC0 Public Domain

This blueprint is released under CC0. You are free to copy, modify, distribute, and use this work for any purpose, without asking permission.

Support the Maker by purchasing products through their Blueprint where they earn a Maker Commission set by Vendors, or create a new iteration of this Blueprint and include it as a connection in your own Blueprint to share revenue.

Discussion

(0)

Log in to join the discussion

Loading comments...