Collaboration
ART
BEAUTY & WELLNESS
CRAFT
CULTURE & HISTORY
ENTERTAINMENT
ENVIRONMENT
FOOD & DRINKS
REVERSE ENGINEERING
SCIENCES
SPORTS
TECHNOLOGY
WEARABLES
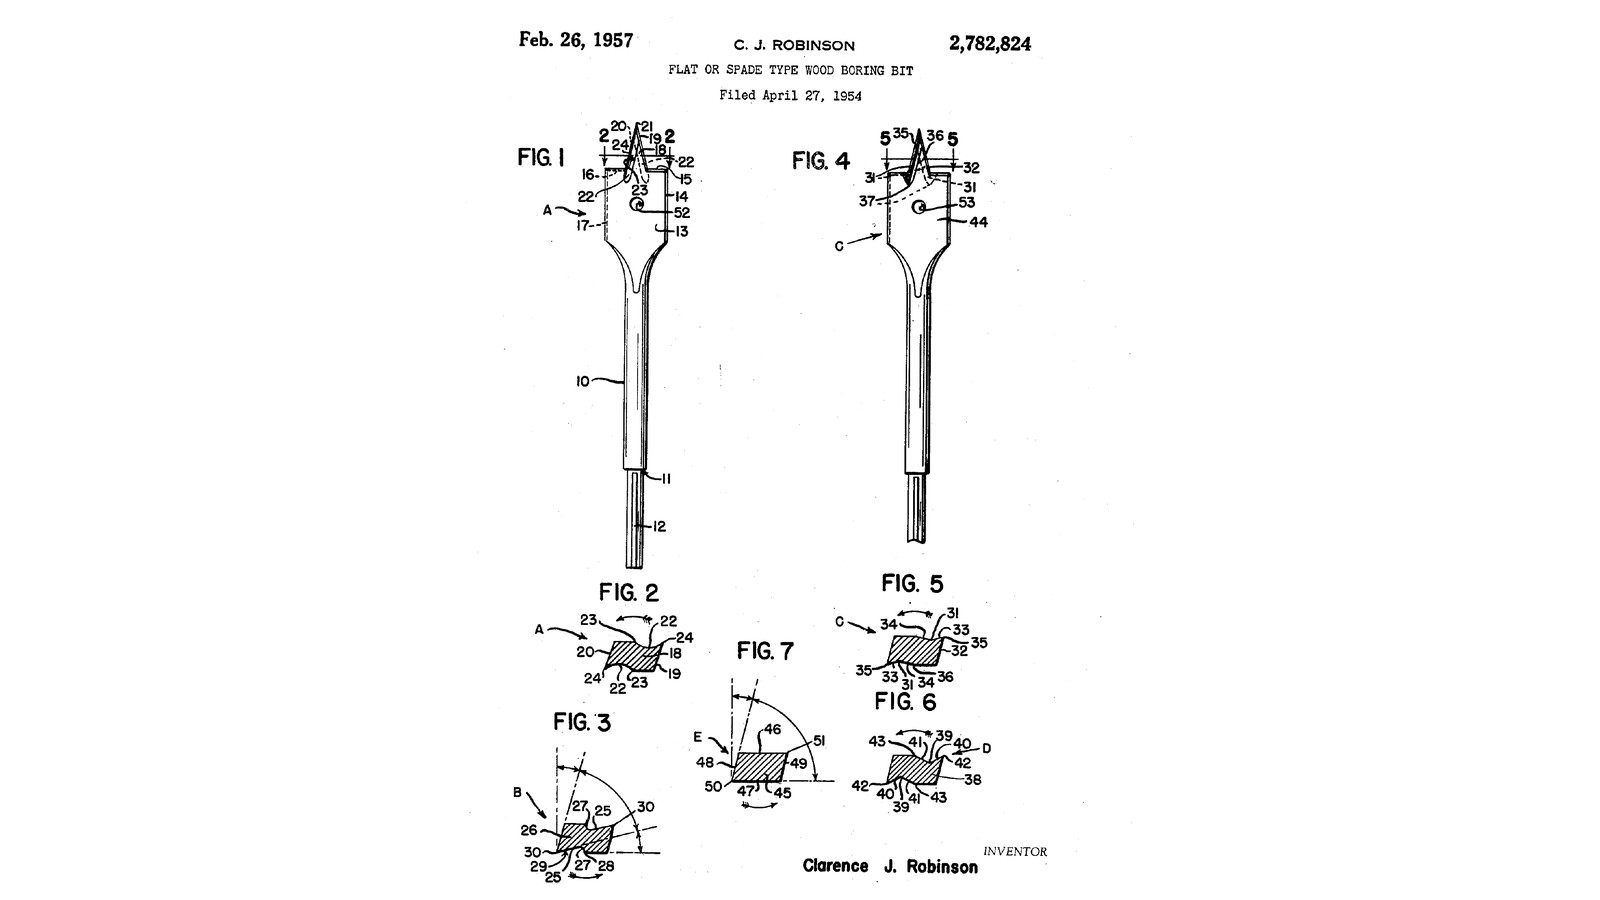


Fluted-Point Spade Bits: A Groove Down Each Face of the Point Sharpens Its Cutting Edge (Robinson, 1957)
Clarence J. Robinson of Wilmington, Ohio, received US 2,782,824, dated 26 February 1957, for the Irwin Auger Bit Company. A spade bit is a flat blade on a shank, for boring wood in a hand-held electric drill. Robinson grooved each flat face of its point beside one edge. The edge becomes sharper, so the point enters the wood with less push and turning force. The chips run along the grooves onto the blade's faces.
We forge a set of three, 16, 20 and 25 mm, from tool steel, as he preferred to forge his. The patent gives no sizes; every size here is ours.
Intermediate
About 1 day
Instructions
1
1
Why a flute sharpens the point
Why a flute sharpens the point
Loading Jupyter Notebook...
2
2
Read US 2,782,824
Read US 2,782,824
"I prefer to forge the bits of this invention from solid or integral pieces of steel, with heat treatment all over, and have discovered that, despite the provision of the flutes or grooves, which are preferably milled or hollow ground, the bits are sturdy and will not bend."
3
3
Forge the blades
Forge the blades
Cut three 170 mm lengths of 10 mm octagonal tool steel. Heat 50 mm of one end to a bright orange in the forge and flatten it on the anvil to about 3 mm thick, centred on the bar. Hammer across it with the peen to spread it wider than the bit, about 2 mm over its size: 18, 22 and 27 mm. Draw the neck down smoothly where the blade meets the bar and keep the blade in line with it. Reheat as soon as the colour fades to red. Finally heat each one to a cherry red and let it cool slowly in the air, to soften it for filing.
Materials for this step:
 Octagonal Tool Steel Bar3 pieces
Tools needed:
 Hacksaw
 Bench Vise
 Forge
 Anvil
 Forge Hammer
 Forge Tongs
 Welding Gloves
 Safety Glasses
4
4
Print the grinding template
Print the grinding template
Full-size A4 template: the outlines of the 16, 20 and 25 mm bits, the flute along the point's edge and the hanging hole. Print at 100 %; its 50 mm bar must measure 50 mm.
5
5
Grind the outline
Grind the outline
Glue each bit's outline from the template on its blade, centred on the bar. Grind to the lines on the bench grinder, dipping the steel in water often: the two sides parallel, the shoulders square across, the point in the middle. Grind the blade's two faces flat and parallel to 2.5 mm. Grind three flats on the end of the shank, a third of the way round from each other, 20 mm long, for the chuck's jaws. Drill a 3 mm hole through the blade where the template's circle is, to hang the bit on a nail.
Tools needed:
 Inkjet Printer
 Glue
 Bench Grinder
 Quench Bucket
 Water
 File SetBench Vise
 Digital Caliper 6-InchSafety Glasses
6
6
File the flutes in the point
File the flutes in the point
Hold the bit flat in the vice by its shank. With the 3 mm round needle file, file a groove 0.3 mm deep along the point's left edge on the face towards you, from the apex to just below the shoulders, leaving a thin sharp edge where it meets the bevel. Turn the bit over and file the other face the same way: again along the left edge, which is the point's other edge. Both flutes face the way the bit turns.
Tools needed:
Bench Vise Needle File SetDigital Caliper 6-Inch
7
7
Harden and temper
Harden and temper
Heat the blade and the neck evenly to a cherry red, until a magnet no longer sticks to it, and quench it straight down in water, moving it up and down. Rub the faces bright with a stone. Heat the shank gently 30 mm behind the blade and watch the colours run down; quench again as soon as a dark straw colour reaches the shoulders and the point. Do the other two.
Tools needed:
ForgeForge Tongs Small MagnetQuench BucketWater
 Sharpening StoneWelding GlovesSafety Glasses
8
8
Sharpen and test
Sharpen and test
Hone the cutting edges on the shoulders and the point with the stone, keeping their angles, and take the burr off. Chuck a bit by its flats and bore a scrap of hardwood: it should start on the point without wandering, cut two clean shavings from the shoulders and leave a round hole of its own size; check it with the caliper.
Tools needed:
Sharpening Stone Cordless Drill
 Hardwood BoardDigital Caliper 6-InchSafety Glasses
9
9
Troubleshooting
Troubleshooting
Spade bit troubleshooting.
Flow
Loading...
10
10
History and honest limits
History and honest limits
**Clarence J. Robinson** of Wilmington, Ohio, assignor to the Irwin Auger Bit Company, US 2,782,824, dated 26 February 1957, filed 27 April 1954. He claimed a spade type wood boring bit whose point has "a pair of substantially parallel edges" from its apex towards the blade, "the juncture of the other of said narrow bevelled edges and one side face of said point body portion providing a cutting edge". He shows four flute shapes; we file the arcuate one of his Figs. 1 and 2, where he preferred to mill or hollow grind them. His shank is round with flats on a reduced end; ours is octagonal tool steel with three ground flats. The patent gives no sizes or heat treatment; every size here, and the house hardening, are ours.
Materials
1- 3 piecesPlaceholder
Tools Required
20- Placeholder
- Placeholder
- Placeholder
- Placeholder
- Placeholder
- Placeholder
- Placeholder
- Placeholder
- Placeholder
- Placeholder
- Placeholder
- Placeholder
- Placeholder
- Placeholder
- Placeholder
- Placeholder
- Placeholder
- Placeholder
- 1 vendor sell this, none ship to you yetPlaceholder
- Placeholder
Design Files
1This blueprint makes

Related Blueprints
These blueprints share knowledge with this one — techniques, materials, or principles that connect them in the learning graph.
CC0 Public Domain
This blueprint is released under CC0. You are free to copy, modify, distribute, and use this work for any purpose, without asking permission.
Support the Maker by purchasing products through their Blueprint where they earn a Maker Commission set by Vendors, or create a new iteration of this Blueprint and include it as a connection in your own Blueprint to share revenue.