

Track Circuit Signal
A signalman can only protect a train he can see. On a long line, in fog or at night, the question "is there already a train in that section?" had no reliable answer — and collisions followed.
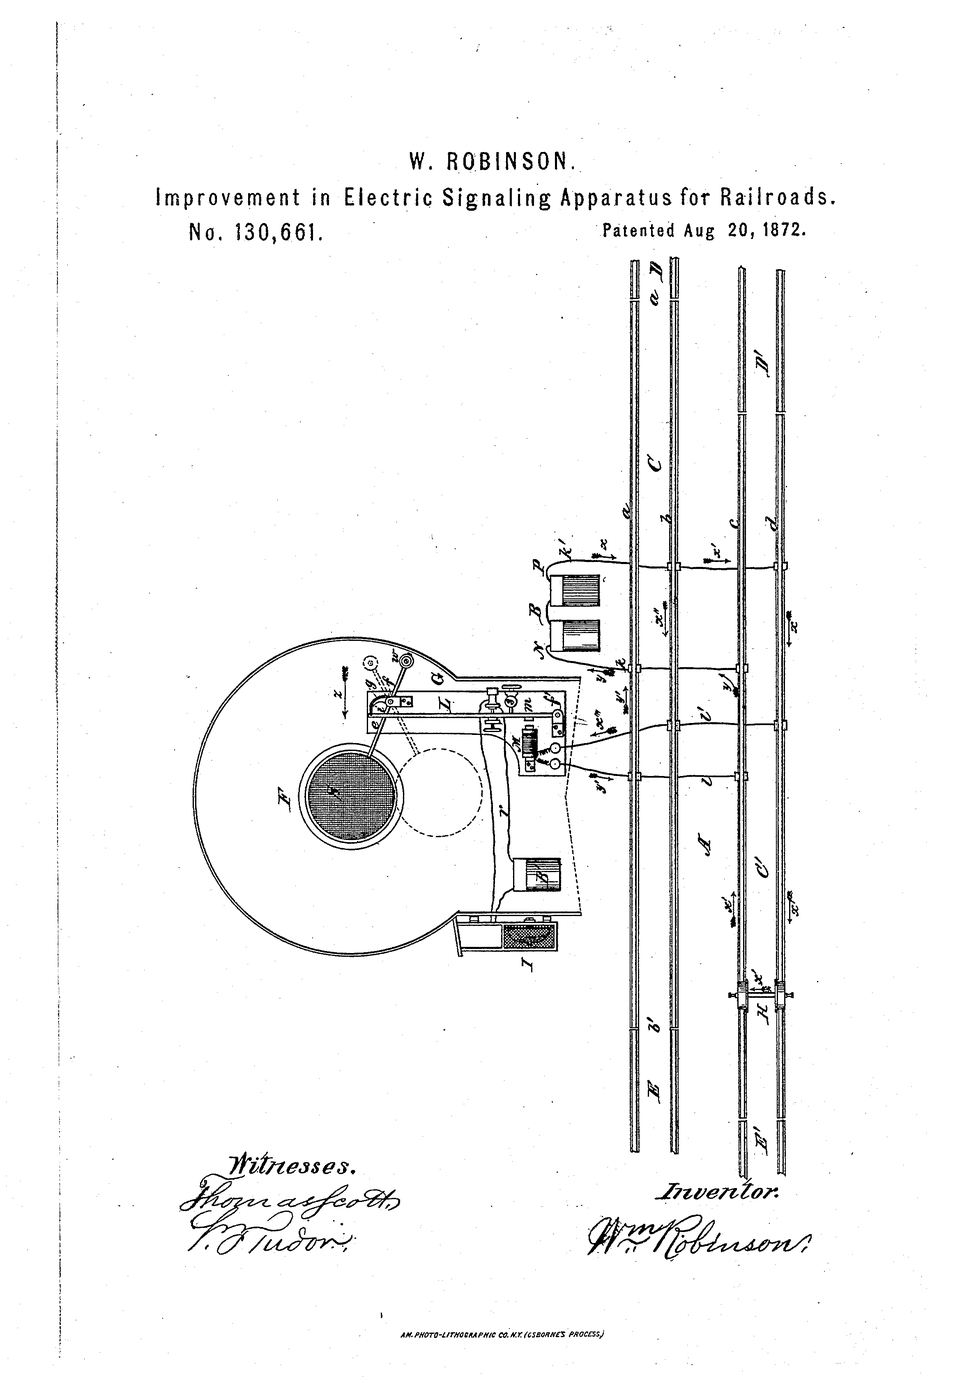
Robinson's answer was to let the train answer for itself, using the rails it is standing on as wires. A battery feeds current along one rail and back down the other through an electromagnet. With the section empty, the current flows and the magnet holds the signal out of sight. When a train enters, its steel wheels and axles bridge the two rails, offering the current an easier path; the magnet loses its current, lets go, and a counterbalanced disc falls into view showing danger.
The profound part is what happens when something breaks. A snapped wire, a flat battery, a cracked rail — all of them stop the current just as surely as a train does, so the signal drops to danger anyway. The apparatus fails towards safety. That idea is now the foundation of safety engineering everywhere.
US Patent 130,661, "Improvement in electric-signaling apparatus for railroads", granted 20 August 1872 to William Robinson of Brooklyn, New York.
Instructions
Read the claim: the rails are the wires
Read the claim: the rails are the wires
Robinson claims the running rails as conductors, a train's wheels and axles as the bridge, and a magnet that releases to show the signal. Note that the magnet is ON when the line is clear.
Lay two foil rails
Lay two foil rails
Stick two parallel strips of aluminium foil, 15 mm wide and 50 mm apart, along a 400 mm strip of card. They must not touch each other anywhere.
Materials for this step:
 Aluminium Foil1 roll
 Corrugated Cardboard Sheets (25-Pack)1 sheet
Tools needed:
 Masking Tape
Wind the signal magnet
Wind the signal magnet
Wind about 150 close turns of enamelled copper wire onto a carriage bolt, all the same direction. Scrape 10 mm of enamel off both ends to bare the copper.
Materials for this step:
 Enamelled Copper Wire3 meters
 Carriage Bolt1 piece
Wire battery and magnet to opposite ends
Wire battery and magnet to opposite ends
Clip the battery across the two rails at one end, and the magnet coil across the two rails at the far end. Current now runs out along one rail and back down the other.
Tools needed:
 Battery Holder
 Alligator Clip Test Leads (10-Pack, 5 Colors)
Hang the counterbalanced signal disc
Hang the counterbalanced signal disc
Pivot a card arm on a brass fastener beside the magnet: a red disc at one end, a paper-clip counterweight at the other, balanced so it falls into view on its own.
Materials for this step:
 Card Stock1 sheet
 Brass Paper Fasteners1 piece
Let the magnet hold the signal clear
Let the magnet hold the signal clear
Position the arm so the energised magnet attracts its steel end and holds the disc hidden. Line clear. Note that holding "clear" costs current continuously.
Build a train with a conducting axle
Build a train with a conducting axle
Make a small card truck with a bare wire axle wide enough to touch both rails at once. That axle is the whole train, electrically.
Materials for this step:
Card Stock1 sheet Galvanised Steel Wire1 meter
Run the train in — the signal drops
Run the train in — the signal drops
Set the truck on the rails. The axle short-circuits them, the magnet lets go, and the disc falls to danger. Remove it: the magnet picks up and the section clears.
Prove it works anywhere in the section
Prove it works anywhere in the section
Place the truck at three points along the rails. The signal drops at every one — the circuit reports occupancy of the whole section, not a spot.
Failure test 1 — disconnect the battery
Failure test 1 — disconnect the battery
With the section empty, unclip one battery lead. The signal drops to danger. A dead battery cannot show a false clear.
Failure test 2 — break a rail
Failure test 2 — break a rail
Cut or peel a small gap in one foil rail. Danger again. A broken rail — the thing most likely to wreck a train — protects itself.
Tools needed:
 Craft Knife
Now wire it the wrong way round
Now wire it the wrong way round
Re-rig so the magnet is normally OFF and the train's axle completes a circuit to raise the danger disc. Test it: it works — until you disconnect the battery, and then it says clear with a dead system. Wire it back.
Tools needed:
Alligator Clip Test Leads (10-Pack, 5 Colors)Write down the two failure tables
Write down the two failure tables
Tabulate both wirings against: empty, occupied, no battery, broken rail. One version is wrong only when it is dangerous to be wrong. That asymmetry is the lesson.
History & Context — the circuit that made the railway safe
History & Context — the circuit that made the railway safe
The patent. US 130,661, "Improvement in electric-signaling apparatus for railroads", granted 20 August 1872 to William Robinson of Brooklyn, New York. The specification uses the running rails themselves as conductors: a battery and a magnet coil are connected across isolated track sections, and when a train bridges the rails with its wheels and axles it offers the current an alternate path, demagnetising the signal magnet so a counterbalanced disc moves from concealment into view. Robinson's stated advantage is that it needs no long line wires and no special track attachments.
The idea is that the train reports itself. Every earlier system depended on a person seeing a train and remembering to act. Robinson made the train close its own circuit just by existing on the rails — it cannot forget, and it cannot be too foggy to notice. Nothing about the train has to be modified: a steel axle between two steel wheels was already there.
Fail-safe is the real invention. The magnet is energised when the line is clear, which seems wasteful — you burn current to say "nothing is happening". But it means every plausible fault produces the safe answer (steps 10-11). Reverse the logic and the apparatus is equally correct in normal use and lethal when it breaks (step 12). This closed-circuit principle spread far beyond railways: lift doors, industrial interlocks, dead-man's handles and emergency stops are all wired so that losing power stops the machine rather than releasing it.
Where it sits. The track circuit is still the backbone of railway signalling more than 150 years on. Modern lines use alternating current, coded pulses and axle counters, and automatic train protection can now brake the train rather than merely show it a disc — but the underlying question is Robinson's, asked the same way: is current still getting through this section of rail? Robinson kept improving the system for decades and is generally regarded as the father of the automatic block signal.
One honest limitation, which real railways must engineer around: the circuit detects a conducting bridge, not a train. Rust, grease, dry leaf film or a very light vehicle can leave the rails insulated enough that a real train fails to register. That is why track circuits are designed with generous current margins and why railways worry about leaf contamination far more than the public expects.
Materials
7- 1 rollPlaceholder
- 1 sheetPlaceholder
- 3 metersPlaceholder
- 1 piecePlaceholder
- 1 sheetPlaceholder
- 1 piecePlaceholder
- 1 meterPlaceholder
Tools Required
4- Placeholder
- 14 vendors sell this, none ship to you yetPlaceholder
- Placeholder
- Placeholder
Connected Blueprint Materials

Related Blueprints
These blueprints share knowledge with this one — techniques, materials, or principles that connect them in the learning graph.
CC0 Public Domain
This blueprint is released under CC0. You are free to copy, modify, distribute, and use this work for any purpose, without asking permission.
Support the Maker by purchasing products through their Blueprint where they earn a Maker Commission set by Vendors, or create a new iteration of this Blueprint and include it as a connection in your own Blueprint to share revenue.