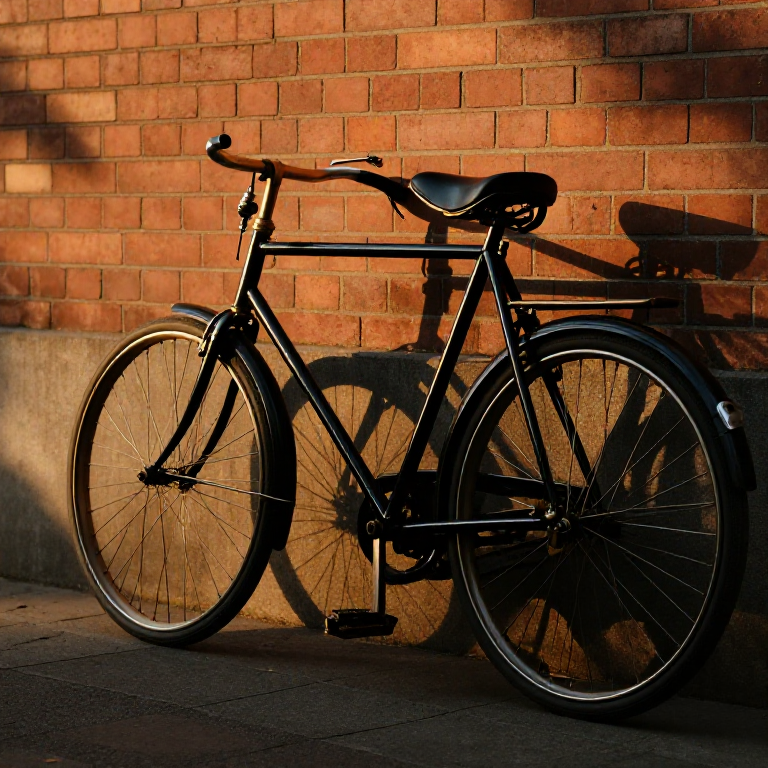
Building a Safety Bicycle — Chain Drive, Equal Wheels, and Personal Freedom
The bicycle that everyone rides today was settled in the 1880s and is still called, in the trade, the safety bicycle — to distinguish it from the terrifying high penny-farthing it replaced. Two equal wheels, a diamond frame, a chain driving the rear wheel, and soon air-filled tyres made cycling safe, fast, and available to ordinary people.
Each feature solves a problem. Equal wheels and a low frame mean you can put a foot down and cannot be pitched over the handlebars. The chain and gearing let a small wheel travel fast without the giant front wheel of the penny-farthing. The diamond frame, built of brazed steel tubes, is astonishingly light and strong for its weight. And Dunlop's pneumatic rubber tyres turned a bone-shaking ride into a smooth one.
The safety bicycle was more than transport. Cheap, simple, and needing no horse or fuel, it gave working people and especially women a freedom of movement they had never had — which is why it is often credited with as much social change as mechanical.
Instructions
Understand the safety design
Understand the safety design
Braze the diamond frame
Braze the diamond frame
Materials for this step:
 Steel Tubing4 meters
Tools needed:
 Brazing Torch
Build the wheels
Build the wheels
Materials for this step:
 Steel Spokes72 pieces
 Bicycle Rim2 pieces
Tools needed:
 Spoke Wrench
Fit pneumatic tyres
Fit pneumatic tyres
Materials for this step:
 Rubber Tyre2 pieces
Build the chain drive
Build the chain drive
Materials for this step:
 Roller Chain1 piece
 Chainwheel and Sprocket1 set
Fit the bottom bracket and cranks
Fit the bottom bracket and cranks
Materials for this step:
 Ball Bearings1 set
Set up the steering
Set up the steering
Materials for this step:
 Handlebars1 piece
Fit brakes
Fit brakes
Materials for this step:
 Brake Caliper2 pieces
Fit the saddle
Fit the saddle
Materials for this step:
 Leather Saddle1 piece
Assemble and true
Assemble and true
Tools needed:
 Wrench
Test and tune
Test and tune
Tools needed:
WrenchAppreciate the freedom it gave
Appreciate the freedom it gave
Materials
10- 4 metersPlaceholder
- 72 piecesPlaceholder
- 2 piecesPlaceholder
- 2 piecesPlaceholder
- 1 piecePlaceholder
- Placeholder
- 1 setPlaceholder
- 1 piecePlaceholder
- 2 piecesPlaceholder
- 1 piecePlaceholder
Tools Required
3- Placeholder
- Placeholder
- Placeholder
Related Blueprints
These blueprints share knowledge with this one — techniques, materials, or principles that connect them in the learning graph.
Related blueprints
Other builds that share materials, tools, or techniques with this one.

CC0 Public Domain
This blueprint is released under CC0. You are free to copy, modify, distribute, and use this work for any purpose, without asking permission.
Support the Maker by purchasing products through their Blueprint where they earn a Maker Commission set by Vendors, or create a new iteration of this Blueprint and include it as a connection in your own Blueprint to share revenue.