ART
BEAUTY & WELLNESS
CRAFT
CULTURE & HISTORY
ENTERTAINMENT
ENVIRONMENT
FOOD & DRINKS
REVERSE ENGINEERING
SCIENCES
SPORTS
TECHNOLOGY
WEARABLES
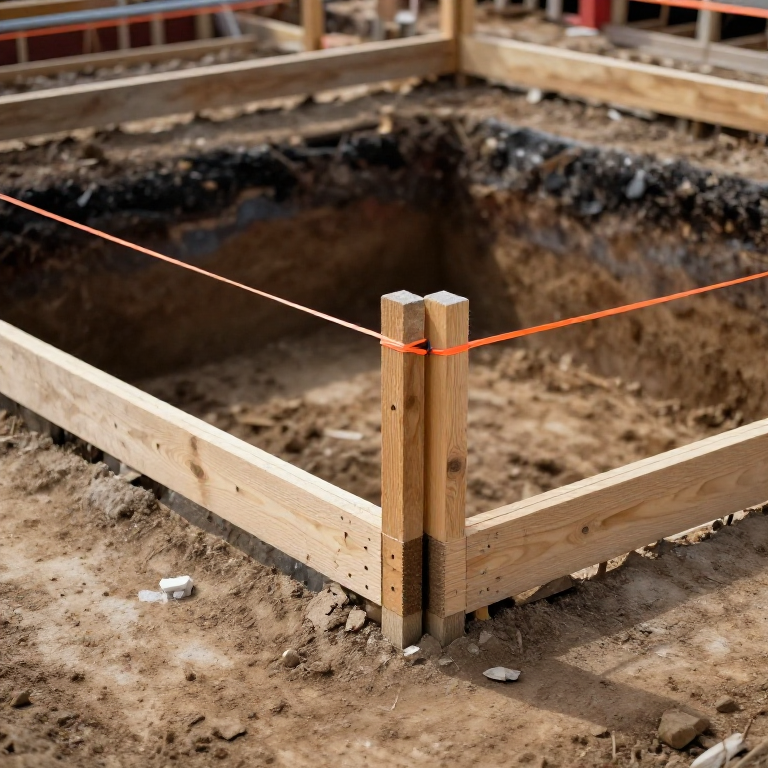


Setting Out a Building: Profiles and Batter Boards
You have pegged out a perfect rectangle. Now the digger arrives and removes every peg in the first ten minutes, because the pegs are exactly where the trench goes.
The answer is older than machinery and completely reliable: move the information OFF the building line. Batter boards — profiles — are horizontal rails set well outside the excavation, carrying saw-cuts or nails that mark where each line runs. Stretch a string between two matching marks and the line reappears, exactly where it was, as many times as you need it.
This rung is the one that turns a survey into a building, and it is the one most often improvised badly. It also carries the levels: the top of the board is usually set to a round height above datum, so a tape from the string gives depth without re-levelling.
Intermediate
1 day
Instructions
1
1
Set the profiles well clear of the dig
Set the profiles well clear of the dig
Drive two stout posts at each corner region, at least a metre and a half outside the building line, and nail a horizontal rail across them.
A metre and a half is a minimum, not a target — an excavator's tracks and its spoil heap need more than people expect, and a profile knocked out of position is worse than no profile, because it still looks authoritative. Put them where the machine will not go, and brace them so a knock moves the whole assembly rather than twisting one post.
Materials for this step:
 Douglas Fir Timber Beam8 length
 Galvanized Nails50 pieces
Tools needed:
 Claw Hammer
 Hand Saw
2
2
Set every rail to ONE level
Set every rail to ONE level
Using the water level or the optical level, set the top edge of every rail to the same height — ideally a round number above your datum, such as exactly one metre.
Now a single tape measurement down from a string gives you the depth of anything, anywhere on the site, with no arithmetic. Setting the rails at arbitrary heights works for the plan lines and throws away this entire second function, which is most of what profiles are worth.
Tools needed:
 Optical Level (Surveying)
 Levelling Staff
 Clear Vinyl Tubing
3
3
Transfer the lines onto the rails
Transfer the lines onto the rails
Stretch a string along each building line from its corner pegs, extend it to the rails, and mark where it crosses with a saw-cut — not a pencil mark.
A saw-cut survives rain, mud, gloves and three months. A pencil line does not last a week outdoors. Cut a second mark for the outside of the foundation and a third for the trench edge, and label each one on the rail in paint or with a nailed tag, because by the time you need them you will not remember which is which.
Materials for this step:
Galvanized Nails30 piecesTools needed:
Hand Saw Plumb Bob
 String Line
4
4
Check the diagonals again, from the profiles
Check the diagonals again, from the profiles
String up all four building lines from the rails and measure the diagonals of the rectangle they form.
This checks the transfer, not the original layout — a saw-cut in the wrong place is easy and invisible. The diagonal check costs two minutes and catches it before anything is dug. Re-check the diagonals every time you re-string, for the whole life of the job, because a rail does get knocked eventually and nothing about a wrong string looks wrong.
Tools needed:
 Measuring Tape
5
5
Working depths and the tolerance you actually have
Working depths and the tolerance you actually have
Loading Jupyter Notebook...
Tools needed:
Measuring Tape6
6
Leave a record on the site itself
Leave a record on the site itself
Paint the datum height and the rail height on one post, and note them in the book with a sketch showing which corner is which.
Sites change hands, work stops for winter, and the person who returns may not be you. A profile with no stated level is a piece of wood. Two painted numbers turn it back into a survey, and they cost thirty seconds at the moment you still remember what they are.
Materials
2- 8 lengthPlaceholder
- 80 piecesPlaceholder
Tools Required
8- Placeholder
- Placeholder
- Placeholder
- Placeholder
- Placeholder
- Placeholder
- Placeholder
- 1 vendor sell this, none ship to you yetPlaceholder
Related Blueprints
These blueprints share knowledge with this one — techniques, materials, or principles that connect them in the learning graph.



CC0 Public Domain
This blueprint is released under CC0. You are free to copy, modify, distribute, and use this work for any purpose, without asking permission.
Support the Maker by purchasing products through their Blueprint where they earn a Maker Commission set by Vendors, or create a new iteration of this Blueprint and include it as a connection in your own Blueprint to share revenue.