Collaboration
ART
BEAUTY & WELLNESS
CRAFT
CULTURE & HISTORY
ENTERTAINMENT
ENVIRONMENT
FOOD & DRINKS
REVERSE ENGINEERING
SCIENCES
SPORTS
TECHNOLOGY
WEARABLES
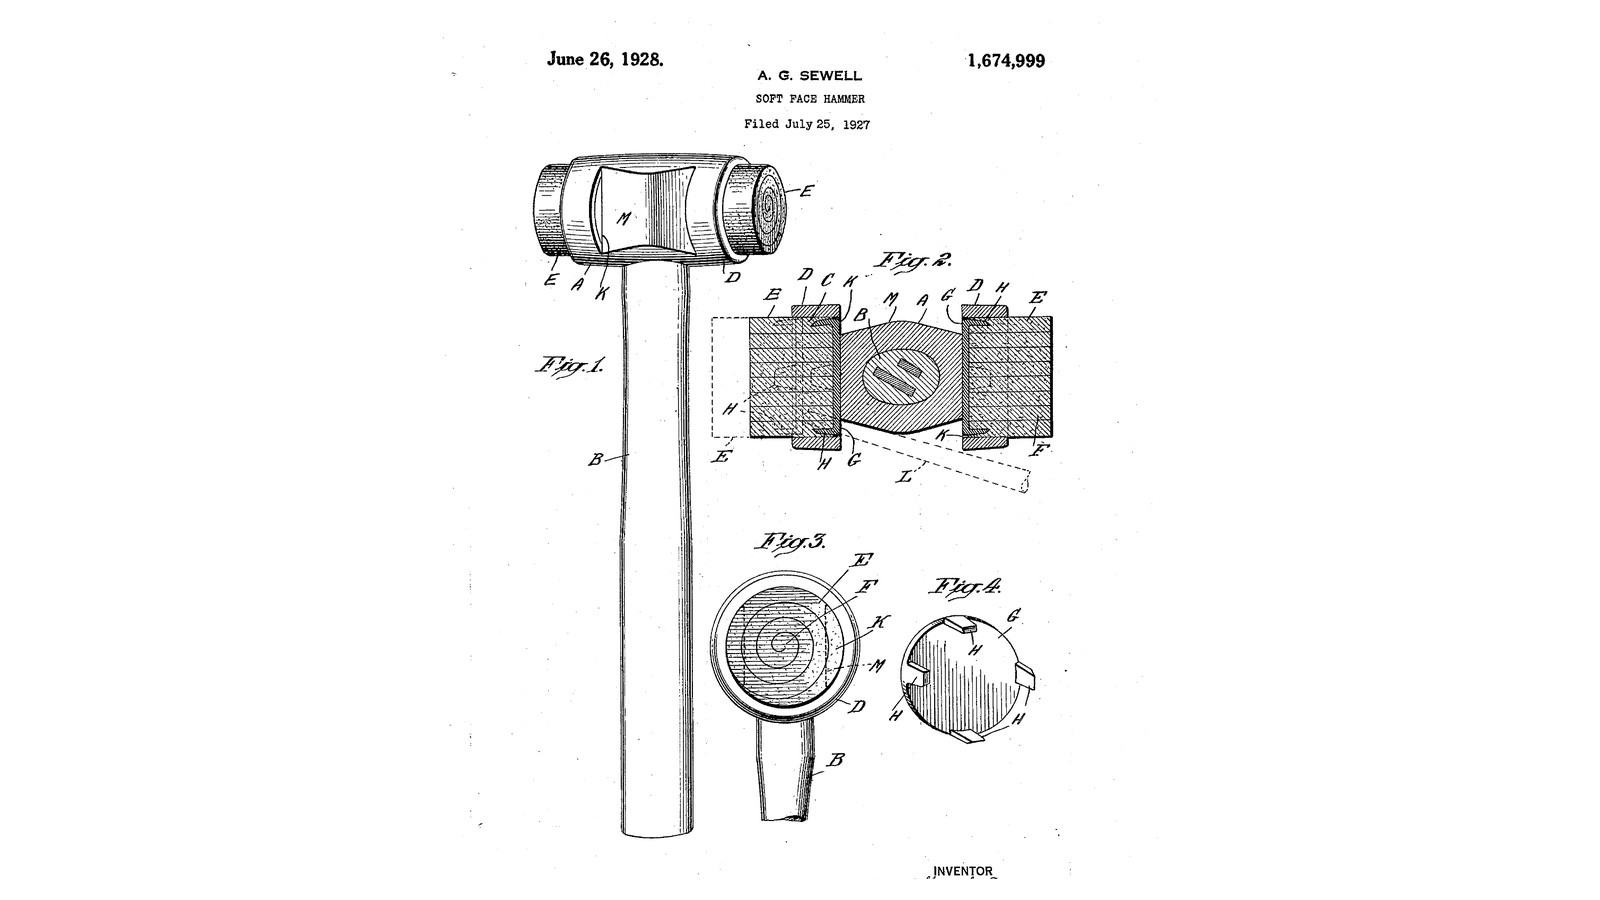


Renewable Rubber-Face Hammer: Rolled Faces Pressed Onto Pronged Discs, Driven Out Through a Notch When Worn (Sewell, 1928)
Albert G. Sewell received US 1,674,999, dated 26 June 1928, for a soft-face hammer whose worn faces can be renewed instead of throwing the hammer away. Each end of the head is a cup. A face rolled from a strip is pressed into the cup onto a loose sheet-metal disc whose prongs bite into it and wedge it tight. When a face is battered, a rod pushed through a notch at the bottom of the cup drives the disc and the face out together, and a new face goes in. He preferred rawhide and named rubber among face materials; ours are rolled from rubber sheet.
The patent gives no sizes; every size here is ours.
Intermediate
About 1 day
Instructions
1
1
Rolling a face plug
Rolling a face plug
Loading Jupyter Notebook...
2
2
Read US 1,674,999
Read US 1,674,999
"Thus, by hammering or otherwise thrusting a rod or suitable device against the wedging member, the latter, with the striking face member, can be forced or driven out of the socket or recess, after which a new striking face member may be forced into the socket, to be secured therein by the wedging member."
3
3
Turn the head
Turn the head
Grip 40 mm steel round bar in the chuck and turn a head 110 mm long: the two ends stay 40 mm across for 26 mm as the flanges D, and the middle is waisted to 30 mm. Bore each end 32 mm across and 22 mm deep for the sockets C, flat at the bottom. Drill a 20 mm eye B through the middle, square to the axis, in a V-block on the drill press.
Materials for this step:
 Mild Steel Round Bar1 piece
 Cutting Oil1 piece
Tools needed:
 Metal Lathe
 Lathe Chuck 3-Jaw
 Lathe Cutting Tool
 Boring Bar
 Parting Tool
 Drill Press
 V-Block
 Drill Bit Set
 Digital Caliper 6-Inch
 Safety Glasses
4
4
Cut the notches K
Cut the notches K
On the handle's side of each flange, saw and file a notch 8 mm wide through the flange's wall at the very bottom of the socket, so a rod can be pushed in at a slant against the edge of the disc at the bottom.
Tools needed:
 Bench Vise
 Hacksaw
 File Set
 Center Punch
5
5
Pronged discs G
Pronged discs G
Cut two discs of 1.5 mm steel sheet 31.5 mm across. At four places round each rim, snip two cuts 6 mm deep 5 mm apart and bend the tab between them up at a right angle with the pliers: the prongs H. Drop one disc loosely into the bottom of each socket, prongs out.
Materials for this step:
 Mild Steel Sheet1 piece
Tools needed:
 Tin Snips
 Flat-Nose PliersBench ViseFile Set
6
6
Roll and press in the faces E
Roll and press in the faces E
Cut two strips of 3 mm natural rubber sheet 32 mm wide and about 270 mm long. Roll each tightly into a coil, trimming the strip until the coil just enters a socket, and tie it. Press the coil into its socket in the vice, between soft packing, until it bottoms on the disc and its prongs bite in, leaving the face standing about 10 mm out. Cut the tie and trim the face flat with the knife.
Materials for this step:
 Natural Rubber Sheet1 piece
Tools needed:
 Craft KnifeBench ViseDigital Caliper 6-Inch
7
7
Handle
Handle
Turn an ash handle 300 mm long, its end a tight fit in the eye. Saw a slot down its end, drive it into the eye, and glue and drive a hardwood wedge into the slot; saw it off flush.
Materials for this step:
 Hardwood Board1 piece
 Wood Glue1 piece
Tools needed:
 Wood Lathe
 Lathe Tool Set (HSS)Hacksaw
 Ball Peen Hammer
8
8
Renew a face
Renew a face
When a face is worn, push a steel rod through the socket's notch against the disc's edge and tap it out with the hammer; the disc and the face come out together. Put the disc back, prongs out, and press in a new rolled face.
Tools needed:
Ball Peen HammerBench Vise9
9
Troubleshooting
Troubleshooting
Soft-face hammer troubleshooting.
Flow
Loading...
10
10
History and honest limits
History and honest limits
**Albert G. Sewell**, US 1,674,999, dated 26 June 1928, filed 25 July 1927. He describes a head with a socket at each end formed by annular flanges, a striking face member of relatively soft material rolled from a strip and pressed in as a plug, a loose sheet-metal wedging disc with prongs in the socket's bottom, and openings through which a rod drives the disc and face out. He preferred rawhide and his head was cast iron; ours is turned steel with faces rolled from rubber sheet, which he lists among the face materials in use. He gives no sizes; every size here is ours.
Materials
6- 1 piecePlaceholder
- 1 piecePlaceholder
- 1 piecePlaceholder
- 1 piecePlaceholder
- 1 piecePlaceholder
- 1 piecePlaceholder
Tools Required
20- Placeholder
- Placeholder
- Placeholder
- Placeholder
- Placeholder
- Placeholder
- Placeholder
- Placeholder
- Placeholder
- Placeholder
- Placeholder
- Placeholder
- Placeholder
- Placeholder
- Placeholder
- Placeholder
- Placeholder
- Placeholder
- Placeholder
- Placeholder
This blueprint makes

Related Blueprints
These blueprints share knowledge with this one — techniques, materials, or principles that connect them in the learning graph.
CC0 Public Domain
This blueprint is released under CC0. You are free to copy, modify, distribute, and use this work for any purpose, without asking permission.
Support the Maker by purchasing products through their Blueprint where they earn a Maker Commission set by Vendors, or create a new iteration of this Blueprint and include it as a connection in your own Blueprint to share revenue.