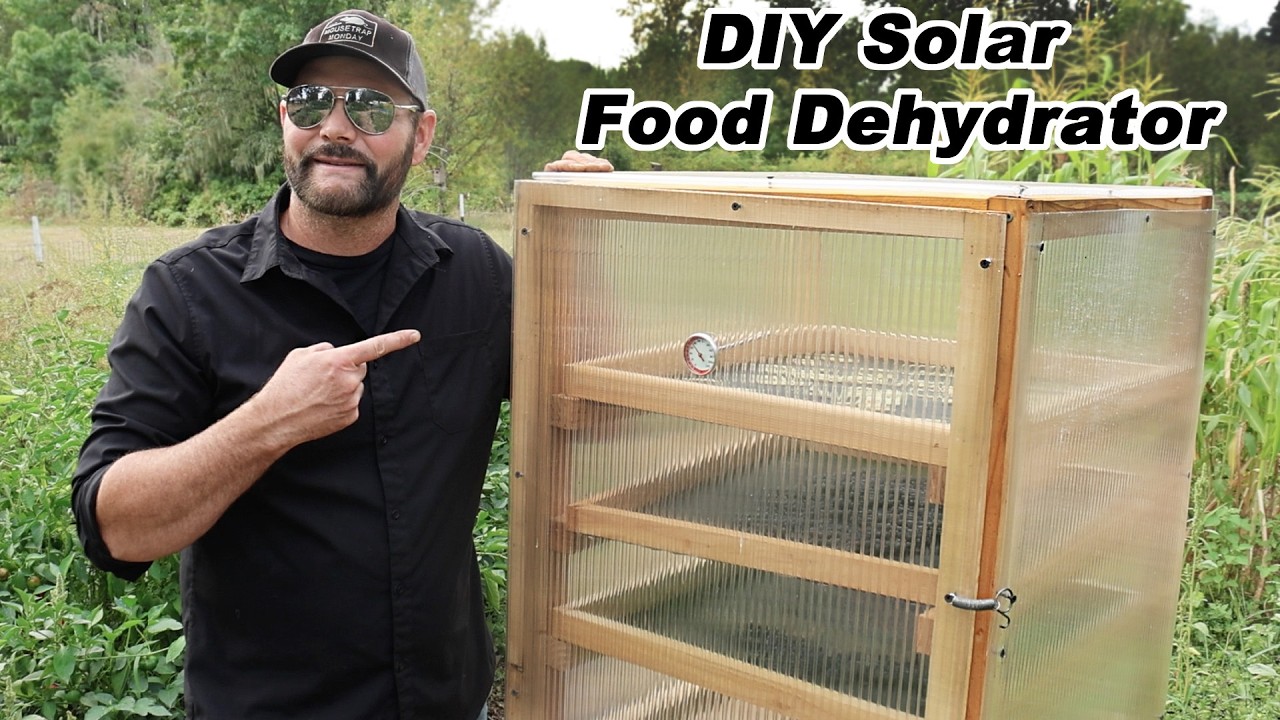

Solar Food Dehydrator — Off-Grid Food Preservation with No Electricity
Drying removes the water that microbes and mould need to grow, so food keeps for months without refrigeration — the oldest form of food preservation. This solar dehydrator is a glazed box that heats air with the sun; vents and rising heat draw moist air out through food stacked on trays. Built from food-safe materials, it dries fruit, vegetables and herbs completely off-grid.
Instructions
Watch the build — overview and results
Watch the build — overview and results
A full walkthrough of building and using the solar dehydrator, plus the range of garden produce it dries.
Build the frame
Build the frame
Build a wooden frame about 60 × 60 cm and 120 cm tall, elevated on legs off the ground. Fit six internal rail pairs so trays slide in and out.
Materials for this step:
 Spruce-Pine-Fir (SPF)6 m
 Wood Screws1 box
Tools needed:
 Hand Saw
 Cordless Drill
Glaze the walls, top and bottom
Glaze the walls, top and bottom
Cut clear acrylic sheet for the four walls, top and bottom; peel the protective film and screw the panels to the frame. Use acrylic or tempered glass — never polycarbonate, which off-gasses BPA and VOCs near food when hot.
Materials for this step:
 Acrylic Sheet3 sheets
Fit the door
Fit the door
Build a framed, acrylic-glazed door for the front on two or three hinges, with a latch to hold it shut.
Materials for this step:
 Cabinet Butt Hinge3 pieces
 Cabinet Latch1 piece
Cut vents and screen out insects
Cut vents and screen out insects
Drill a 25 mm vent hole in the top-centre before fixing the top panel. Cover every vent with fine insect screen.
Materials for this step:
 Insect Screen1 roll
Build the drying trays
Build the drying trays
Make six shallow wooden tray frames to slide on the rails. Staple food-grade stainless-steel mesh across each — not fibreglass window screen, which sheds fibre into food.
Materials for this step:
 Food-Grade Stainless Steel Mesh2 mSpruce-Pine-Fir (SPF)4 m
 Staples1 box
Optional — add forced airflow
Optional — add forced airflow
Optional modern upgrade: fit a small solar panel and one or two 12 V fans to push air up through the trays, angling the panel toward the sun. The dryer still works passively without it.
Materials for this step:
 Flexible Solar Panel 50W1 piece
 Cooling Fan (120mm, PWM, 2-Pack)1 pack
Load food and control the temperature
Load food and control the temperature
Load the trays, aim the box at the sun, and read the inside temperature with a thermometer. Aim for 50–70 °C (120–160 °F): cover the vents and switch fans off to run hotter, open vents and fans on to run cooler. Heat rises, so put wetter food on the top racks and drier food below.
Tools needed:
 Oven Thermometer
Dry and store
Dry and store
Dry until leathery or crisp — herbs at about 35 °C for a few hours, most fruit and vegetables at 50–60 °C for 6–12 hours or more. Cool fully, then store in airtight jars away from light.
Materials for this step:
 Glass Storage Jar Set1 set
Materials
11- Placeholder
- 1 boxPlaceholder
- 3 sheetsPlaceholder
- 3 piecesPlaceholder
- 1 piecePlaceholder
- 1 rollPlaceholder
- Placeholder
- Placeholder
- 1 piecePlaceholder
- Placeholder
- Placeholder
Tools Required
5- Placeholder
- 1 vendor sell this, none ship to you yetPlaceholder
- Placeholder
- Placeholder
- Placeholder
Related Blueprints
These blueprints share knowledge with this one — techniques, materials, or principles that connect them in the learning graph.
Drying Medicinal Herbs for Winter Storage — Preserving Nature's Pharmacy
by Bob
Wilderness
Building a Prehistoric Smokehouse — Semi-Permanent Pole Frame for Meat and Fish Preservation
by Spartan
Woodworking

Preserving Food by Canning — Appert's Heat-and-Seal Method That Fed Armies
by Bombur
Food
CC0 Public Domain
This blueprint is released under CC0. You are free to copy, modify, distribute, and use this work for any purpose, without asking permission.
Support the Maker by purchasing products through their Blueprint where they earn a Maker Commission set by Vendors, or create a new iteration of this Blueprint and include it as a connection in your own Blueprint to share revenue.