ART
BEAUTY & WELLNESS
CRAFT
CULTURE & HISTORY
ENTERTAINMENT
ENVIRONMENT
FOOD & DRINKS
REVERSE ENGINEERING
SCIENCES
SPORTS
TECHNOLOGY
WEARABLES
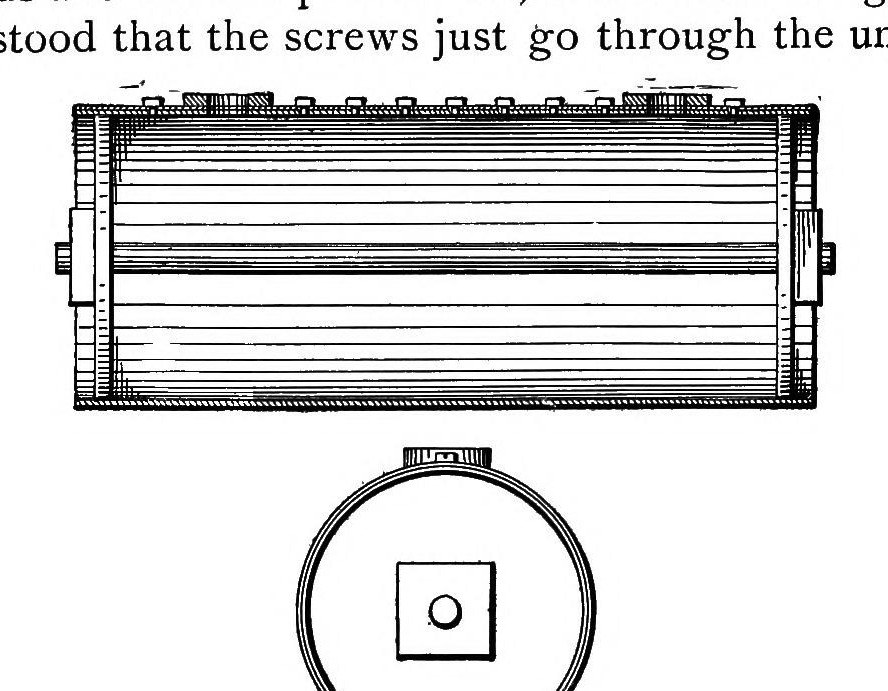


Steam Boiler: Small Brass Shell Boiler, Screwed and Soldered (Hopkins, Model Engines and Small Boats, 1898)
A small steam boiler for model engines and boats: a brass cylinder 4 in across, closed by two brass heads tied together by a brass stay rod, its seam held by two rows of brass screws and sealed with solder. It sits in a russia-iron jacket over an alcohol lamp, with a weighted safety valve and fusible plugs that put the lamp out if the water runs low.
Result: a strong little shell boiler, 6 to 12 in long to suit the engine.
Source: N. M. Hopkins, Model Engines and Small Boats (1898), ch. III. Unknown: the working pressure and the valve's sizes. Picture: the book's Fig. 33.
Intermediate
Unknown
Instructions
1
1
Make the heads and stay
Make the heads and stay
Cut two brass disks 4 in across and about 1/8 in thick, each with a 1/4 in hole in the centre, and true them up in the lathe. Pass a 1/4 in brass rod through both and solder it, with plenty of solder inside the heads to make them steam-tight. Screw heavy brass disks (round nuts are better than square) onto the rod ends against the heads. Set the heads 10 in apart over their outsides; about 6 in will do for a small single-acting engine, 7 in for a double engine, up to 12 in for a larger one.
Materials for this step:
 Brass Round Bar1 two heads, two nuts
 Brass Rod1 1/4 in stay
 Tin-Lead Solder1 as needed
 Flux1 as needed
Tools needed:
 Metal Lathe
 Bunsen Burner
2
2
Roll and screw the shell
Roll and screw the shell
Cut soft sheet brass at least 1/32 in thick (1/16 in for boilers over 8 in long), about 14 in long and 1/2 in longer than the heads so it overhangs 1/4 in each end. Roll it round the heads on tinner's rollers, never by hand, so it laps about 1 in. Slip it over the heads and rod and bind it tight with heavy twine. Drill two rows of holes along the lap, tap them and turn in little brass screws that go just through the under plate without projecting. Do not use iron screws: their rust pits the seams.
Materials for this step:
 Brass Sheet1 shell
 Machine Screws1 small brass screws
 Binding Twine1 binding
Tools needed:
 Plate Bending Rolls
 Hand Drill
 Tap and Die Set
3
3
Solder it up
Solder it up
Push the heads and rod out, hold the shell in a Bunsen flame and run solder well along the seam. Push the heads back and solder them all round the edge, and screw the nuts tight: the screws and stay take the strain, the solder keeps in the steam. Drill two or three 1/4 in holes in the top and bush them with heavy brass disks soldered on. For fusible plugs, drill two 1/4 in holes near the bottom and solder them shut with little brass caps.
Materials for this step:
Tin-Lead Solder1 as neededFlux1 as neededBrass Round Bar1 bushes and plug capsTools needed:
Bunsen BurnerHand Drill4
4
Fit the jacket and safety valve
Fit the jacket and safety valve
Cut end supports from russia sheet iron to hold the boiler by its ends, with an opening for the alcohol lamp, and bend a russia-iron cover over it, riveted to the ends by little ears. Punch a row of small holes along the cover's lower edge to let air in for the lamp; the cover keeps in the heat and keeps draughts off the flame. Turn a small safety valve true in the lathe, grind it to its seat with emery and oil, and fit a lead weight on its bar. Not given: the valve's sizes.
Materials for this step:
 Russia Iron Sheet1 ends and cover
 Iron Rivets1 smallBrass Round Bar1 valve
 Lead1 weight
Tools needed:
 Tin Snips
 Rivet SetMetal Lathe
 Emery Cloth
5
5
Fire and set it
Fire and set it
Fill the boiler two-thirds full, connect the engine and light the alcohol lamp under it. If the valve blows off before the engine turns over, move the weight a little farther out until the engine runs without steam escaping; well made, the valve will then blow off soon after the engine stops if the fire is left. If the water ever runs very low, the fusible plugs melt and the steam puts out the lamp. Do not try to burst a boiler to test it.
Tools needed:
 Alcohol Burner (Spirit Lamp)
Materials
10- 1 valvePlaceholder
- 1 1/4 in stayPlaceholder
- 2 as neededPlaceholder
- 2 as neededPlaceholder
- 1 shellPlaceholder
- 1 small brass screwsPlaceholder
- 1 bindingPlaceholder
- 1 ends and coverPlaceholder
- 1 smallPlaceholder
- 1 weightPlaceholder
Tools Required
9- Placeholder
- Placeholder
- Placeholder
- Placeholder
- Placeholder
- Placeholder
- Placeholder
- Placeholder
- Placeholder
Connected Blueprint Materials


This blueprint makes
CC0 Public Domain
This blueprint is released under CC0. You are free to copy, modify, distribute, and use this work for any purpose, without asking permission.
Support the Maker by purchasing products through their Blueprint where they earn a Maker Commission set by Vendors, or create a new iteration of this Blueprint and include it as a connection in your own Blueprint to share revenue.