ART
BEAUTY & WELLNESS
CRAFT
CULTURE & HISTORY
ENTERTAINMENT
ENVIRONMENT
FOOD & DRINKS
REVERSE ENGINEERING
SCIENCES
SPORTS
TECHNOLOGY
WEARABLES
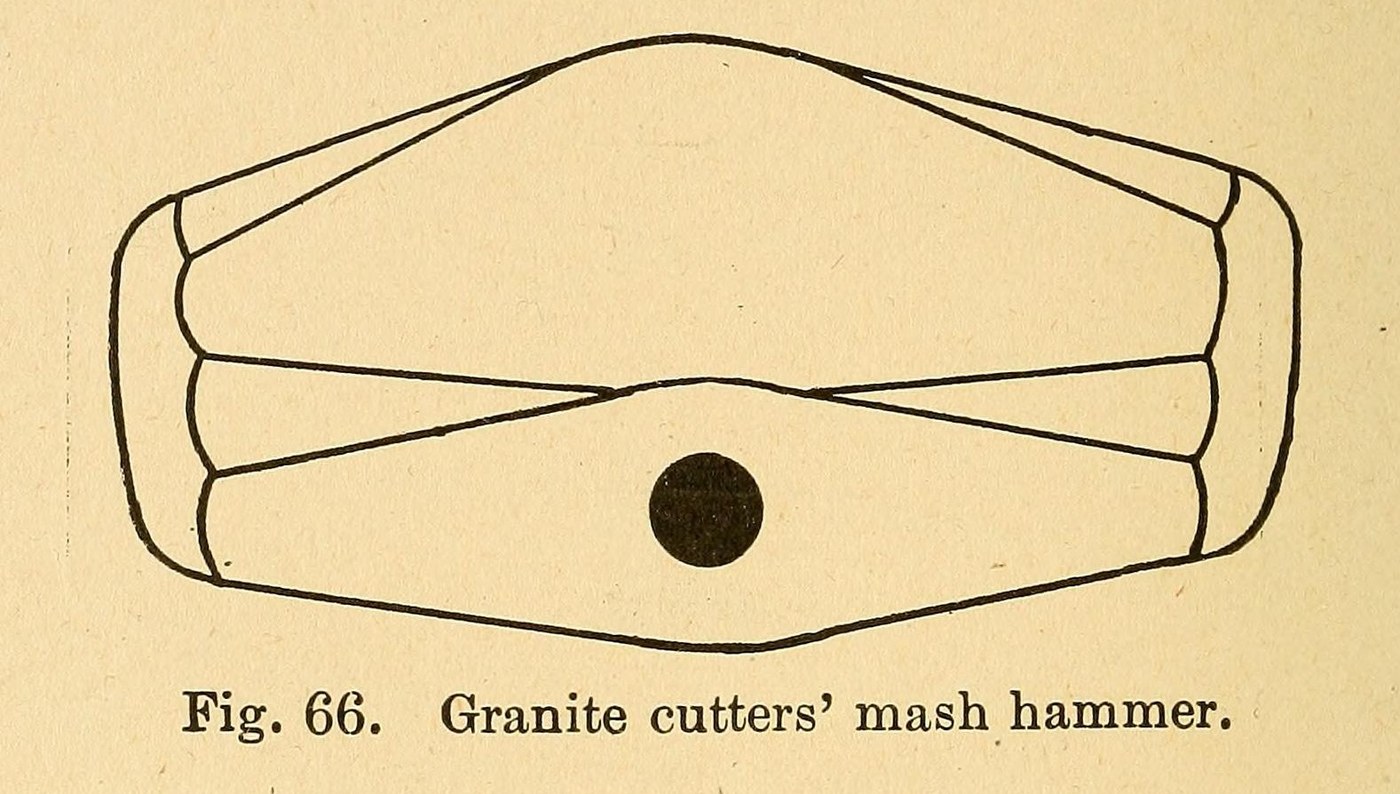


Stone Carving Hammer: a Granite Cutters' Mash Hammer (Holford, 1907)
A mash hammer is a two-faced hammer used by granite cutters. H. Holford's 20th Century Toolsmith and Steelworker (1907) gives the granite cutters' pattern: forged from 75-point carbon steel 1 3/4 inches square, with a small round eye, both ends bevelled and hardened, with no temper drawn.
His forging and hardening come from his chapter on the hand hammer. The brine bath comes from his chapter on the hardening bath. He gives no weight or length for the mash hammer and no handle wood; those are unknown here.
Source: H. Holford (1907), pp. 21, 47-53, 127-128. Picture: his Fig. 66.
Intermediate
A day
Instructions
1
1
Read Holford
Read Holford
"After proper hardening it is not necessary to draw any temper as there are no sharp corners to break off."
2
2
Heat the steel
Heat the steel
Take good steel of 75 point carbon (about 0.75 per cent), 1 3/4 inches square; the length for a given weight is not given (unknown). In a good clean fire, heat it slowly, turning it now and then so the corners do not overheat while the middle is still black, until it is an even yellow heat right through.
Materials for this step:
 Square Tool Steel Bar1 1 3/4 in square
Tools needed:
 Forge
 Blacksmith Tongs
 Unknown Dimensions
 Heat-Resistant Gloves
3
3
Punch a small round eye
Punch a small round eye
Punch a small round eye, not the large oval eye of other hammers, no more than 3/4 inch across when finished. Start it a little smaller, as the eye grows while the hammer is forged. A little coal dust in the hole keeps the punch from sticking.
Tools needed:
 Hot Punch
 Blacksmith Hammer
 AnvilBlacksmith Tongs
 Safety Glasses
4
4
Forge the bevelled ends
Forge the bevelled ends
Forge both ends bevelled down from the eye on the top and sides, leaving the bottom side perfectly flat (Fig. 66). Bevel the face at each end too, dress it a little full in the centre and leave the corners very rounded. Start at an even yellow heat and work lower as you finish, ending at a dark dull red; steel worked too cold is strained and may crack in hardening. Anneal it if much filing is to be done.
Tools needed:
Blacksmith Hammer FullerAnvilForgeBlacksmith TongsSafety Glasses
5
5
Harden both ends
Harden both ends
With the coal well charred and free from sulphur and thick smoke, stand one end upright in the fire and heat it slowly and evenly. If the corners get hot enough to harden before the centre, stop blowing until the centre is cherry red too. Heat no more than 3/4 inch back from the end and never harden the eye. Plunge the whole hammer in the hardening bath and hold it there until stone cold. Holford's bath (p. 21) is clean water free from grease, best made into a brine with as much salt as it will dissolve, kept as large and cold as possible. Do the same with the other end. Draw no temper.
Tools needed:
ForgeBlacksmith Tongs Brine Solution (Saturated Salt Water)Heat-Resistant Gloves
6
6
Hang it
Hang it
Fit a good straight handle through the eye; Holford adds that a little spring in it is a good fault. He does not name the wood (unknown).
Materials for this step:
 Unknown Material1 handle
7
7
History and honest limits
History and honest limits
Holford wrote for blacksmiths and toolsmiths who dressed quarry and granite tools; the same page describes the granite hammer, drawn to a sharp edge at both ends and tempered to a light straw. He blames broken corners and hollow faces on steel soaked too long or worked too cold, and on the old way of dipping only an inch of the end, which leaves the face hollow.
The size of the mash hammer and the handle wood are not given; the tools are ours.
Materials
2- 1 1 3/4 in squarePlaceholder
- 1 handlePlaceholder
Tools Required
10- Placeholder
- Placeholder
- Placeholder
- Placeholder
- Placeholder
- Placeholder
- Placeholder
- Placeholder
- Placeholder
- Placeholder
This blueprint makes

CC0 Public Domain
This blueprint is released under CC0. You are free to copy, modify, distribute, and use this work for any purpose, without asking permission.
Support the Maker by purchasing products through their Blueprint where they earn a Maker Commission set by Vendors, or create a new iteration of this Blueprint and include it as a connection in your own Blueprint to share revenue.