ART
BEAUTY & WELLNESS
CRAFT
CULTURE & HISTORY
ENTERTAINMENT
ENVIRONMENT
FOOD & DRINKS
REVERSE ENGINEERING
SCIENCES
SPORTS
TECHNOLOGY
WEARABLES
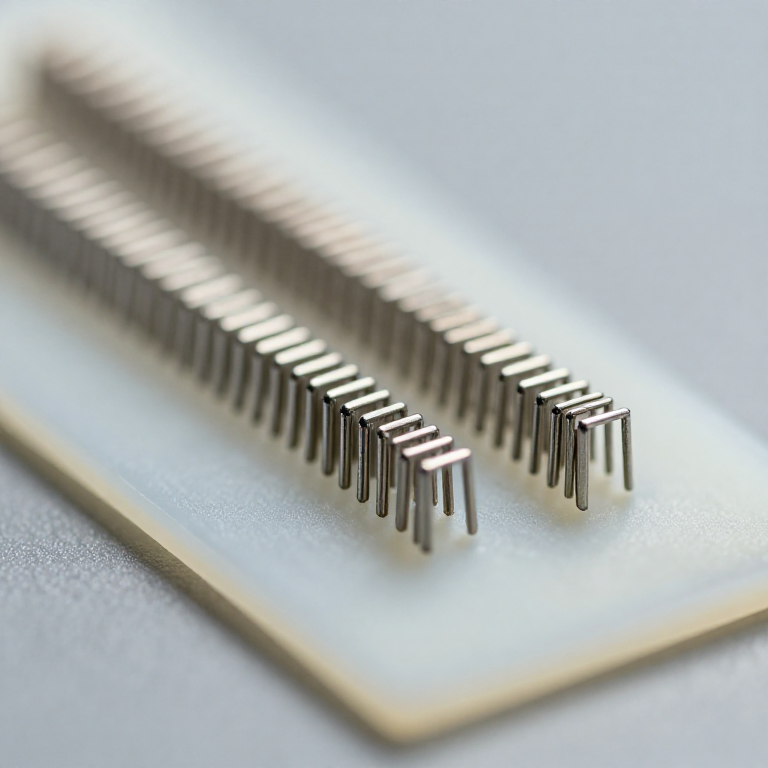


The Surgical Stapler
Hand suturing a bowel closure takes a skilled surgeon a long time and produces a seam whose quality varies along its length. In 1908 Humer Hueltl built a machine in Budapest to do it in one motion. It weighed about three and a half kilograms, took two hours to assemble and load, and it worked. Aladar von Petz simplified it in 1921 into something a surgeon would actually pick up, and the mechanical seam entered practice.
The clever part is not the mechanism, which is a press. It is the shape of the closed staple.
A staple that closes flat crushes the tissue between its legs, and crushed tissue dies. A staple that closes into a B — the legs curling inward and meeting, leaving two open loops — grips firmly enough to seal against leakage while leaving a path through which blood can still reach the tissue caught in it. That single geometric decision is what makes a stapled anastomosis heal instead of necrose, and it is produced entirely by the shape of two small pockets in the anvil.
The other half of the design is the staggered double row. One row alone leaves a straight line of holes; two rows offset from each other mean no straight path exists through the seam.
You will build the forming jig, make staples, and measure the one number the whole device is specified by: closed height.
Intermediate
6 hours
Instructions
1
1
Cut the anvil pockets
Cut the anvil pockets
Everything is decided here, so take the time.
The anvil is a flat steel block with paired pockets facing the staple legs. Each pocket is a shallow curved groove that catches the leg tip and turns it inward as the driver pushes the staple down. The curvature sets the final shape: too shallow and the leg does not turn far enough, so the staple closes as a wide U that grips nothing; too deep and the leg over-rotates, the tips cross, and the staple pierces the tissue a second time.
Mill or file two pockets per staple position, spaced to match your staple's leg spacing, with the groove axis parallel to the seam. The pocket floor should be a smooth arc of roughly the staple wire diameter in radius — a sharp corner will shear the wire instead of bending it.
Stagger your rows. Set the second row offset by half a pitch from the first and about two and a half millimetres away from it. Lay a straightedge across the finished pattern at any angle and check that it cannot pass between staples without touching one. That test is the whole reason the stagger exists.
Harden the anvil face if you can. Soft steel pockets change shape after a few dozen firings and your closed height drifts without you noticing.
Materials for this step:
 Tool Steel Flat Bar (10mm)1 piece
Tools needed:
 Digital Caliper 6-Inch
 Needle File Set
 Digital Microscope
2
2
Closed height against tissue thickness
Closed height against tissue thickness
Loading Jupyter Notebook...
Tools needed:
 Desktop Computer
3
3
The firing sequence as blocks
The firing sequence as blocks
Blockly Workspace
Loading Blockly workspace...
Tools needed:
Desktop Computer4
4
Form staples and measure what you made
Form staples and measure what you made
Cut staple blanks from fine stainless or titanium wire and bend them into a square U on a simple former: crown width to match your anvil pocket spacing, legs long enough that the tips reach the pockets with the crown still proud of the tissue.
Load a row into the driver and fire into a stack of silicone sheet standing in for tissue. Fire into three thicknesses: one matched to your intended closed height, one clearly too thin, one clearly too thick.
Now measure. Section the fired staple line, or simply photograph it side-on under the microscope with a scale in frame, and measure the closed height directly — the clear gap between the inside of the crown and the top of the closed legs. Compare against the notebook's window for the thickness you fired into.
Look at the shape while you are there. You are looking for a B: two closed loops with the leg tips meeting or nearly meeting the crown, not crossing it, not stopping short. A staple that has under-rotated shows as a wide U and will pull out under tension. One that has over-rotated shows as tips crossed past each other and will have punched a second hole on the way round.
Adjust the pocket arc and repeat. Two or three iterations gets you there, and the microscope photographs are the record of the change.
Materials for this step:
 Stainless Steel Wire (0.4mm)5 metre
 Silicone Rubber Sheet (2mm)1 sheet
Tools needed:
Digital MicroscopeDigital Caliper 6-Inch Bench Vice
5
5
Pull the seam apart, and read the limit
Pull the seam apart, and read the limit
Clamp a stapled silicone seam in the tensile rig and pull it until it fails. Record the load and, more usefully, watch how it fails.
A good seam fails by tearing the sheet beside the staple line. A poor one fails by staples pulling straight out, leaving the sheet intact and a row of small holes. The second failure means your closed height was too large or your legs under-rotated, and it is the failure mode that matters clinically because it happens under ordinary tension rather than extreme load.
Then do the test that justifies the stagger. Fire a single row seam and a staggered double row seam with the same staples and the same closed height, and pressurise both with water behind them. The single row will weep along its line. The staggered pair will not, at the same pressure, because there is no straight path through it.
Where this stops. You have built a staple forming jig, learned to read closed height, and demonstrated the two design decisions that make a mechanical seam viable. What you have not built is a surgical instrument. A real stapler is single-use or fully sterilisable, has a reload that cannot be fitted the wrong way round, fires both rows simultaneously so the tissue cannot shift between them, carries a built-in cutting blade between the rows, and is manufactured with the anvil geometry held to microns and verified per lot — which after the wear plot in step 2 you now know is the whole game. Practise on silicone and leather. This is a mechanism study, not an operation.
Materials for this step:
Silicone Rubber Sheet (2mm)1 sheet Distilled Water2 liters
Tools needed:
 Ring Stand (Support Stand)
 Precision Digital Scale (0.01g)Digital Microscope
Materials
4- 1 piecePlaceholder
- 5 metrePlaceholder
- 1 sheetPlaceholder
- 2 litersPlaceholder
Tools Required
7- Placeholder
- Placeholder
- Placeholder
- Placeholder
- Placeholder
- Placeholder
- Placeholder
Related Blueprints
These blueprints share knowledge with this one — techniques, materials, or principles that connect them in the learning graph.



CC0 Public Domain
This blueprint is released under CC0. You are free to copy, modify, distribute, and use this work for any purpose, without asking permission.
Support the Maker by purchasing products through their Blueprint where they earn a Maker Commission set by Vendors, or create a new iteration of this Blueprint and include it as a connection in your own Blueprint to share revenue.