ART
BEAUTY & WELLNESS
CRAFT
CULTURE & HISTORY
ENTERTAINMENT
ENVIRONMENT
FOOD & DRINKS
REVERSE ENGINEERING
SCIENCES
SPORTS
TECHNOLOGY
WEARABLES
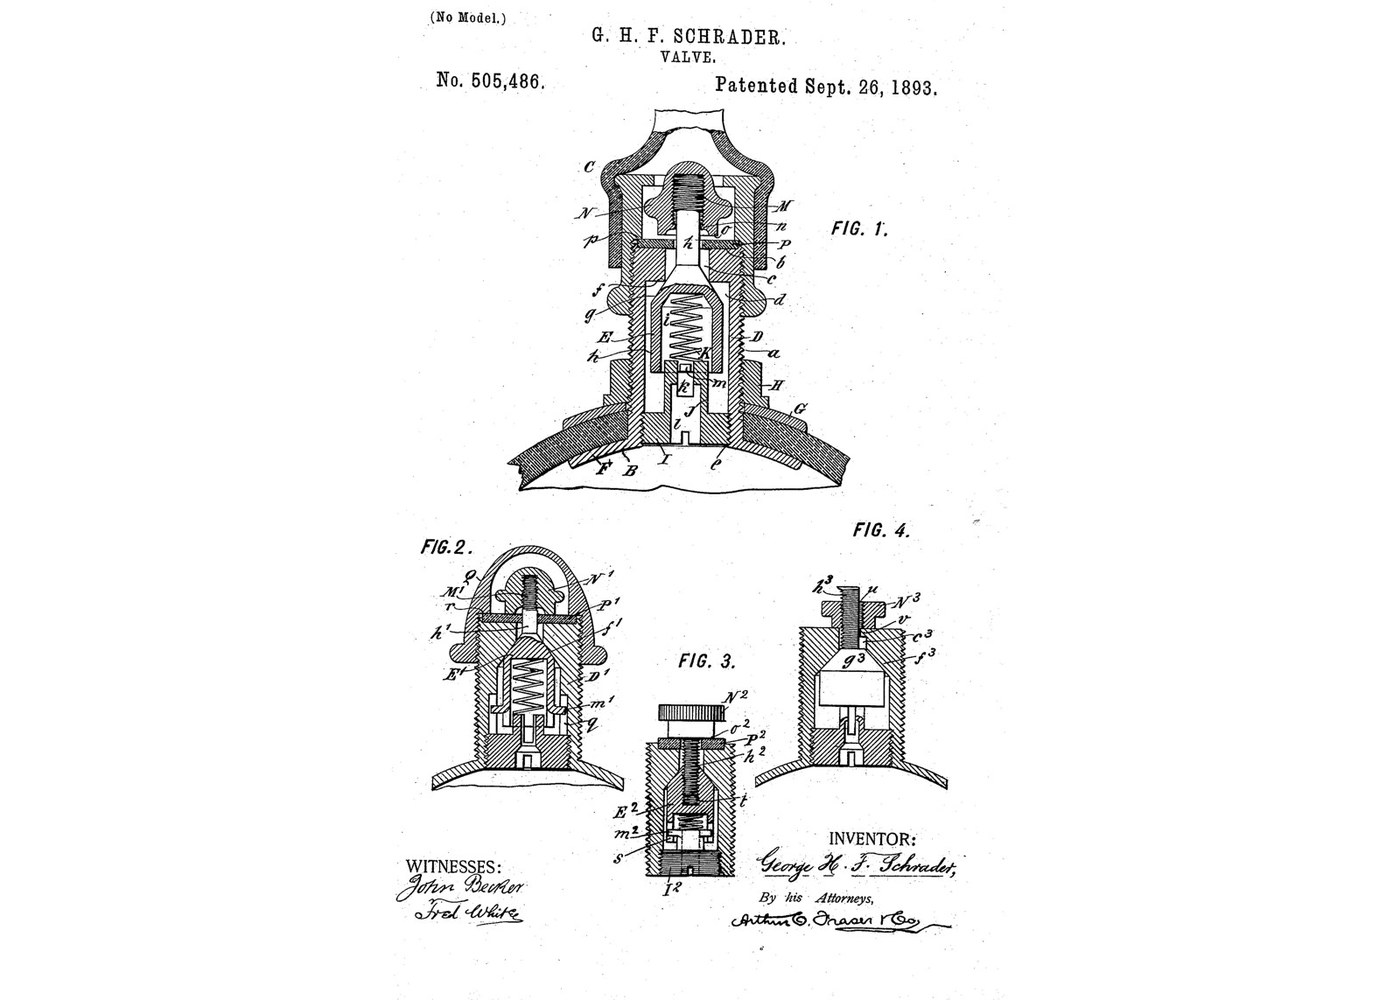


Tire Valve: Spring-Closed Plunger and Locking Hand Nut (Schrader 1893)
Schrader's bicycle-tire valve: a plunger in a tube, pushed onto its seat by a spring and by the air in the tyre. The pump's air lifts it, the tyre's air closes it. A hand nut on the stem then screws down on a washer to lock it tight, and a lip on the nut stops it coming off the stem.
Source: George H. F. Schrader, US 505,486 (1893), Fig. 1. Unknown: the metals, the packing and the sizes. Schrader gives none of them, so they are linked to unknown heads. Lathe work and grinding the seat are ours. Picture: the patent's drawing.
Advanced
2 days
Instructions
1
1
Turn the casing
Turn the casing
Turn a tube with a flange at its lower end and a thread up its outside, ending in a socketed top face. Bore a narrow aperture down from that face into a wider space, leaving a square-cornered shoulder between them: that corner is the seat. Thread the inside of the lower end. Turn a nut for the outer thread. Unknown: the metal and the sizes.
Materials for this step:
 Unknown Metal1 as required
Tools needed:
 Metal Lathe
 Lathe Tool Set (HSS)
 Tap and Die Set
 Vernier Caliper
 Unknown Dimensions
2
2
Turn the plunger and its plug
Turn the plunger and its plug
Turn the plunger: a conical face that meets the seat, a smooth stem above it rising through the aperture with a threaded head at its end, and below it a hollow cylinder nearly filling the casing, open at the bottom. Turn a plug that screws into the casing's lower end, with a stub that fits loosely inside the hollow, a cross groove across the stub and a hole through the plug. Strike a lug in from the plunger's lower edge so it rides in the groove and stops the plunger turning.
Materials for this step:
Unknown Metal1 as requiredTools needed:
Metal LatheLathe Tool Set (HSS)Tap and Die Set File SetUnknown Dimensions
3
3
Make the spring, washers and hand nut
Make the spring, washers and hand nut
Wind a spring to fit inside the plunger's hollow. Cut a packing washer for the socket on top of the casing and a washer for the tyre side. Turn a hand nut that screws onto the stem head, with a seating face underneath, and turn its lip inwards round the stem so it overhangs the head. Unknown: the spring metal and the packing.
Materials for this step:
Unknown Metal1 as required Unknown Packing2 pieces
Tools needed:
Metal Lathe Combination PliersUnknown Dimensions
4
4
Grind the seat and assemble
Grind the seat and assemble
Grind the plunger's conical face onto the casing seat, as Schrader recommends alongside the washer. Put the spring in the plunger and screw in the plug from below, the lug in the groove. Fit the packing washer in the socket and the hand nut on the stem. Clamp the casing through the tyre between its flange and the outer washer and nut. Pump: the air lifts the plunger. Stop: spring and tyre pressure close it. Screw the hand nut down onto the washer to lock it.
Tools needed:
Combination Pliers Safety Glasses
Materials
2- 1 as requiredPlaceholder
- 2 piecesPlaceholder
This blueprint makes

Related Blueprints
These blueprints share knowledge with this one — techniques, materials, or principles that connect them in the learning graph.
CC0 Public Domain
This blueprint is released under CC0. You are free to copy, modify, distribute, and use this work for any purpose, without asking permission.
Support the Maker by purchasing products through their Blueprint where they earn a Maker Commission set by Vendors, or create a new iteration of this Blueprint and include it as a connection in your own Blueprint to share revenue.