ART
BEAUTY & WELLNESS
CRAFT
CULTURE & HISTORY
ENTERTAINMENT
ENVIRONMENT
FOOD & DRINKS
REVERSE ENGINEERING
SCIENCES
SPORTS
TECHNOLOGY
WEARABLES
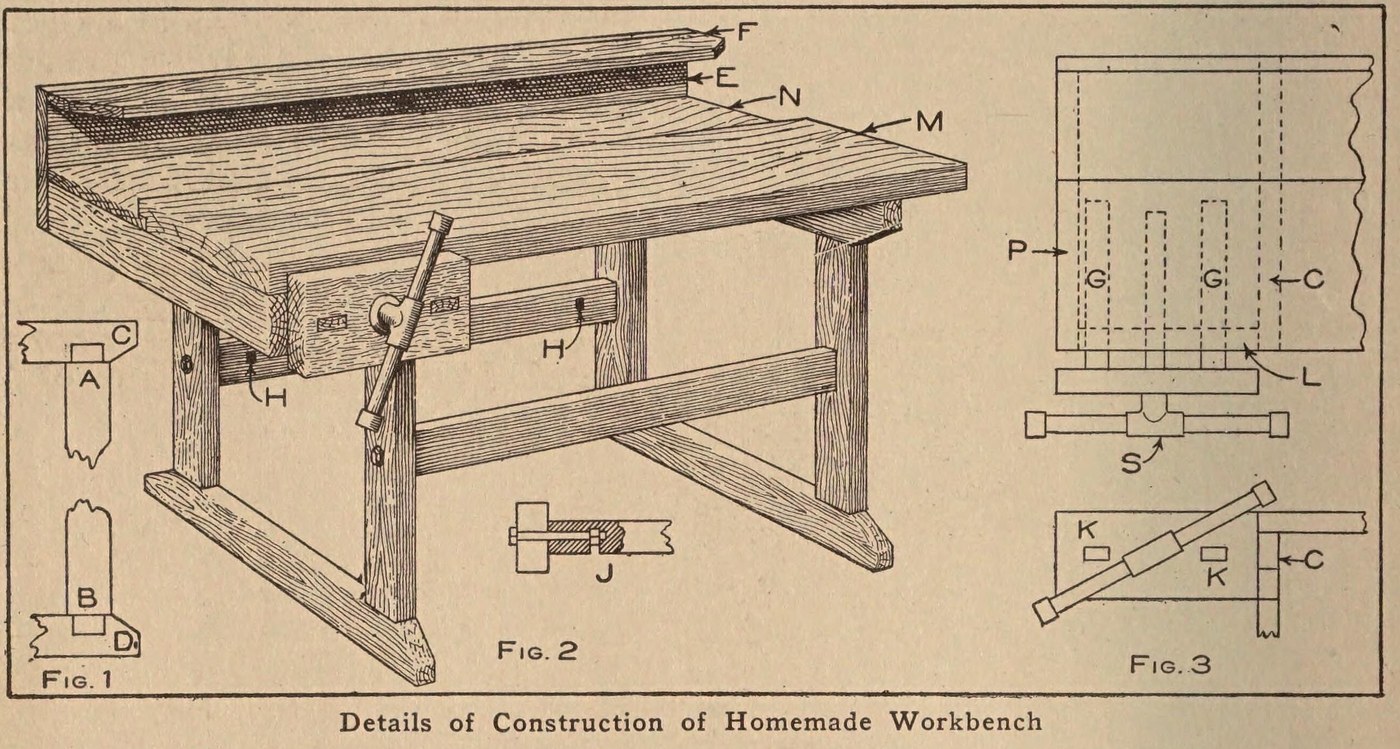


Workbench: a Pine Bench with a Laminated Maple Top and Vise (Boy Mechanic, 1913)
The same pine bench with a harder top: 14 maple strips set on edge, glued and screwed together, with a back board, a tool rack and a wooden vise on an iron bench screw.
Source: C. E. McKinney, Jr., 'Homemade Workbench', The Boy Mechanic, Book 1 (1913), pp. 442-443. Picture: Figs. 1-3 of the book.
Intermediate
Unknown
Instructions
1
1
Make the two leg frames
Make the two leg frames
Cut four 2 x 4 in pine legs 23 in long with a tenon on each end 1/2 in thick, 3 1/2 in wide and 1 1/2 in long (Fig. 1, A and B). Cut four crosspieces of the same stock 20 in long, mortised in the narrow edge 1 1/4 in from each end, and slope their corners from the leg out to the middle. Fit each pair of legs to a pair of crosspieces to make the two supports.
Materials for this step:
 Pine Lumber1 2 x 4 in: legs, crosspieces
Tools needed:
 Hand Saw
 Mortise Chisel
 Hammer
2
2
Brace them together
Brace them together
Join the supports with two 2 x 4 in braces 24 in long, ends sawn square. Bore through each leg and 4 in into the centre of each brace end, bore an intersecting hole on the back of each brace for the nut, and draw each joint tight with a 3/8 x 6 in bolt (Fig. 2, J). A cross brace on the back stops rocking when planing.
Materials for this step:
Pine Lumber1 2 x 4 in: braces Carriage Bolt4 3/8 x 6 in
Tools needed:
Hand Saw Brace and Bit
 Adjustable Spanner
3
3
Build up the maple top
Build up the maple top
Make the main top M of 14 maple strips 7/8 in thick, 2 in wide and 3 1/2 ft long, set on edge, each glued and screwed to the next, all with the grain one way so it planes smooth. Rabbet its back edge 1/2 in to take a back board N of the same length, 8 1/2 in wide and 7/8 in thick. Screw the top to the top crosspieces with long screws.
Materials for this step:
 Unknown Material14 maple strips 7/8 x 2 in x 3 1/2 ft
 Wood Glue1 piece
 Pine Board1 back board
 Wood Screws1 piece
Tools needed:
Hand Saw Block Plane (Low-Angle)
 Screwdriver - Flat
4
4
Add the tool rack
Add the tool rack
Nail a board E 10 in wide to the back of the bench and fasten a 2 1/2 in board F on top of it at right angles; both 7/8 in thick and 3 1/2 ft long. Bore holes or cut notches in F to hold tools.
Materials for this step:
Pine Board2 7/8 in, 3 1/2 ft Nails1 piece
Tools needed:
Brace and BitHand SawHammer5
5
Fit the vise
Fit the vise
Fasten an iron bench screw in a 2 x 6 in block 12 in long. Mortise two guide rails 7/8 x 1 1/2 in and 20 in long into the block; they slide in mortises in a 2 x 4 piece L bolted under the top, which holds the bench-screw nut between the two mortises. Nail L to a top crosspiece and to a 2 x 4 piece P bolted under the top at the end (Fig. 3).
Materials for this step:
Pine Lumber1 2 x 6 block, 2 x 4 pieces, guide rails Wood Carving Bench Screw1 pieceCarriage Bolt1 for L and PNails1 piece
Tools needed:
Hand SawMortise ChiselBrace and BitAdjustable SpannerHammerMaterials
8- 1 2 x 6 block, 2 x 4 pieces, guide railsPlaceholder
- 1 for L and PPlaceholder
- 14 maple strips 7/8 x 2 in x 3 1/2 ftPlaceholder
- 1 piecePlaceholder
- 2 7/8 in, 3 1/2 ftPlaceholder
- 1 piecePlaceholder
- 2 piecesPlaceholder
- 1 piecePlaceholder
This blueprint makes

CC0 Public Domain
This blueprint is released under CC0. You are free to copy, modify, distribute, and use this work for any purpose, without asking permission.
Support the Maker by purchasing products through their Blueprint where they earn a Maker Commission set by Vendors, or create a new iteration of this Blueprint and include it as a connection in your own Blueprint to share revenue.