NGHỆ THUẬT
LÀM ĐẸP VÀ SỨC KHỎE
THỦ CÔNG
VĂN HÓA VÀ LỊCH SỬ
GIẢI TRÍ
MÔI TRƯỜNG
THỰC PHẨM VÀ ĐỒ UỐNG
KỸ THUẬT NGƯỢC
KHOA HỌC
THỂ THAO
CÔNG NGHỆ
THIẾT BỊ ĐEO
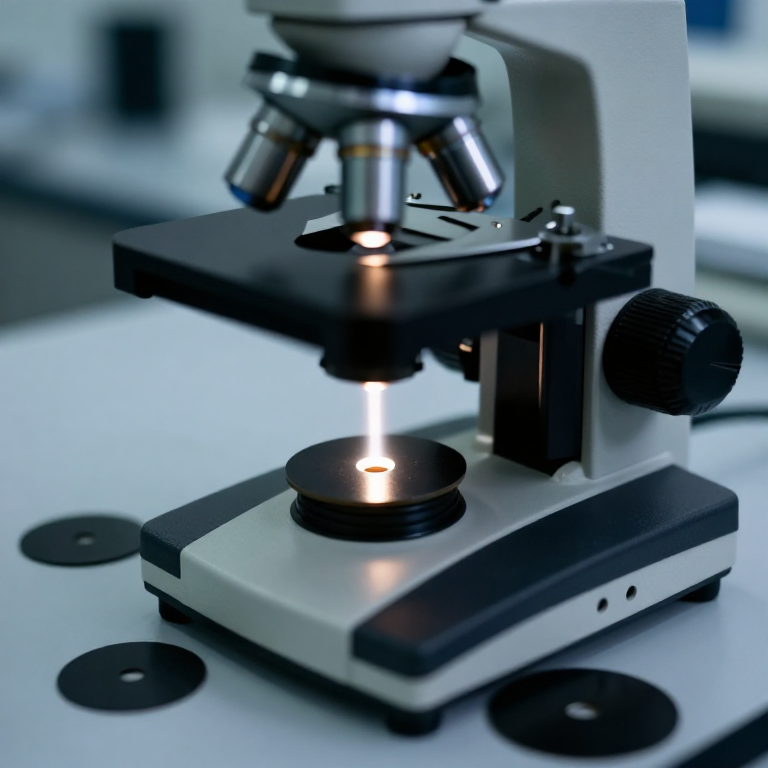


Köhler Illumination
Point a lamp at a specimen and you get an image of the lamp filament lying across it. Nineteenth-century microscopists worked around this with ground glass and oil flames and a great deal of patience, and accepted uneven, glary fields as normal.
August Köhler, a young zoologist in Giessen in 1893, worked out an arrangement that solves it completely. The trick is to focus the lamp filament NOT on the specimen but into the condenser's aperture, so that every point of the filament illuminates the whole specimen and the specimen sees a perfectly even, wide cone of light with no image of the source in it at all.
It takes five minutes to set up, costs nothing, and it is the single largest improvement available to any microscope — including the one in the first rung of this batch. Most people who own a microscope have never done it.
Trung cấp
3 hours
Hướng dẫn
1
1
Understand the two sets of planes
Understand the two sets of planes
A Köhler system has two sets of conjugate planes that never mix. The FIELD set contains the field diaphragm, the specimen and your retina — what you see in focus. The APERTURE set contains the lamp filament, the condenser diaphragm and the objective's back focal plane — what controls the cone of light.
Everything in the setup follows from keeping these separate: the filament belongs in the aperture set, so it is deliberately OUT of focus at the specimen. Once that idea lands, the procedure stops being a ritual and becomes obvious.
2
2
Add a field diaphragm at the lamp
Add a field diaphragm at the lamp
Cut an adjustable iris from two overlapping discs of black card, or simply make a set of card discs with different-sized holes, and mount it right at the lamp exit.
Most simple microscopes have no field diaphragm at all, which is why they cannot be set up this way. It costs a piece of card. Its job is to restrict the illuminated area to just the field you are viewing, and every ray outside that area is pure glare bouncing around inside the tube.
Vật liệu cho bước này:
 Bìa đen6 cái
Công cụ cần thiết:
 Dao mổ
 Thước kẻ
3
3
Focus the specimen first, then the field diaphragm
Focus the specimen first, then the field diaphragm
Focus sharply on a specimen. Now close the field diaphragm right down, and move the CONDENSER up or down — not the objective — until the edge of that diaphragm is sharp in the same focus as the specimen.
That single adjustment is the heart of the method. When the field diaphragm edge is sharp, the condenser is projecting an image of it onto the specimen plane, which is exactly where it belongs in the field set — and the filament, which is in the other set, is automatically thrown out of focus.
Công cụ cần thiết:
 Kính hiển vi
4
4
Centre the diaphragm, then open it to the field edge
Centre the diaphragm, then open it to the field edge
With the diaphragm still nearly closed, centre its bright patch with the condenser centring screws, then open it just until its edge disappears outside the field of view. No further.
Opening it wider does not brighten what you are looking at — it only lights parts of the slide you cannot see, and every one of those rays scatters into the objective as veiling glare. This is why a correctly set-up microscope often looks DARKER and yet shows far more.
Công cụ cần thiết:
Kính hiển vi5
5
Set the condenser aperture by looking at the back of the objective
Set the condenser aperture by looking at the back of the objective
Take the eyepiece out and look down the tube — or use a phone camera. You will see a bright disc: the objective's back focal plane. Adjust the CONDENSER diaphragm until the light fills about three-quarters of that disc.
This one control trades resolution against contrast and nothing else. Wide open gives maximum resolution and a washed-out, low-contrast image. Closed down gives punchy contrast and throws away resolution, adding diffraction fringes that beginners mistake for structure. Three-quarters is the usual compromise — and never use it as a brightness control. That is what the lamp is for.
Công cụ cần thiết:
Kính hiển vi6
6
What each adjustment actually costs
What each adjustment actually costs
Đang tải sổ tay Jupyter…
Công cụ cần thiết:
Kính hiển vi7
7
Reset it every time you change objective
Reset it every time you change objective
Each objective has a different numerical aperture and a different field size, so both diaphragms need resetting when you switch.
It takes fifteen seconds once you know the sequence: focus, close the field diaphragm, focus the condenser on its edge, centre, open to the field edge, then set the aperture at the back of the objective. Doing it every time is what separates people who get good images from people who own good microscopes.
Công cụ cần thiết:
Kính hiển viBlueprint liên quan
Các blueprint này chia sẻ kiến thức — kỹ thuật, vật liệu hoặc nguyên tắc
CC0 Phạm vi công cộng
Bản thiết kế này được phát hành theo CC0. Bạn tự do sao chép, sửa đổi, phân phối và sử dụng cho bất kỳ mục đích nào mà không cần xin phép.
Hỗ trợ nhà sáng tạo bằng cách mua sản phẩm qua bản thiết kế, nơi họ nhận Hoa hồng nhà sáng tạo do nhà bán hàng đặt, hoặc tạo phiên bản mới và kết nối trong bản thiết kế riêng để chia sẻ doanh thu.