NGHỆ THUẬT
LÀM ĐẸP VÀ SỨC KHỎE
THỦ CÔNG
VĂN HÓA VÀ LỊCH SỬ
GIẢI TRÍ
MÔI TRƯỜNG
THỰC PHẨM VÀ ĐỒ UỐNG
KỸ THUẬT NGƯỢC
KHOA HỌC
THỂ THAO
CÔNG NGHỆ
THIẾT BỊ ĐEO
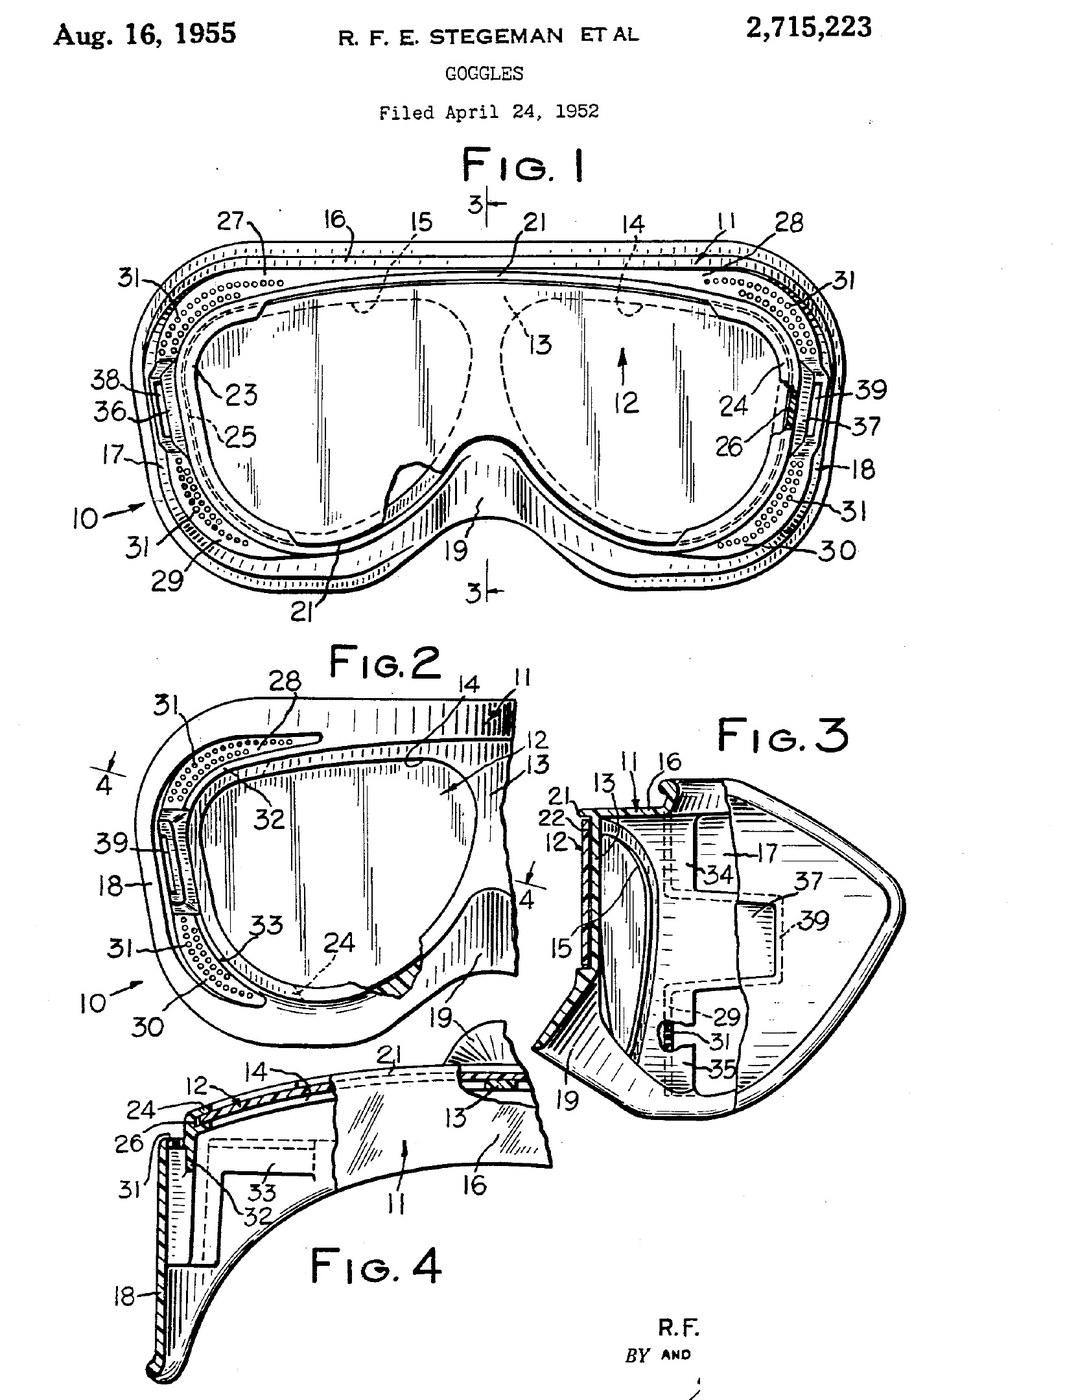


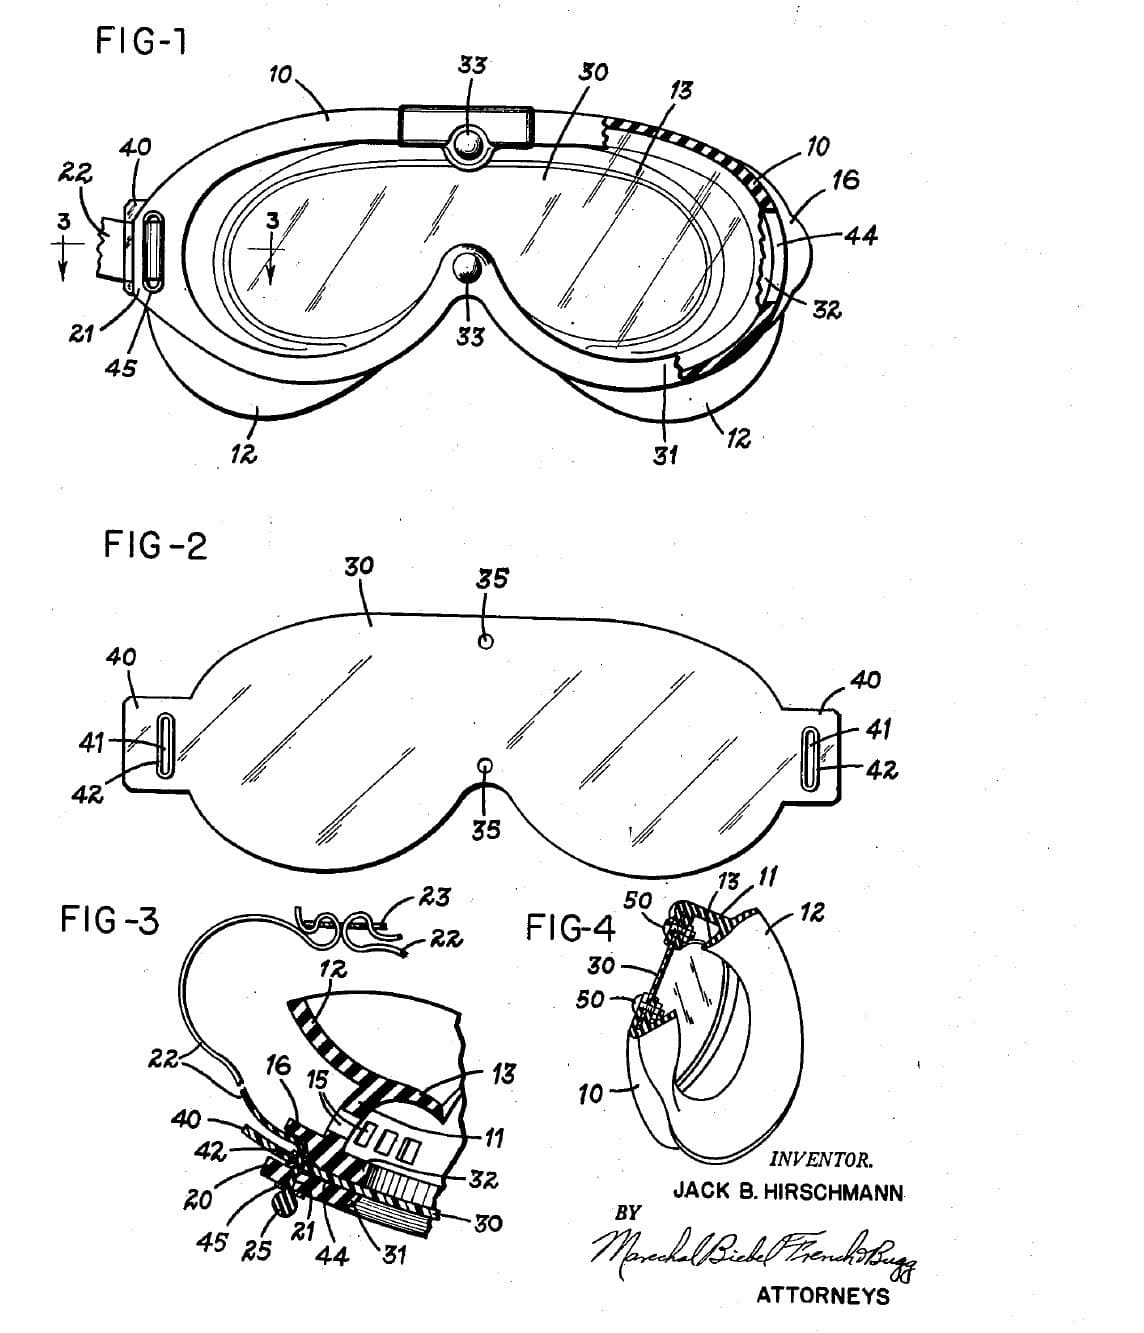
Lab Safety Goggles: Cover-All Body with Baffled Side Vents and a Snap-In Lens (Bausch & Lomb, US 2,715,223, 1955)
Cover-all goggles in two moulded plastic parts: a one-piece body that wraps the eyes and nose, and a flat clear lens panel sprung into a curve across its front. A raised rib round the front hides the lens edge so no particles can get in. The vents sit in set-back panels at the sides, and baffles inside turn the incoming air away from the eyes.
Result: ventilated goggles that keep out flying particles and splash, with a lens that snaps out for replacement.
Source: R. F. E. Stegeman and F. G. Gay (Bausch & Lomb), US 2,715,223 (1955). Unknown: sizes, the moulding and the strap. Picture: the patent drawing.
Trung cấp
Unknown
Hướng dẫn
1
1
Mould the body
Mould the body
Mould the body in one piece of plastic such as polystyrene or vinyl acetate. Give it a front wall curved from side to side with two sight openings, and a top wall and side walls running round to a projecting nose piece. Add a continuous rib round the front edge that stands forward of the lens, with overhanging flanges at the two temple ends forming grooves for the lens. Ours: polystyrene, injection moulded. Not given: sizes, the moulding.
Vật liệu cho bước này:
 Polystyren1 body
Công cụ cần thiết:
 Máy ép phun
 Kích thước chưa rõ
2
2
Form the vents, baffles and strap anchors
Form the vents, baffles and strap anchors
In the same moulding, set back panels on the temple and side parts behind the lens plane and pierce them with many small vent holes. Inside, put baffle walls behind the holes so the incoming air is turned away from the eyes. Form an anchor recess with an opening in each side wall for the head strap.
Công cụ cần thiết:
Máy ép phun3
3
Cut and fit the lens, add the strap
Cut and fit the lens, add the strap
Cut a flat, transparent lens panel to cover the whole front wall. Put one end in one temple groove, flex the panel and put its other end in the other groove; its own stiffness holds it curved against the front wall, with the rib covering its edge. Fasten a head strap in the two anchor recesses. Ours: clear plastic sheet, elastic cord. Not given: the lens thickness, the strap.
Vật liệu cho bước này:
 Tấm nhựa trong1 lens panel
 Dây chun tròn1 head strap
Công cụ cần thiết:
 Kéo cắt tônKích thước chưa rõ
Vật liệu
3- 1 bodyTạm thời
- 1 lens panelTạm thời
- 1 head strapTạm thời
Công cụ yêu cầu
3- Tạm thời
- Tạm thời
- Tạm thời
Vật liệu bản thiết kế liên kết


Bản thiết kế này làm ra

Blueprint liên quan
Các blueprint này chia sẻ kiến thức — kỹ thuật, vật liệu hoặc nguyên tắc
CC0 Phạm vi công cộng
Bản thiết kế này được phát hành theo CC0. Bạn tự do sao chép, sửa đổi, phân phối và sử dụng cho bất kỳ mục đích nào mà không cần xin phép.
Hỗ trợ nhà sáng tạo bằng cách mua sản phẩm qua bản thiết kế, nơi họ nhận Hoa hồng nhà sáng tạo do nhà bán hàng đặt, hoặc tạo phiên bản mới và kết nối trong bản thiết kế riêng để chia sẻ doanh thu.