NGHỆ THUẬT
LÀM ĐẸP VÀ SỨC KHỎE
THỦ CÔNG
VĂN HÓA VÀ LỊCH SỬ
GIẢI TRÍ
MÔI TRƯỜNG
THỰC PHẨM VÀ ĐỒ UỐNG
KỸ THUẬT NGƯỢC
KHOA HỌC
THỂ THAO
CÔNG NGHỆ
THIẾT BỊ ĐEO
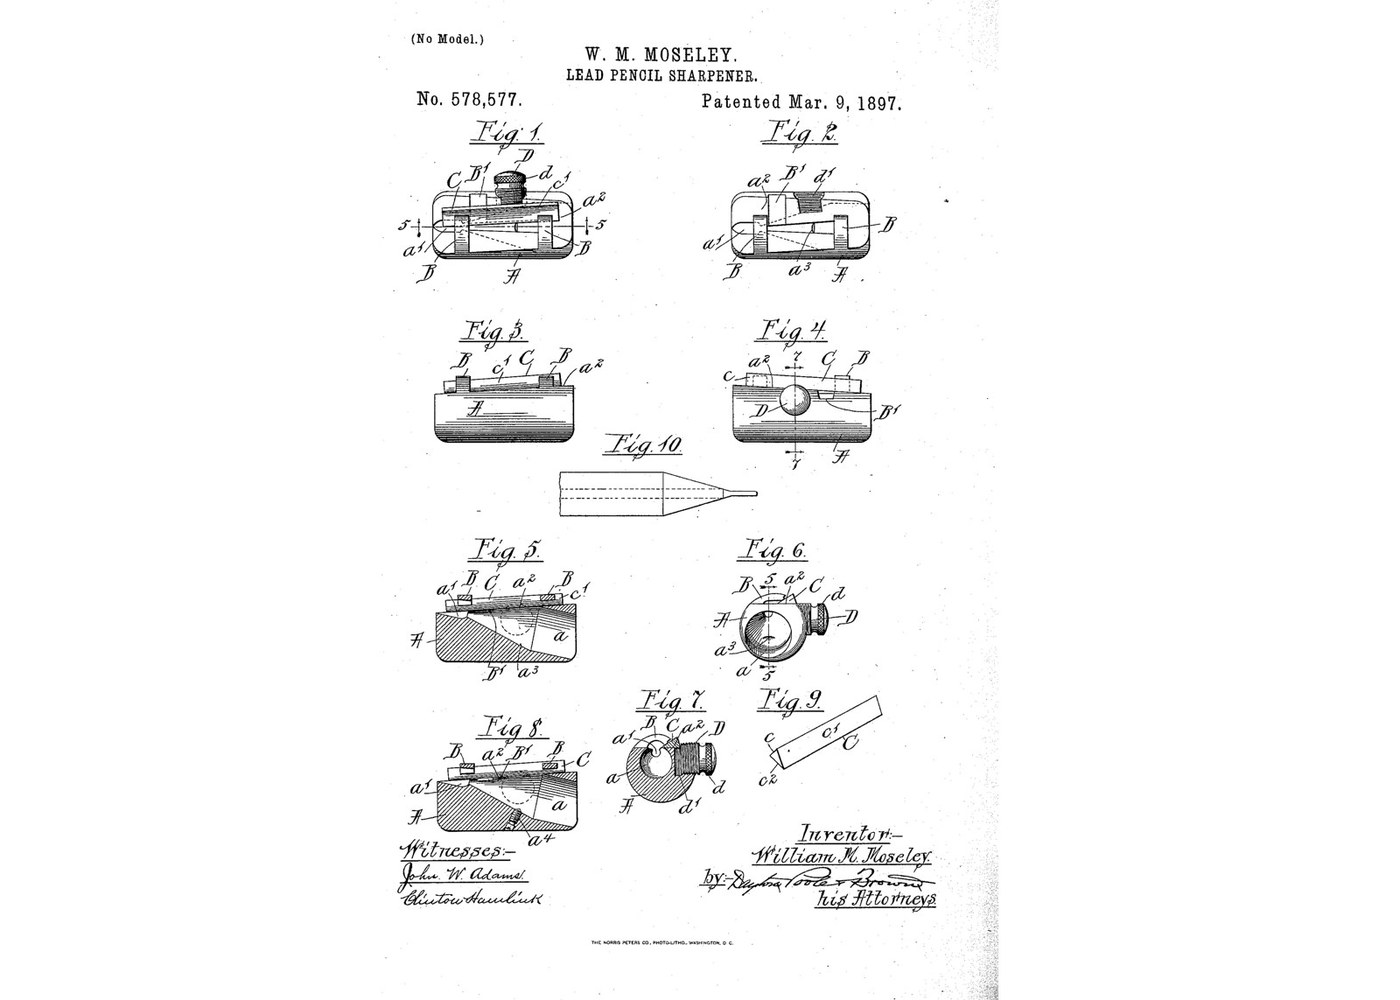


Pencil Sharpener: Conical Bore and a Reversible Triangular Blade (Moseley 1897)
The pocket pencil sharpener: twist the pencil in a conical hole and a blade along its side shaves the wood and lead to a point. Moseley made the body from plain round rod by drilling the cone at a slant, so the flat seat for the blade could be cut close to the rod's surface. His blade is longer than it needs to be: when the part that meets the lead wears, slide it along or turn it end for end.
Source: William M. Moseley, US 578,577 (1897). Unknown: the metals and the sizes. Moseley gives the body as metal, hard rubber or the like, and no sizes or angles, so these are linked to unknown heads. Lathe and mill are ours. Picture: the patent's drawing.
Trung cấp
1 day
Hướng dẫn
1
1
Turn the body from rod
Turn the body from rod
Cut a length of round rod and round its ends. In one end, bore a cone tapering inwards, its axis set at an angle to the rod's axis. Unknown: the metal, the sizes and the angle.
Vật liệu cho bước này:
 Kim loại chưa rõ1 as required
Công cụ cần thiết:
 Máy tiện kim loại
 Bộ dao tiện gỗ (HSS)
 Thước cặp
 Kích thước chưa rõ
2
2
Cut the blade seat and the stop arms
Cut the blade seat and the stop arms
Mill one side of the rod flat to make the blade seat, roughly parallel with the side of the cone, so it breaks into the bore. Leave two ribs standing across it as stop arms, and undercut them so the blade's edge slips under. Give their free ends oblique faces matching the blade. Cut away a clearance space in front of the blade so shavings do not clog. Drill and tap a hole for the clamping stud.
Công cụ cần thiết:
 Máy phay
 Bộ giũa
 Bộ ta-rô và bàn renKích thước chưa rõ
3
3
Make the blade and the clamping stud
Make the blade and the clamping stud
Make a triangular blade: a back, and two converging faces meeting in the cutting edge, longer than the cone. Turn a threaded stud with a knurled head for the finger.
Vật liệu cho bước này:
Kim loại chưa rõ1 as requiredCông cụ cần thiết:
Bộ giũaMáy tiện kim loạiBộ ta-rô và bàn renKích thước chưa rõ4
4
Clamp the blade and sharpen
Clamp the blade and sharpen
Lay the blade with one face on the seat and the other against the arms, edge projecting into the bore, and screw the stud down. Twist a pencil in the cone. When the part of the edge that meets the lead wears, slide the blade along; when that is used up, turn it end for end.
Công cụ cần thiết:
 Kính bảo hộ
Vật liệu
1- 1 as requiredTạm thời
Bản thiết kế này làm ra
Blueprint liên quan
Các blueprint này chia sẻ kiến thức — kỹ thuật, vật liệu hoặc nguyên tắc
CC0 Phạm vi công cộng
Bản thiết kế này được phát hành theo CC0. Bạn tự do sao chép, sửa đổi, phân phối và sử dụng cho bất kỳ mục đích nào mà không cần xin phép.
Hỗ trợ nhà sáng tạo bằng cách mua sản phẩm qua bản thiết kế, nơi họ nhận Hoa hồng nhà sáng tạo do nhà bán hàng đặt, hoặc tạo phiên bản mới và kết nối trong bản thiết kế riêng để chia sẻ doanh thu.