Hợp tác
NGHỆ THUẬT
LÀM ĐẸP VÀ SỨC KHỎE
THỦ CÔNG
VĂN HÓA VÀ LỊCH SỬ
GIẢI TRÍ
MÔI TRƯỜNG
THỰC PHẨM VÀ ĐỒ UỐNG
KỸ THUẬT NGƯỢC
KHOA HỌC
THỂ THAO
CÔNG NGHỆ
THIẾT BỊ ĐEO
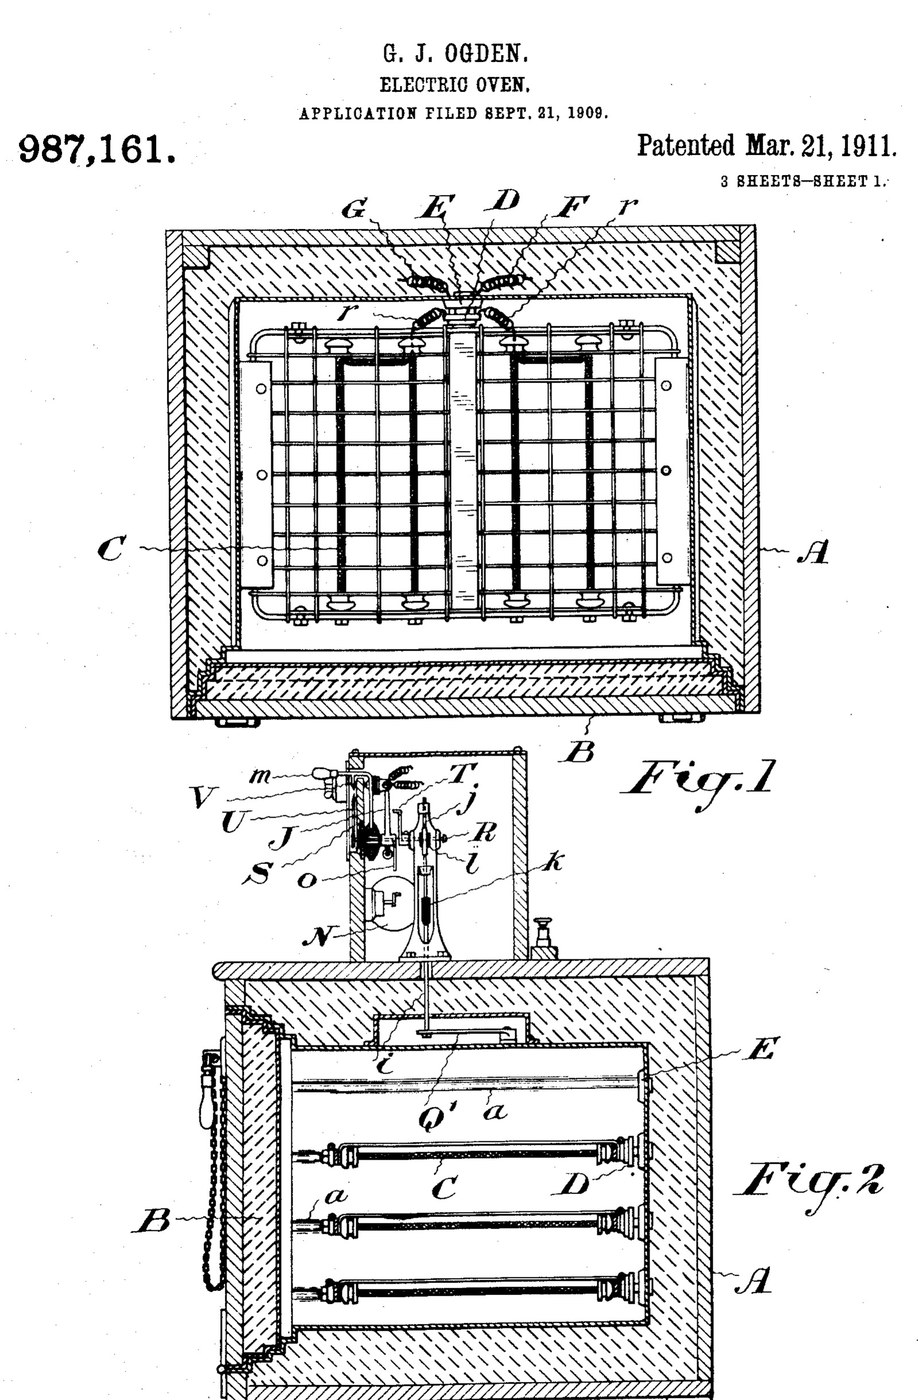


Oven: Insulated Electric Oven with Plug-In Grid Heaters and a Thermostat (Ogden, US 987,161, 1911)
An electric oven built to waste as little heat as possible: a double-walled, packed box with a packed door that seals like a strong-room door. Grid-shaped heating elements slide into grooves in the walls and plug into sockets at the back, and the food rests on them. A thermostat cuts the current when the set temperature is reached and switches it on again as the oven cools.
Result: an oven that bakes, roasts or dries at a set temperature with any number of heating grids.
Source: G. J. Ogden, US 987,161 (1911). Unknown: sizes, metals, packing and temperatures. Picture: the patent drawing.
Nâng cao
Unknown
Hướng dẫn
1
1
Build the insulated casing and door
Build the insulated casing and door
Make the oven chamber as a double-walled casing with packing between the walls, and grooves on the inner side walls to take the heating grids. Fit a door that closes like a fire-proof vault door, also packed, so the casing seals closely. Ours: mild steel sheet. Not given: sizes, the packing.
Vật liệu cho bước này:
 Tấm thép mềm1 inner and outer walls, door
 Vật liệu cách điện chưa rõ1 packing
Công cụ cần thiết:
 Kéo cắt tôn
 Máy khoan bàn
 Kích thước chưa rõ
2
2
Make the plug-in heating grids
Make the plug-in heating grids
Make heating elements in the form of grids that slide into the grooves and on which the food can rest. Fix a porcelain plug to each, carrying spring fingers that push into a socket with matching spring fingers in the back wall. Wire the sockets so all the elements are in parallel; use as many as the temperature and amount of food need. Ours: nichrome wire. Not given: the element type.
Vật liệu cho bước này:
 Dây nicrom1 heating grids
 Vật liệu không rõ1 porcelain plugs and sockets
 Dây thép lò xo1 spring fingers
 Dây đấu nối1 circuit wiring
Công cụ cần thiết:
 Mỏ hàn
3
3
Fit the thermostat control
Fit the thermostat control
Put a thermostat that bends with heat inside the oven, working a contact finger that plays between two contacts a few degrees above and below the set temperature. A switch-changing device, a small rotary motor, throws the main switch off and on as the finger touches one contact or the other. Mount a setting arm with a pointer over a scale marked in degrees, and a second pointer driven by the thermostat. Add a hand switch to turn the current on or off independently, and a lamp with its own switch to light the oven. Ours: a bimetal strip, toggle switches. Not given: temperatures.
Vật liệu cho bước này:
 Dải lưỡng kim1 thermostat
 Động cơ điện1 switch-changing motor
 Công tắc gạt3 main, hand and lamp switches
 Kim loại chưa rõ1 contacts, arm, scaleVật liệu không rõ1 incandescent oven lamp
Công cụ cần thiết:
Mỏ hàn Nhiệt kế
Vật liệu
10- 1 inner and outer walls, doorTạm thời
- 1 packingTạm thời
- 1 heating gridsTạm thời
- 1 incandescent oven lampTạm thời
- 1 spring fingersTạm thời
- Tạm thời
- 1 thermostatTạm thời
- 1 switch-changing motorTạm thời
- Tạm thời
- 1 contacts, arm, scaleTạm thời
Vật liệu bản thiết kế liên kết

Bản thiết kế này làm ra

CC0 Phạm vi công cộng
Bản thiết kế này được phát hành theo CC0. Bạn tự do sao chép, sửa đổi, phân phối và sử dụng cho bất kỳ mục đích nào mà không cần xin phép.
Hỗ trợ nhà sáng tạo bằng cách mua sản phẩm qua bản thiết kế, nơi họ nhận Hoa hồng nhà sáng tạo do nhà bán hàng đặt, hoặc tạo phiên bản mới và kết nối trong bản thiết kế riêng để chia sẻ doanh thu.