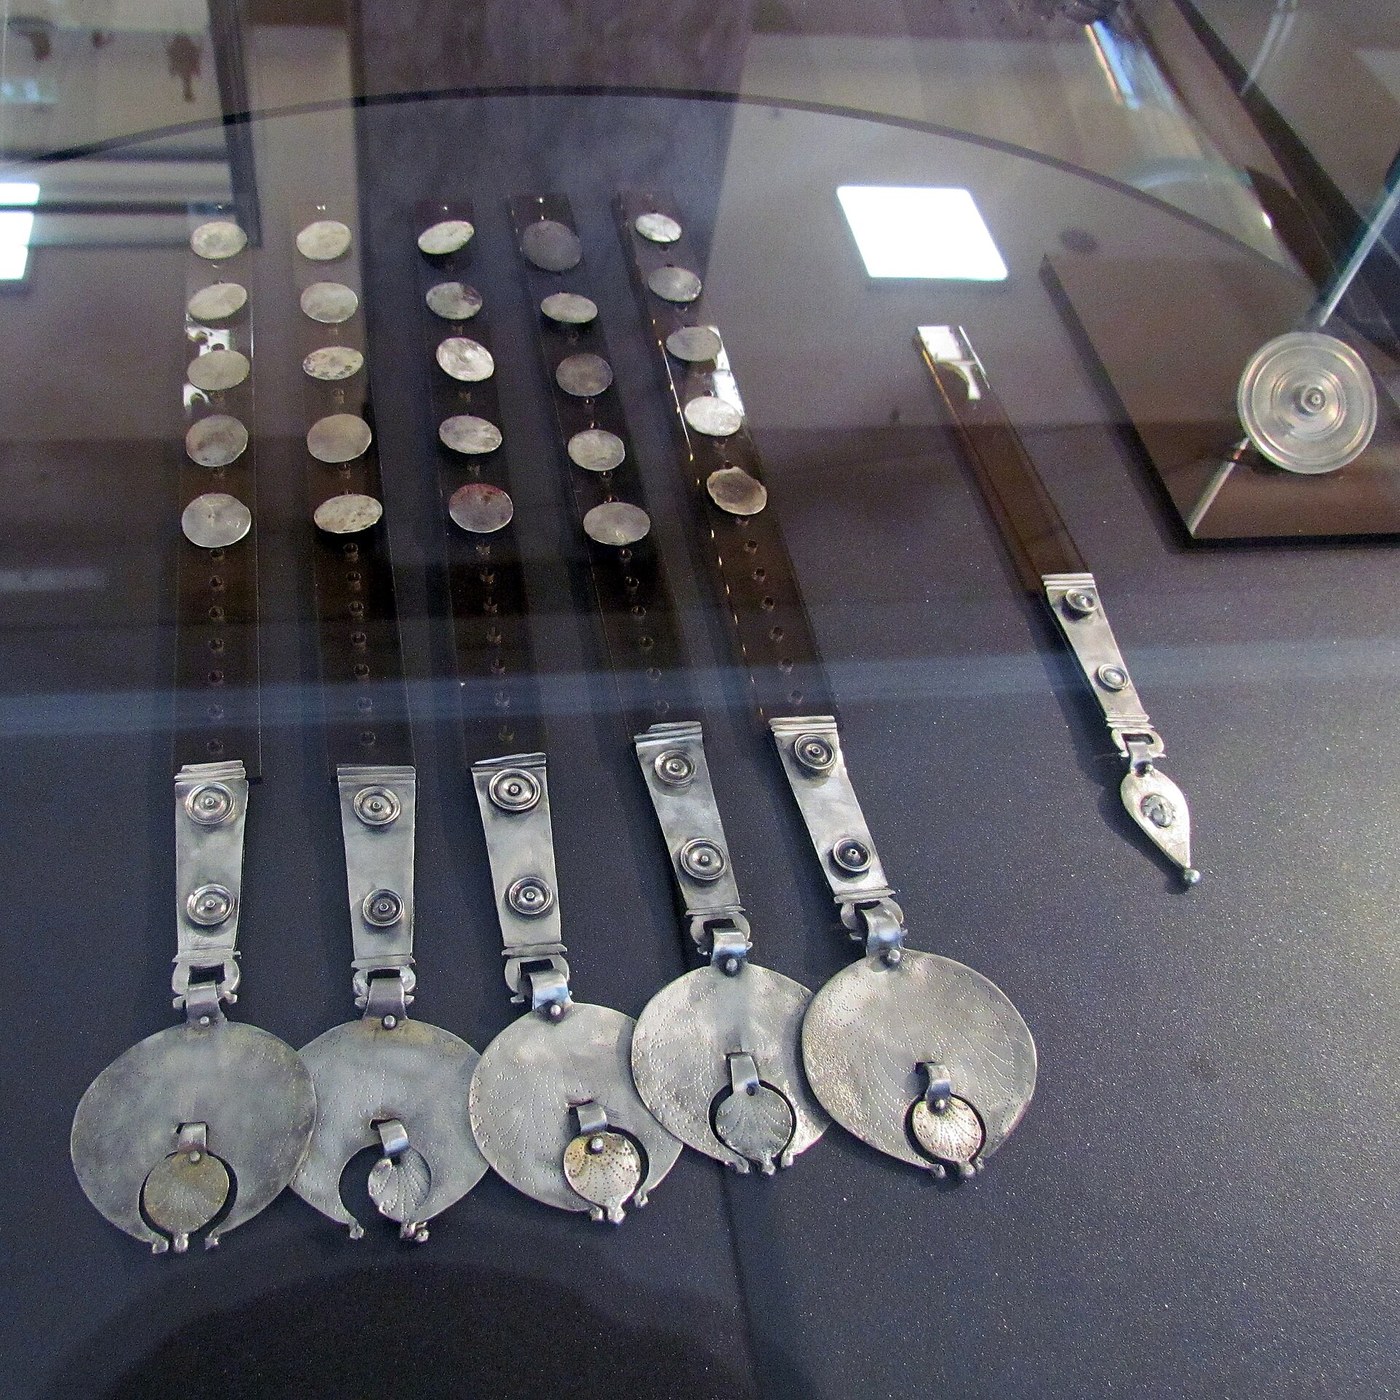


Roman Belt Fitting
A Roman soldier's belt was not a way of holding up trousers. The cingulum militare was the visible badge of military status — the thing that said, at a glance and across a street, that the man wearing it was a soldier. Its plates were cast, tinned or silvered, engraved and inlaid, and riveted to the leather in a row.
This blueprint makes the fittings, not the belt: a set of cast copper-alloy plates, surface-finished and riveted to a leather strap. It is a small casting and cold-working exercise that ends in an object with a genuine archaeological form behind it.
Distinct from the leather belts and buckles already on Youblob — those are leatherwork with a fastening. Here the leather is the backing and the metalwork is the subject.
Hướng dẫn
Work from a published find, not from imagination
Work from a published find, not from imagination
Choose a documented plate type from an excavation report or a museum catalogue and copy its dimensions. Plates of the mid-first century AD are the best recorded; inventing a "Roman-looking" plate produces an object that teaches nothing.
Draw the plate at full size
Draw the plate at full size
Draw the plate at 1:1 — typically a rectangle around 50 x 45 mm with rivet holes at the corners. Everything downstream is cut to this drawing.
Công cụ cần thiết:
 Thước kẻ
Carve a pattern in wood or wax
Carve a pattern in wood or wax
Carve a master pattern slightly oversize to allow for shrinkage. This is the piece the mould is taken from, so every fault in it repeats in every plate.
Vật liệu cho bước này:
 Khối gỗ đoạn để chạm khắc1 cái
Make a two-part sand mould
Make a two-part sand mould
Press the pattern into casting sand to make a two-part mould, then cut a sprue and vents. Roman fittings were cast in two-part moulds and by lost-wax, and either route is authentic.
Vật liệu cho bước này:
 Cát đúc2 kg
Set up for the pour properly
Set up for the pour properly
Work outdoors or with strong ventilation, in leather boots and gloves and a face shield, with dry tools and a clear path from furnace to mould. Molten metal and any trace of moisture react explosively — every mould and tool must be bone dry.
Công cụ cần thiết:
 Găng tay da
 Kính bảo hộ kín
Melt and pour the copper alloy
Melt and pour the copper alloy
Melt brass or bronze in a crucible and pour steadily in one continuous stream. Roman belt plates are copper alloys of varying composition — brass, bronze and leaded mixtures all occur.
Vật liệu cho bước này:
 Phế liệu đồng thau200 g
Break out and cut off the sprue
Break out and cut off the sprue
Let the casting cool fully before opening the mould, then saw off the sprue and file the stub flush.
Công cụ cần thiết:
 Bộ giũa kim
File and flatten the plate
File and flatten the plate
File the faces flat and true up the edges. A cast plate always comes out with a rough face; the finish is filed on, not cast in.
Drill the rivet holes
Drill the rivet holes
Drill the corner holes to match your rivets and countersink them lightly on the back so the rivet heads sit down into the leather.
Tin the surface
Tin the surface
Tin the front face to a bright silvery finish. First-century belt fittings were regularly tinned or silvered — the belts were meant to catch the light, and a plain brown plate is the wrong object.
Engrave the design
Engrave the design
Engrave a geometric or vegetal pattern with a graver, cutting a clean V-section groove. Cut slowly and let the tool do the work; a slipped graver cannot be undone on a tinned surface.
Fill the engraving with a dark inlay
Fill the engraving with a dark inlay
Fill the cut lines with a black inlay and level it back to the surface. The Roman material was niello — a black silver-sulphide paste — and the effect is a bright plate carrying a black-line design.
Cut and prepare the leather strap
Cut and prepare the leather strap
Cut a strap of vegetable-tanned leather to the width of your plates and mark the rivet positions in a row along it.
Vật liệu cho bước này:
 Dải da thuộc thảo mộc1 cái
Rivet the plates to the leather
Rivet the plates to the leather
Punch the holes, push the rivets through from the front and peen them over on the back against a steel block. Riveting through pre-drilled holes is exactly how the originals are attached.
Check the belt still bends
Check the belt still bends
Flex the finished strap. Plates set too close make a rigid band that will not sit at the waist — the gaps between plates are what let a metal-covered belt behave like a belt.
History & Context
History & Context
A badge, not a fastening. The cingulum militare was worn as a mark of military status by soldiers and officials, and losing the right to wear it was itself a punishment. The decoration is doing social work: this is a uniform component in an army that had no uniform in the modern sense.
How they were actually made. Plates were produced by casting — lost-wax or two-part mould — or by embossing sheet, or a combination of both, in copper alloys of varying composition. In the first century AD in particular they were regularly tinned or silvered, then engraved with geometric or vegetal designs, and the engraved lines filled with niello or enamel. Fixing to the leather was by rivets driven through pre-drilled holes.
The apron. The belt was often completed by a hanging apron of several leather straps, the pteryges, each covered in a row of riveted metal fittings. It offered essentially no protection; it hung, it swung, and it made a noise when the wearer moved. It appears to have been decorative and demonstrative, which is a legitimate function.
Dating by belt plate. Belt fitting styles changed fast enough that archaeologists use them to date deposits — Tiberian to Neronian, or Claudian to Flavian, roughly the middle and later first century AD. A soldier's belt is one of the more precisely datable objects on a Roman military site, which is why so much has been written about a strap.
Where the finds come from. Most surviving fittings come from military sites along the Rhine and Danube frontiers and in Britain, often as single plates lost from the strap. Complete belts are rare; the reconstruction of how a set was arranged is largely inferred from tombstone reliefs, which are pictures rather than objects — a limit worth stating whenever a "typical" Roman belt is described.
Vật liệu
4- Tạm thời
- 2 kgTạm thời
- 200 gTạm thời
- Tạm thời
Công cụ yêu cầu
4- Tạm thời
- Tạm thời
- Tạm thời
- Tạm thời
Bản thiết kế này làm ra

Blueprint liên quan
Các blueprint này chia sẻ kiến thức — kỹ thuật, vật liệu hoặc nguyên tắc
CC0 Phạm vi công cộng
Bản thiết kế này được phát hành theo CC0. Bạn tự do sao chép, sửa đổi, phân phối và sử dụng cho bất kỳ mục đích nào mà không cần xin phép.
Hỗ trợ nhà sáng tạo bằng cách mua sản phẩm qua bản thiết kế, nơi họ nhận Hoa hồng nhà sáng tạo do nhà bán hàng đặt, hoặc tạo phiên bản mới và kết nối trong bản thiết kế riêng để chia sẻ doanh thu.