Lựa chọn và gia vị gỗ cứng để chế biến gỗ
Mỗi món đồ nội thất cao cấp, mỗi chiếc bát được chạm khắc bằng tay, mỗi nhà kho có khung gỗ đều bắt đầu bằng một hành động đơn giản: chọn một cái cây và biến gỗ sống xanh tươi của nó thành gỗ ổn định, có thể sử dụng được. Sự chuyển đổi này - gia vị - là bước quan trọng nhất và bị bỏ qua nhất trong chế biến gỗ. Gỗ kém chất lượng bị cong vênh, nứt, tách và phá hủy hàng tháng trời được gia công cẩn thận. Gỗ được xử lý đúng cách sẽ ổn định trong nhiều thế kỷ.
Gỗ xanh (mới khai thác) chứa 30-200% độ ẩm tính theo trọng lượng, tùy thuộc vào loài và mùa. Gia vị làm giảm tỷ lệ này xuống còn 6-12% - độ ẩm cân bằng để sử dụng trong nhà ở hầu hết các vùng khí hậu. Sự mất độ ẩm này làm cho gỗ co lại và vì nó co lại theo thớ nhiều hơn là dọc theo thớ gỗ, quá trình sấy tạo ra ứng suất bên trong có thể làm nứt hoặc cong vênh gỗ. Kiểm soát tốc độ mất độ ẩm là toàn bộ nghệ thuật nêm gia vị.
Sấy khô trong không khí (gia vị tự nhiên) là phương pháp lâu đời nhất và đáng tin cậy nhất. Nó đòi hỏi sự kiên nhẫn — khoảng một năm cho mỗi tấm ván dày 25 mm đối với gỗ cứng — nhưng tạo ra gỗ xẻ ổn định, được bảo quản tốt mà không gặp vấn đề về cứng hóa vỏ có thể xảy ra khi sấy trong lò.
Hướng dẫn
Chọn và đốn cây
Chọn và đốn cây
Đối với đồ nội thất và đồ gỗ mỹ nghệ, hãy chọn những cây có thớ thẳng, ít phân nhánh ở phần thân dưới. Tránh những cây có thớ xoắn ốc nhìn thấy được (hình vỏ cây xoắn quanh thân cây), nạc nặng (tạo ra gỗ phản ứng với hiện tượng khô khó lường) hoặc có dấu hiệu bị bệnh và thối.
Thời điểm tốt nhất để đốn cây để lấy gỗ là cuối mùa thu đến đầu mùa xuân — khi hàm lượng nhựa thấp nhất và gỗ sẽ bắt đầu khô ngay lập tức. Gỗ rụng vào mùa hè có độ ẩm cao hơn và dễ bị côn trùng tấn công và bị nấm mốc hơn. Chặt cây một cách an toàn bằng cách sử dụng kỹ thuật cưa máy hoặc dụng cụ cầm tay thích hợp và bẻ (cắt) thân cây thành khúc gỗ có chiều dài phù hợp với phương pháp cưa của bạn.
Chuyển nhật ký thành bảng
Chuyển nhật ký thành bảng
Các khúc gỗ phải được chuyển đổi thành ván kịp thời — toàn bộ khúc gỗ sẽ bị kiểm tra kỹ lưỡng ở khâu cuối và ứng suất bên trong trong vòng vài tuần sau khi chặt hạ. Đối với các dụng cụ cầm tay, phương pháp truyền thống là tách dọc theo thớ bằng nêm và dăm), phương pháp này tạo ra những tấm ván chắc chắn nhất có thể vì không có thớ nào bị cắt. Đối với các dụng cụ điện, máy cưa xích hoặc máy cưa vòng di động sản xuất các tấm ván xẻ phẳng.
Cắt các tấm ván đến độ dày cuối cùng cộng với dung sai 3-5 mm cho phép co ngót và làm sạch. Độ dày tiêu chuẩn: 25mm (1 inch) cho đồ nội thất, 50mm (2 inch) cho mặt bàn làm việc và kết cấu nặng. Cưa xuyên suốt (cưa trơn) là đơn giản nhất - cắt khúc gỗ từ bên này sang bên kia, tạo ra hỗn hợp các tấm xẻ phẳng và xẻ một phần tư. Ván xẻ tứ giác (vòng năm vuông góc với mặt) ổn định hơn nhưng đòi hỏi nhiều chất thải hơn.
Công cụ cần thiết:
 Wax Marker
 Precision Ruler
Bịt kín hạt cuối cùng ngay lập tức
Bịt kín hạt cuối cùng ngay lập tức
Hạt cuối khô nhanh hơn 10-15 lần so với hạt mặt. Việc sấy khô không đồng đều này tạo ra ứng suất nghiêm trọng ở các đầu tấm, gây ra hiện tượng kiểm tra phần cuối (các vết nứt sâu tỏa ra từ các đầu). Bịt kín thớ cuối ngay sau khi cưa là bước hiệu quả nhất để ngăn ngừa các khuyết tật do sấy khô.
Bôi một lớp dày chất bịt kín thớ cuối lên cả hai đầu của mỗi tấm ván trong vòng vài giờ sau khi cưa. Chất bịt kín truyền thống: sáp nóng chảy (paraffin hoặc sáp ong), sơn latex (lớp phủ dày) hoặc chất bịt kín hạt thương mại. Lớp phủ không cần phải tồn tại lâu dài - nó chỉ cần làm chậm quá trình mất độ ẩm qua các đầu cho đến khi tấm ván đạt đến trạng thái cân bằng. Che phủ hoàn toàn phần cuối, bao gồm mọi phần kiểm tra đã bắt đầu.
Công cụ cần thiết:
Wax MarkerXếp chồng và dán các bảng
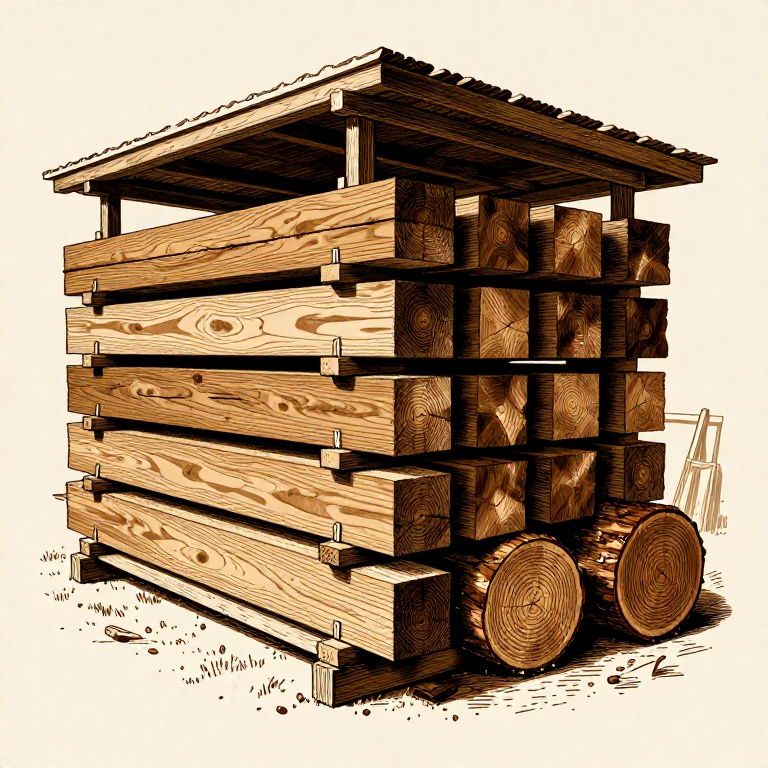
Xếp chồng và dán các bảng
Việc xếp chồng đúng cách là điều cần thiết để sấy khô đều. Đặt các tấm ván nằm ngang trên nền bằng phẳng (khối bê tông, gỗ nặng) cách mặt đất ít nhất 30 cm để không khí lưu thông. Giữa mỗi lớp ván, đặt các miếng dán — các dải gỗ mỏng, khô (có tiết diện khoảng 20x20mm) — cách đều nhau (cách nhau 45-60 cm).
Quy tắc quan trọng: tất cả các miếng dán phải nằm ngay phía trên nhau trong mỗi lớp (để truyền trọng lượng đều và tránh bị cong). Miếng dán phải có độ dày đồng đều (miếng dán không đều sẽ gây xoắn). Thùng rác phải được bảo vệ khỏi mưa và nắng trực tiếp - lý tưởng là mái nghiêng đơn giản. Ánh nắng đầy đủ làm tăng tốc độ làm khô bề mặt và gây ra hiện tượng kiểm tra; mưa lại làm ướt bề mặt và tạo điều kiện cho nấm bám màu. Việc lưu thông không khí tốt xung quanh tất cả các mặt của ngăn xếp là điều cần thiết.
Công cụ cần thiết:
Precision RulerCân chồng và chờ đợi
Cân chồng và chờ đợi
Đặt các vật nặng lên trên chồng — khối bê tông, đá lớn hoặc gỗ nặng. Trọng lượng này hạn chế các tấm ván không bị uốn cong và xoắn khi chúng khô. Áp lực từ trọng lượng, kết hợp với các miếng dán giữ cho tấm ván phẳng, tạo ra gỗ khô thẳng nhất có thể.
Quy tắc chung đối với gỗ cứng sấy khô trong không khí: một năm cho mỗi tấm có độ dày 25mm (1 inch). Một tấm gỗ sồi 50mm mất khoảng hai năm để đạt được trạng thái cân bằng. Gỗ mềm khô nhanh hơn (khoảng một nửa thời gian). Kiểm tra tiến độ bằng cách cân bảng mẫu định kỳ — khi trọng lượng ổn định sau hai lần kiểm tra hàng tháng liên tiếp, gỗ ở độ ẩm cân bằng.
Kiểm tra độ ẩm và thích nghi
Kiểm tra độ ẩm và thích nghi
Trước khi sử dụng gỗ xẻ sấy khô trong không khí, hãy kiểm tra độ ẩm. Máy đo độ ẩm dạng chốt (hai đầu dò kim loại ép vào gỗ) là công cụ tiêu chuẩn - nhằm đạt được độ ẩm 8-12% cho đồ nội thất trong nhà, 12-16% khi sử dụng ngoài trời. Nếu không có thước đo, hãy cắt một mẫu thử nhỏ từ giữa tấm ván, cân, sấy khô ở nhiệt độ 105°C cho đến khi trọng lượng ổn định và tính: MC% = (trọng lượng ướt - trọng lượng khô) / trọng lượng khô × 100.
Trước khi xây dựng, hãy mang gỗ xẻ khô vào xưởng hoặc tòa nhà nơi sản phẩm hoàn thiện sẽ tồn tại. Xếp chồng lên nhau một cách lỏng lẻo (không dán) trong 2-4 tuần. Giai đoạn thích nghi này cho phép gỗ đạt được độ ẩm cân bằng cụ thể của môi trường đó. Gỗ sống trong một ngôi nhà có hệ thống sưởi cần MC thấp hơn gỗ dành cho nhà xưởng không có hệ thống sưởi. Bỏ qua việc thích nghi là nguyên nhân phổ biến nhất gây ra hiện tượng hở các mối nối và nứt các tấm trên đồ nội thất thành phẩm.
Công cụ cần thiết:
Precision RulerCC0 Phạm vi công cộng
Bản thiết kế này được phát hành theo CC0. Bạn tự do sao chép, sửa đổi, phân phối và sử dụng cho bất kỳ mục đích nào mà không cần xin phép.
Hỗ trợ nhà sáng tạo bằng cách mua sản phẩm qua bản thiết kế, nơi họ nhận Hoa hồng nhà sáng tạo do nhà bán hàng đặt, hoặc tạo phiên bản mới và kết nối trong bản thiết kế riêng để chia sẻ doanh thu.