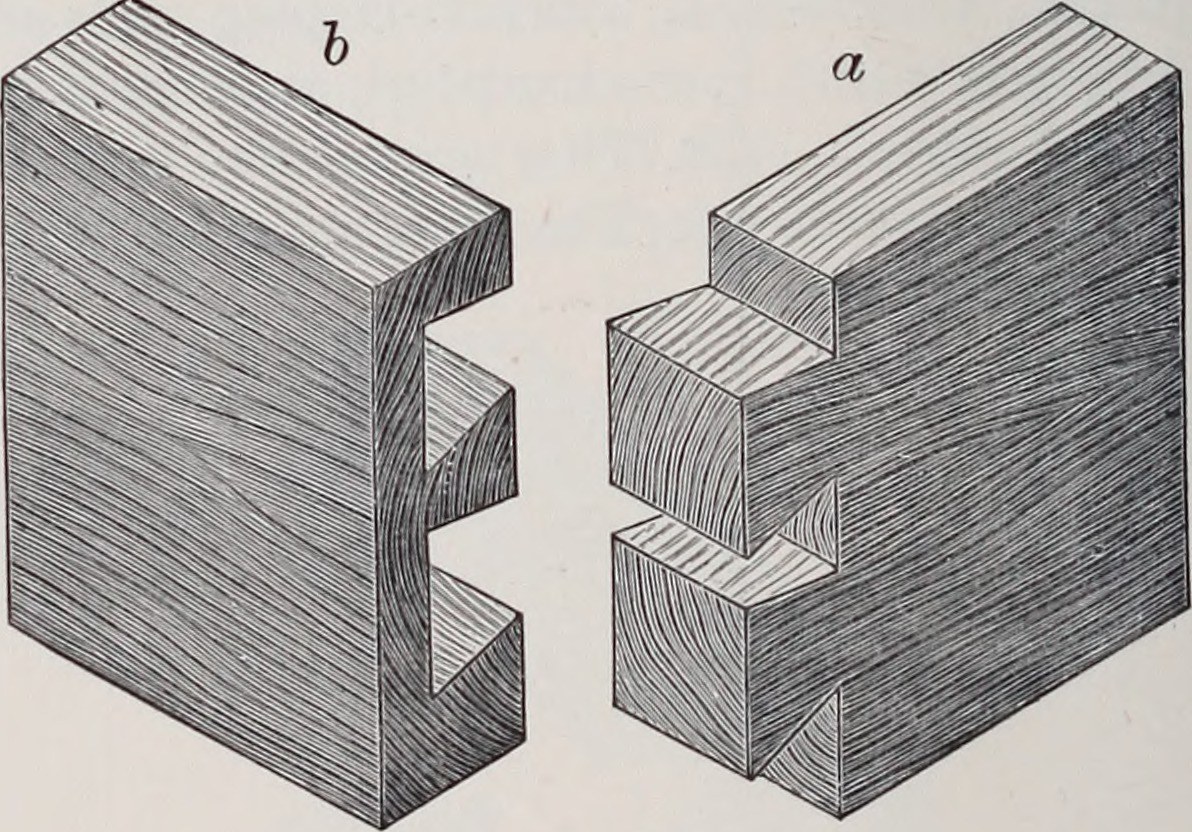


Through Dovetail Joint
A through dovetail is a joint that cannot be pulled apart in the direction it is designed to resist. The tails flare outward, the pins between them flare the other way, and once assembled the wedge geometry means the only way out is the way it went in. Glue helps, but a well-cut dovetail holds without it — which is why drawers cut this way in the 1700s are still tight today, long after the animal glue has given up.
The angle is the part people get wrong. Too shallow and the joint loses its mechanical grip and may as well be a box joint. Too steep and the corners of the tails become fragile short grain that snaps off during assembly. The traditional answer is a ratio, not a degree: 1:8 for hardwoods, 1:6 for softwoods — steeper in softwood because its fibres crush more readily and need the extra bite.
Cut the tails first, then use them to mark the pins. Every accurate dovetail comes from transferring a real edge rather than measuring twice.
Hướng dẫn
Square and mark the two boards
Square and mark the two boards
Plane both board ends dead square. Mark the inside face and top edge of each — every later measurement references those two faces, and a joint referenced off the wrong face will not close.
Vật liệu cho bước này:
 Ván sồi (đỏ)2 cái
Set the gauge to the mating board's thickness
Set the gauge to the mating board's thickness
Set the marking gauge to the exact thickness of the other board. In a through dovetail both surfaces finish flush, so each baseline equals the mating piece's thickness.
Công cụ cần thiết:
 Cữ vạch
Scribe the baselines all round
Scribe the baselines all round
Scribe the baseline around both faces and both edges of each board. A knifed line severs the surface fibres, so the chisel drops into it and the shoulder comes out crisp.
Công cụ cần thiết:
Cữ vạchLay out the tails at 1:8
Lay out the tails at 1:8
On the tail board, mark a 1:8 slope — 8 units along, 1 unit across, about 7.1°. That is the hardwood ratio. For softwood use 1:6, roughly 9.5°, because softwood fibres crush more easily and need a steeper wedge to grip.
Space the tails and mark the waste
Space the tails and mark the waste
Lay out three tails with half-pins at each edge. Shade every waste area now, before any sawing. Cutting the wrong side of a line is the single most common way a dovetail dies.
Saw the tails down to the baseline
Saw the tails down to the baseline
Saw on the waste side of each line, stopping exactly at the baseline. Keep the saw plate vertical in one axis and on the slope in the other — the eye tracks one angle far better than two.
Công cụ cần thiết:
 Cưa lưng mộng đuôi én
Remove the bulk waste with a coping saw
Remove the bulk waste with a coping saw
Cut across between the saw kerfs with the coping saw, staying 2 mm above the baseline. Chisel the last 2 mm — a coping saw cannot leave a shoulder clean enough to glue.
Công cụ cần thiết:
 Cưa lọng tay
Pare the shoulders to the line
Pare the shoulders to the line
Chisel down to the baseline from both faces, working half the thickness from each side. Chiselling straight through from one face blows out the fibres on the far side.
Công cụ cần thiết:
 Bộ đục gỗ
 Vồ chạm khắc
Transfer the tails onto the pin board
Transfer the tails onto the pin board
Stand the finished tail board on the end grain of the pin board, aligned to the baseline, and knife around every tail. Transfer, never measure. This is what makes the joint fit — the pins are copied from the tails that actually exist, not from the tails you intended to cut.
Square the marks down the face
Square the marks down the face
Carry each knifed mark square down the face to the baseline, and shade the waste between the pins. The pin waste is the mirror of the tail waste — check it twice before sawing.
Saw the pins on the waste side
Saw the pins on the waste side
Saw down to the baseline, leaving the knife line intact on the pin. Half a line of extra material makes a tight joint; half a line removed makes a gap you cannot close.
Công cụ cần thiết:
Cưa lưng mộng đuôi énChop out the pin waste
Chop out the pin waste
Coping-saw the bulk away, then pare to the baseline from both faces as before. Undercut the middle very slightly so the shoulder meets at the outer edges — that is what gives a seamless outside line.
Công cụ cần thiết:
Cưa lọng tayBộ đục gỗTest fit once
Test fit once
Push the joint together by hand no more than a third of the way, and read where it binds. Every full dry assembly compresses the fibres slightly, so a joint tested repeatedly ends up loose.
Glue and drive home
Glue and drive home
Brush hide glue onto the pin faces and drive the joint home with a mallet and a scrap block. Hide glue is period-correct, gives long open time, and — unlike modern PVA — a future repairer can reverse it with heat and moisture.
Vật liệu cho bước này:
 Keo da động vật50 ml
Công cụ cần thiết:
Vồ chạm khắcPlane the proud end grain flush
Plane the proud end grain flush
Once dry, plane or sand the slightly proud tail and pin ends flush, working inward from the edges. Sand 120 then 220 grit.
Vật liệu cho bước này:
 Giấy nhám1 tờGiấy nhám1 tờ
History & Context
History & Context
Why the wedge works. A dovetail resists tension in one direction mechanically, through geometry rather than adhesive. Pull a drawer front and the flared tails simply cannot pass the pins. That is why the joint went on the front of drawers, where the handle applies exactly that load, thousands of times a year, for centuries.
The ratio, and the argument about it. 1:8 for hardwood and 1:6 for softwood are the conventional numbers, and the reasoning is real: a steep angle on brittle hardwood leaves short grain at the tail corners that snaps during assembly, while a shallow angle in soft, crushable fibre loses grip. But plenty of experienced makers regard the distinction as overstated and cut everything at one angle by eye. Both positions have good work behind them. Treat the ratios as a well-founded starting point, not a rule of physics.
Through, and its relatives. A through dovetail shows end grain on both faces — honest, and traditionally used where the joint would be seen or did not need hiding, as in carcase and box work. A half-blind dovetail stops short so nothing shows on the front, which is why drawer fronts usually use it while drawer backs use through dovetails. A secret mitred dovetail hides the joint completely and is largely a demonstration of skill.
Tails first. Cutting tails first and transferring them to the pin board is the dominant tradition, though pins-first has its advocates. The reason tails-first persists is that transferring from a physical edge cancels your own sawing errors: whatever angle you actually cut becomes the angle you mark. Measuring both halves independently means two sets of errors that have to agree, and they rarely do.
Hide glue and repairability. Hide glue was the standard until synthetic adhesives arrived, and it has a property modern glue lacks — it can be released with heat and moisture. A 250-year-old chest can be taken apart, repaired and reassembled. Joints glued with modern PVA generally cannot. When you see furniture conservators choosing hide glue today, repairability is why.
Vật liệu
4- 2 cáiTạm thời
- 50 mlTạm thời
- 1 tờTạm thời
- 1 tờTạm thời
CC0 Phạm vi công cộng
Bản thiết kế này được phát hành theo CC0. Bạn tự do sao chép, sửa đổi, phân phối và sử dụng cho bất kỳ mục đích nào mà không cần xin phép.
Hỗ trợ nhà sáng tạo bằng cách mua sản phẩm qua bản thiết kế, nơi họ nhận Hoa hồng nhà sáng tạo do nhà bán hàng đặt, hoặc tạo phiên bản mới và kết nối trong bản thiết kế riêng để chia sẻ doanh thu.