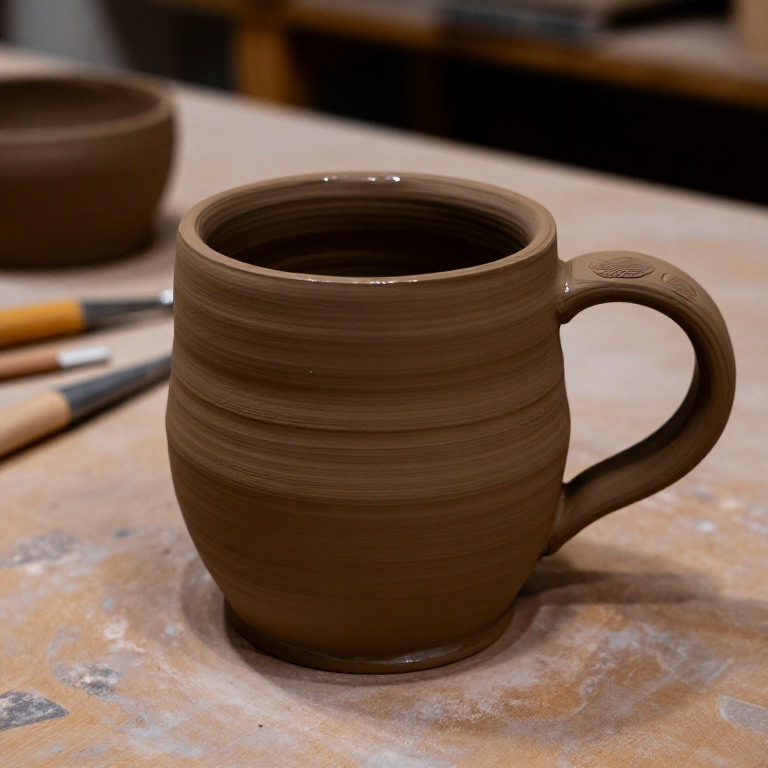


Hand-Building a Ceramic Mug with Slab Construction
Imiyalelo
Preparing and Rolling Clay Slabs
Preparing and Rolling Clay Slabs
Wedging the Clay
Before building, wedge the clay for 3-5 minutes: push the clay forward with the heel of your palm, fold it back, rotate 90°, repeat. This serves two purposes:
- Removes air bubbles — trapped air expands during firing and can crack or explode the piece
- Creates uniform consistency — eliminates hard and soft spots
Rolling Slabs
- Place wedged clay on canvas or newspaper.
- Place 6mm guide sticks on each side of the clay.
- Roll the clay firmly and evenly with the rolling pin, resting it on the guide sticks. The guides ensure uniform thickness.
- Roll in multiple directions (rotate clay 90° periodically) for even thickness.
- You need two slabs: one for the body/wall (approx. 24cm × 10cm) and one for the base (large enough to cut a circle 7-8cm diameter).
Resting the Slabs
Let the rolled slabs rest for 15-30 minutes until they reach leather-hard stage — firm enough to handle without distorting but still flexible. This prevents slumping when you form the cylinder.
Izinto zokwakha zalesi sinyathelo:
 Ubumba bezitsha bomlilo ophansi1 kg
 I-slip yobumba (ubumba obumanzi)1 small container
Amathuluzi adingekayo:
 Isigqiki sokhuni sokucindezela inhlama
 Izinduku eziqondisayo zokhuni (izimbili)
 Isethi yentambo nommese wobumba
 Ithuluzi lokuklwebha ubumba
 Isethi yezinsipho zobumba
 Indawo yokusebenza ye-canvas yobumba
 Isithando
Assembling the Mug Body
Assembling the Mug Body
Cutting the Pieces
- Wall: Cut a rectangle approximately 24cm × 10cm (the 24cm wraps around to form a cylinder of ~7.5cm diameter). Height of 10cm gives a standard mug after shrinkage.
- Base: Cut a circle 7-8cm diameter. Use a cup or compass as a template.
- Handle: Roll a coil approximately 12cm long × 1.5cm diameter, or cut a strip 12cm × 2cm × 6mm from the slab.
Score-and-Slip Joining
This is the most critical technique in slab construction. Clay pieces will NOT bond just by pressing together — they'll crack apart during drying or firing.
- Score: Use a fork or scoring tool to scratch a crosshatch pattern on both surfaces to be joined.
- Slip: Paint liquid slip (wet clay) on both scored surfaces.
- Press: Firmly press the pieces together and blend the seam with your finger or a tool.
Forming the Cylinder
- Score-and-slip the two short ends of the wall rectangle.
- Wrap the slab into a cylinder, overlapping the scored edges by ~1cm.
- Press and blend the seam inside and outside until invisible.
- Score-and-slip the bottom edge of the cylinder and the base circle.
- Press the cylinder onto the base. Blend the interior seam with your finger — reinforcing this joint is critical to prevent leaks.
Izinto zokwakha zalesi sinyathelo:
Ubumba bezitsha bomlilo ophansi1 kgI-slip yobumba (ubumba obumanzi)1 small containerAttaching the Handle and Finishing
Attaching the Handle and Finishing
Handle Attachment
- Gently curve the handle piece into a comfortable C or D shape.
- Mark where the handle will attach on the mug wall — typically 1cm below the rim (top) and 3cm above the base (bottom).
- Score-and-slip all four contact points (two on the handle ends, two on the mug wall).
- Press the handle firmly onto the mug. Blend the joints smoothly.
- Support the handle from the inside of the mug with your other hand while pressing — otherwise you'll deform the wall.
Finishing Touches
- Smooth all surfaces with a damp sponge. Pay special attention to seams — visible seams are structural weak points.
- Check the rim is level. Trim with a knife if needed, then smooth with the sponge.
- Ensure the base is flat so the mug sits without wobbling.
- Optionally, scratch your initials into the base (a maker's mark).
Drying (1-2 weeks)
The mug must dry completely and slowly before firing:
- Place on a wire rack or paper to allow air circulation under the base.
- Cover loosely with plastic for the first 2-3 days to slow initial drying (prevents cracking from uneven drying).
- Remove plastic and air-dry for another 5-10 days.
- The mug is ready for bisque firing when it's bone dry — it will be lighter in color, noticeably lighter in weight, and cool to the touch (wet clay feels cooler than room temperature).
Izinto zokwakha zalesi sinyathelo:
I-slip yobumba (ubumba obumanzi)1 small containerUbumba bezitsha bomlilo ophansi1 kgBisque Firing, Glazing, and Glaze Firing
Bisque Firing, Glazing, and Glaze Firing
Bisque Firing (Cone 06, ~999°C / 1830°F)
The first firing converts the clay from fragile dried clay to hard, porous bisqueware:
- Place the bone-dry mug in the kiln (pieces must NOT touch each other or kiln walls).
- Fire to Cone 06 (~999°C / 1830°F) for earthenware.
- The kiln ramps up slowly (typically 8-12 hours) and cools down slowly (another 12-24 hours). Do not open the kiln until it's below 100°C.
- After bisque firing, the mug is porous (absorbs water) and hard. It can now absorb glaze.
Glazing
- Wipe bisqueware with a damp sponge to remove dust.
- Wax the bottom: Apply kiln wash or melted wax to the bottom 3mm of the mug and the entire base. Glaze on the base will fuse to the kiln shelf — ruining both.
- Apply glaze: Dip the mug into the glaze bucket (hold by the waxed base), hold for 3 seconds, and remove. Or brush on 3 even coats, letting each coat dry between applications.
- The glaze layer should be approximately 1-2mm thick — too thin = bare spots, too thick = runs and drips.
- Clean the bottom: Wipe any glaze off the waxed base with a damp sponge.
Glaze Firing (Cone 06-1, matching clay)
- Fire to the temperature specified by your glaze (must match your clay's firing range).
- The glaze melts, flows, and fuses into a glassy surface. This is what makes the mug waterproof and food-safe.
- After cooling (12-24 hours), your mug is complete — a functional, food-safe drinking vessel.
Troubleshooting
| Issue | Cause | Prevention |
|---|---|---|
| Cracks during drying | Uneven drying (thick and thin areas) | Uniform slab thickness, slow drying |
| Handle falls off | Insufficient score-and-slip | Score deeply, use generous slip, blend joints |
| Explodes in kiln | Trapped air or moisture | Wedge clay thoroughly, ensure bone-dry before firing |
| Glaze crawling (bare spots) | Dusty bisqueware or too-thin glaze | Clean bisqueware, apply adequate glaze thickness |
Izinto zokwakha zalesi sinyathelo:
I-slip yobumba (ubumba obumanzi)1 small container I-glaze ecacile1 ijekeUbumba bezitsha bomlilo ophansi1 kg
Izinto
3- Isibambeli
- 1 small container small containerIsibambeli
- 1 jar ijekeIsibambeli
Amathuluzi Adingekayo
7- Isibambeli
- Isibambeli
- Isibambeli
- Isibambeli
- Isibambeli
- Isibambeli
- Isibambeli
CC0 Isizinda Somphakathi
Le blueprint ikhishwe ngaphansi kwe-CC0. Ukhululekile ukukopisha, ukuguqula, ukusabalalisa, nokusebenzisa ngaphandle kwemvume.
Sekela uMenzi ngokuthenga imikhiqizo nge-Blueprint yabo IKhomishane Yomenzi kumiswe ngabathengisi, noma dala inguqulo entsha yale Blueprint bese uyifaka njengoxhumaniso ku-Blueprint yakho ukuze wabelane ngemali engenayo.