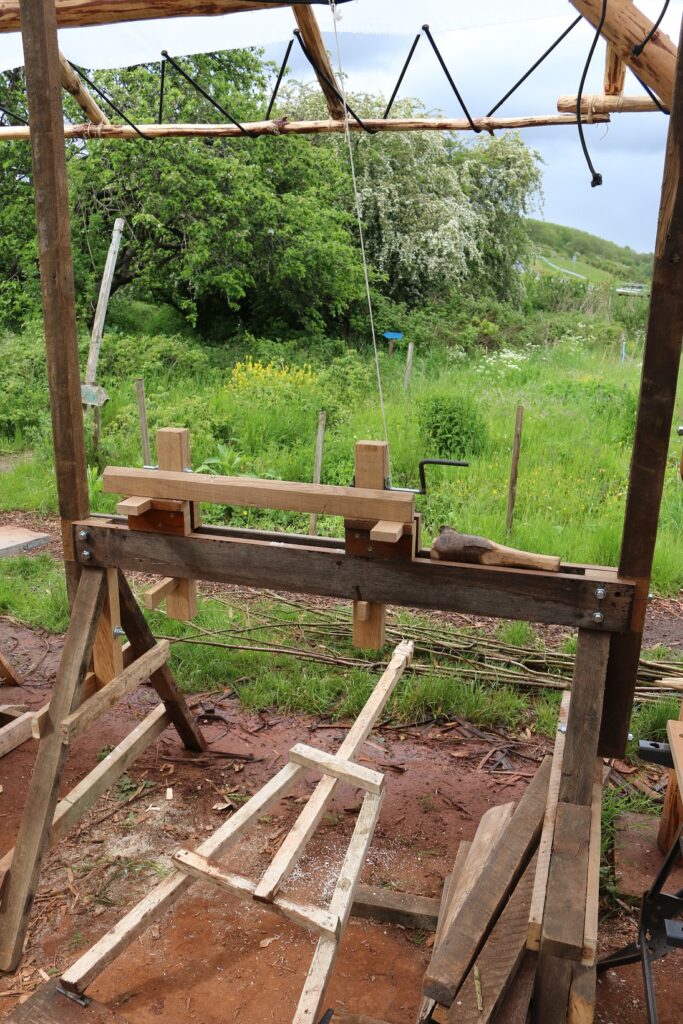


Dala i-Lathe Yepolo Yesikhathi Sendlulamithi Somhlathi Omluhlaza
Imiyalelo
Build a Strong Horizontal Beam for the Lathe Bed
Build a Strong Horizontal Beam for the Lathe Bed
Izinto zokwakha zalesi sinyathelo:
 Isigaxa sesiqu somuthi we-ash1 ucezu
Add Two Vertical Stands and a Top Rail
Add Two Vertical Stands and a Top Rail
Amathuluzi adingekayo:
 Imbazo
 Imbazo encane
Install the Pole Lathe Drive System
Install the Pole Lathe Drive System
Create Support Centers
Create Support Centers
Izinto zokwakha zalesi sinyathelo:
 Izigodo zomuthi olukhuni (i-oki, i-mapula, i-beech)1 ucezu
Amathuluzi adingekayo:
 Imbazo yokuqhekeza
 I-wedge yokhuni yokuwisa umuthi
 Isando Sokhuni
Set Up the Chuck
Set Up the Chuck
Amathuluzi adingekayo:
 Ummese Odonswayo
Test the Drive Connection
Test the Drive Connection
Amathuluzi adingekayo:
 I-auger yomhlabathi
Install a Tool Holder
Install a Tool Holder
Izinto zokwakha zalesi sinyathelo:
Izigodo zomuthi olukhuni (i-oki, i-mapula, i-beech)2 izicucuAmathuluzi adingekayo:
ImbazoUmmese Odonswayo Isethi yezisebenziIsando Sokhuni
Set Up the First Workpiece
Set Up the First Workpiece
Izinto zokwakha zalesi sinyathelo:
 Izipikili2 izicucu
Amathuluzi adingekayo:
Isando Sokhuni Insimbi yokuhlikihla izinsimbi
Secure the Workpiece
Secure the Workpiece
Izinto zokwakha zalesi sinyathelo:
Izigodo zomuthi olukhuni (i-oki, i-mapula, i-beech)4 izicucuAmathuluzi adingekayo:
ImbazoUmmese OdonswayoTest Rotation
Test Rotation
Amathuluzi adingekayo:
Isethi yezisebenziIsando SokhuniI-auger yomhlabathiBegin Rounding
Begin Rounding
Izinto zokwakha zalesi sinyathelo:
I-wedge yokhuni yokuwisa umuthi8 izicucuAmathuluzi adingekayo:
Isando SokhuniAdjust Across the Downstroke
Adjust Across the Downstroke
Izinto zokwakha zalesi sinyathelo:
Isigaxa sesiqu somuthi we-ash2 izicucuAmathuluzi adingekayo:
Isethi yezisebenziIsando SokhuniI-auger yomhlabathiFinish the Smooth Surface
Finish the Smooth Surface
Izinto zokwakha zalesi sinyathelo:
 Ipulangwe le-ash1 ucezu
Amathuluzi adingekayo:
Ummese Odonswayo Isaha yabantu ababili
Remove and Clean the Workpiece
Remove and Clean the Workpiece
Izinto zokwakha zalesi sinyathelo:
 Izinduku Zokhuni1 ucezu
Amathuluzi adingekayo:
I-auger yomhlabathiTest Final Quality
Test Final Quality
Izinto zokwakha zalesi sinyathelo:
 Intambo Ye-hemp3 metre
Amathuluzi adingekayo:
 Ummese
Begin the Drying Process
Begin the Drying Process
Izinto zokwakha zalesi sinyathelo:
 Intambo yokubopha enkulu2 metre
Amathuluzi adingekayo:
Isando SokhuniApply Optional Finishing Techniques
Apply Optional Finishing Techniques
Amathuluzi adingekayo:
I-auger yomhlabathiPrepare the Lathe for the Next Project
Prepare the Lathe for the Next Project
Amathuluzi adingekayo:
Isando SokhuniUmmeseRefine Your Skills
Refine Your Skills
Maintain Tool Sharpness
Maintain Tool Sharpness
Explore Design Variations
Explore Design Variations
Amathuluzi adingekayo:
 Isikweletho Esigobile
Izinto
8- Isibambeli
- Isibambeli
- 2 izicucuIsibambeli
- 8 izicucuIsibambeli
- 1 ucezuIsibambeli
- 1 ucezuIsibambeli
- 3 metreIsibambeli
- 2 metreIsibambeli
Amathuluzi Adingekayo
12- Isibambeli
- Isibambeli
- Isibambeli
- Isibambeli
- Isibambeli
- Isibambeli
- Isibambeli
- Isibambeli
- Isibambeli
- Isibambeli
- Isibambeli
- Isibambeli
Le blueprint yenza

CC0 Isizinda Somphakathi
Le blueprint ikhishwe ngaphansi kwe-CC0. Ukhululekile ukukopisha, ukuguqula, ukusabalalisa, nokusebenzisa ngaphandle kwemvume.
Sekela uMenzi ngokuthenga imikhiqizo nge-Blueprint yabo IKhomishane Yomenzi kumiswe ngabathengisi, noma dala inguqulo entsha yale Blueprint bese uyifaka njengoxhumaniso ku-Blueprint yakho ukuze wabelane ngemali engenayo.