Ukusebenzisana
UBUCIKO
UBUHLE NEMPILO
UBUCIKO BEZANDLA
AMASIKO NOMLANDO
EZOKUZIJABULISA
IMVELO
UKUDLA NEZIPHUZO
REVERSE ENGINEERING
IZAYENSI
EZEMIDLALO
UBUCHWEPHESHE
IZINTO EZIGQOKWAYO
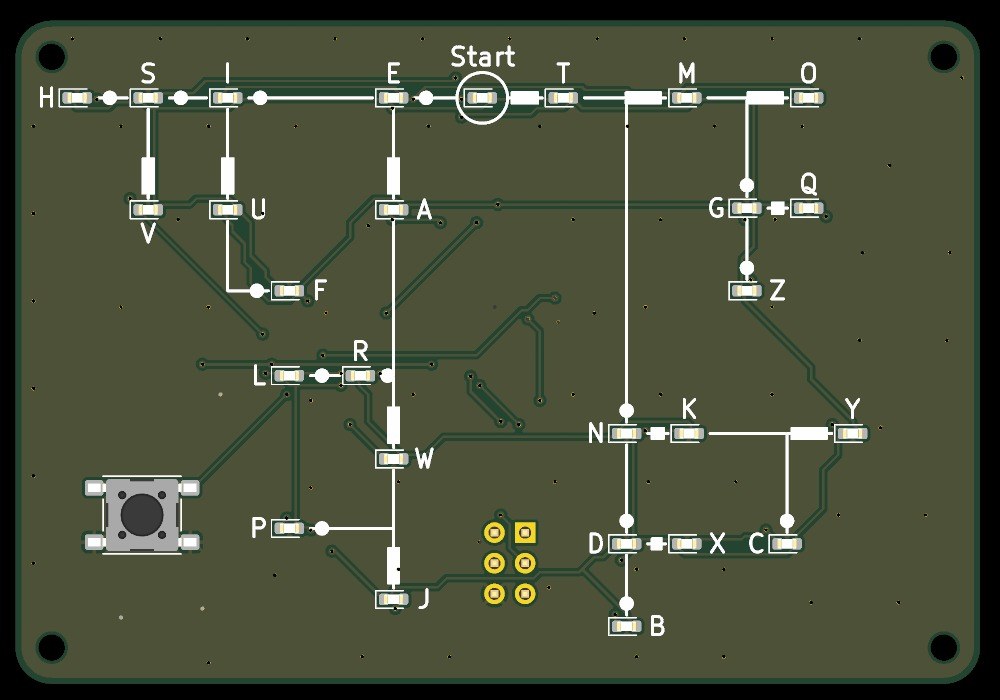


Pocket Morse Code Learning Board - v.1
A pocket board, 80 x 55 mm, that teaches you to read Morse code. Its front is Dave Nathanson's Morse decoding chart: from Start, dots run one way and dashes the other, and every letter sits where its dots and dashes lead. Here every letter has its own LED. Press the key short for a dot and long for a dash, and the LED of the letter you have reached lights; pause, and it blinks.
It runs on one CR2032 coin cell and sleeps between uses. The board was drawn with Youblob's Draw PCB, and its checks pass, but it has not been built yet.
Osezingeni eliphezulu
About 1 day, plus board delivery
Imiyalelo
1
1
LED current and keying speed
LED current and keying speed
Ilayisha incwadi ye-Jupyter…
2
2
The code it decodes
The code it decodes
This board reads the International Morse code letters as ITU-R M.1677-1 gives them.
3
3
Read the chart
Read the chart
Dave Nathanson (KG6ZJO) drew his decoding chart in 2010: "Start with your finger at "Start Here". Then move your finger to track the Morse dots & dashes. You will arrive at the correct letter!" On this board the LEDs do the tracking. ITU-R M.1677-1: "A dash is equal to three dots."
4
4
The schematic
The schematic
ATmega328P on its internal 8 MHz clock, straight from the coin cell; 27 LEDs charlieplexed on PC0-PC5 through six 330 Ω resistors; the key on INT0; a 2x3 ISP footprint.
Kulayishwa isibukeli se-KiCanvas...
Isibukeli Somklamo We-PCB Sobungcweti
5
5
The board
The board
Two layers, 80 x 55 mm. The chart, LEDs and key on the front; the chip, resistors, capacitors and cell holder on the back.
Kulayishwa isibukeli se-KiCanvas...
Isibukeli Somklamo We-PCB Sobungcweti
6
6
Order the board
Order the board
Open the board in KiCad and plot Gerber and drill files (File > Fabrication Outputs). Order a two-layer board, 1.6 mm thick, from any board maker that takes Gerbers.
Izinto zokwakha zalesi sinyathelo:
 Ipuleti le-PCB1 ucezu
Amathuluzi adingekayo:
 Ikhompyutha Ene-Arduino IDE
7
7
Solder the parts
Solder the parts
Back first: paste and reflow U1, R1-R7, C1-C3 and the cell holder BT1 with hot air. Then the front: the 27 red LEDs D1-D27 with pad 1 (cathode) as the board's assembly drawing shows, and the key SW1. Leave J1 empty. Clean off the flux, then test each LED's direction with the meter's diode test.
Izinto zokwakha zalesi sinyathelo:
 I-microcontroller ATmega328P1 ucezu
 I-LED ye-chip27 izicucu
 I-resistor ye-chip7 izicucu
 I-capacitor ye-ceramic ye-chip3 izicucu
 Inkinobho yokucindezela1 ucezu
 Isibambi sebhethri1 ucezu
 Iphasta yokushisela (engenalo ilothe)1 ucezu
 Ucingo Lwesoda1 ucezu
Amathuluzi adingekayo:
 Isiteshi sokulungisa ngomoya oshisayo
 Insimbi yokushisela
 Ithwezazi elinamacijo abukhali
 Ifulaksi
 Isibonakhulu
 Isilinganisi sikagesi esiyinhlanganisela
 Utshwala Be-isopropyl 99 %
8
8
The firmware
The firmware
pocket_morse_decoder_az.ino: every timing is a named constant at the top of the sketch. Board in the Arduino IDE: Arduino Pro or Pro Mini, ATmega328P (3.3V, 8 MHz).
pocket_morse_decoder_az.inoarduino
9
9
Set the fuses and upload
Set the fuses and upload
Do not use Burn Bootloader: the Pro board setting expects a crystal, and this board has none. Hold an ISP programmer's 2x3 pins on J1 and set the internal 8 MHz clock: avrdude -c usbasp -p m328p -U lfuse:w:0xE2:m -U hfuse:w:0xD9:m -U efuse:w:0xFF:m. Then, in the Arduino IDE, use Sketch > Upload Using Programmer.
Amathuluzi adingekayo:
 Umhleli we-AVR ISPIkhompyutha Ene-Arduino IDE
10
10
Print the back shell
Print the back shell
An open-front shell, 84.8 x 59.8 x 8.9 mm, with four standoffs for M2 screws, a slot to slide the cell out and a window under J1. PLA, 0.2 mm layers, 20 % infill, printed on its floor.
11
11
Fit the shell
Fit the shell
The shell leaves 5.0 mm for the back parts: measure your cell holder with a cell in it before you print. Check the holder's open side faces the board's left edge, where the shell's cell slot is. Slide in a CR2032 and screw the board into the shell with four M2 self-tapping screws.
Izinto zokwakha zalesi sinyathelo:
 I-filament ye-PLA1 ucezu
 Isikulufu esizisikela imicu4 izicucu
 Ibhethri lohlamvu CR20321 ucezu
Amathuluzi adingekayo:
 Iphrinta ye-3D yentambo (i-FDM)
 I-Vernier Caliper
 Isethi yezikulufu ezinembile
12
12
Troubleshooting
Troubleshooting
Pocket Morse decoder troubleshooting.
Flow
Loading...
13
13
History and honest limits
History and honest limits
The chart is **Dave Nathanson**'s (KG6ZJO), drawn in 2010 and shared as copyleft; his post says it is a novel way to decode by following a path. The letter codes are ITU-R M.1677-1's. The board, sizes, parts and timings are ours, drawn with Youblob's Draw PCB: its ERC and DRC pass with no errors and every LED's wiring was checked against the firmware by script, but it has not been built, flashed or tested.
Izinto
12- 1 ucezuIsibambeli
- 1 ucezuIsibambeli
- 27 izicucuIsibambeli
- 7 izicucuIsibambeli
- 3 izicucuIsibambeli
- Isibambeli
- Isibambeli
- Isibambeli
- 1 ucezuIsibambeli
- 1 ucezuIsibambeli
- 4 izicucuIsibambeli
- 1 ucezuIsibambeli
Amathuluzi Adingekayo
12- Isibambeli
- Isibambeli
- 2 vendors sell this, none ship to you yetIsibambeli
- Isibambeli
- Isibambeli
- Isibambeli
- Isibambeli
- Isibambeli
- Isibambeli
- Isibambeli
- Isibambeli
- Isibambeli
Amafayela omklamo
1Le blueprint yenza

Ama-blueprint ahlobene
Lama-blueprint abelana ngolwazi — amasu, izinto noma izimiso


CC0 Isizinda Somphakathi
Le blueprint ikhishwe ngaphansi kwe-CC0. Ukhululekile ukukopisha, ukuguqula, ukusabalalisa, nokusebenzisa ngaphandle kwemvume.
Sekela uMenzi ngokuthenga imikhiqizo nge-Blueprint yabo IKhomishane Yomenzi kumiswe ngabathengisi, noma dala inguqulo entsha yale Blueprint bese uyifaka njengoxhumaniso ku-Blueprint yakho ukuze wabelane ngemali engenayo.