
Colaboração
ARTE
BELEZA E BEM-ESTAR
ARTESANATO
CULTURA E HISTÓRIA
ENTRETENIMENTO
MEIO AMBIENTE
COMIDA E BEBIDAS
ENGENHARIA REVERSA
CIÊNCIAS
ESPORTES
TECNOLOGIA
TECNOLOGIA VESTÍVEL
Four-Passenger Coasting Bobsled: Iron-Shod Ash Runners, Hinged Rear Sled and Hoop Steering Wheel (Boy Mechanic, 1915)
Woody

Criado por

Woody

13. novembro 2026NO
6
0
0
0
0

Four-Passenger Coasting Bobsled: Iron-Shod Ash Runners, Hinged Rear Sled and Hoop Steering Wheel (Boy Mechanic, 1915)

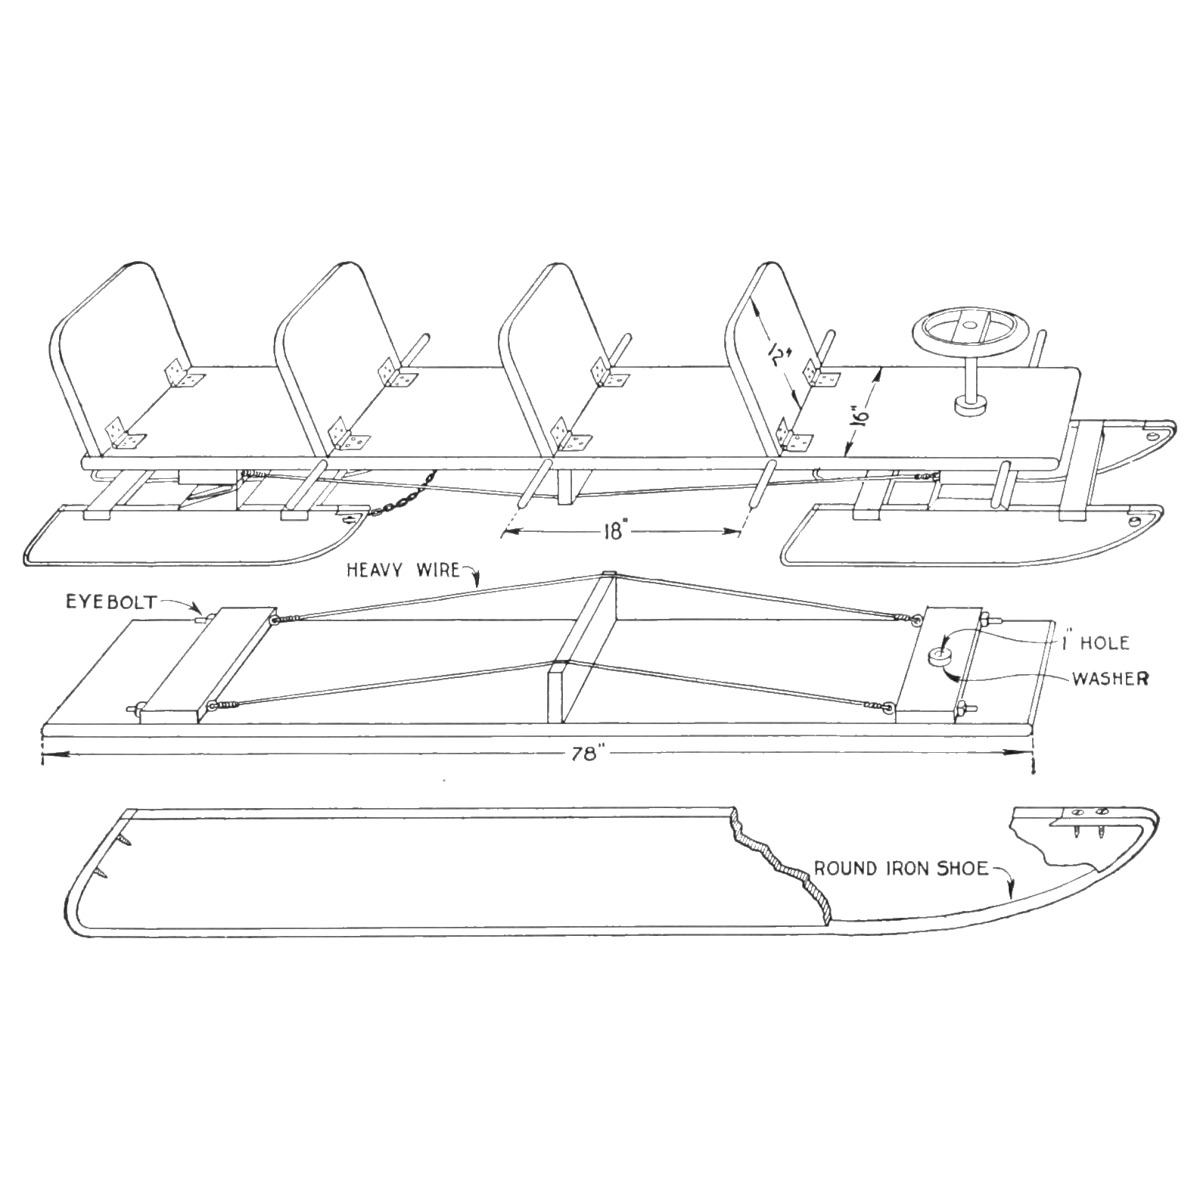
R. H. Allen's four-passenger coasting bob from The Boy Mechanic, Book 2 (1915): a 6-1/2 ft top board with four hinged seat backs, carried on two short sleds with ash runners shod in 5/8 in round iron. The rear sled rocks on a wedge and hinges to follow the ground; the front sled steers by a broom-handle post and a wheel made from a nail-keg hoop. Every size is his.
Intermediário
About 3 days

Instruções

1

His list of materials in centimetres

A carregar o notebook Jupyter…
2

Read The Boy Mechanic, Book 2

"Any wood may be used for the sled, except for the runners, which should be made of ash." His list of materials: 1 top 6-1/2 ft x 16 in x 1-1/4 in; 4 runners 22 x 4 x 1 in; 4 crosspieces 16 x 3 x 1 in; 3 pieces 16 x 5 x 2 in; 1 piece 16 x 5 x 1 in; 1 shore 16 x 3 x 1 in; 4 seat backs 12 x 16 x 1 in; 1 dowel 3 ft x 1 in; 4 rods 5/8 in x 30 in; 4 eyebolts 1/2 x 6 in; 3 hinges 5 in strap; 8 hinges 3 in strap.
3

Shape and shoe the runners

Cut one ash runner to shape and use it as the pattern for the other three. Cut a groove about 1/4 in deep along the under edge to take the curve of a 5/8 in round iron rod. Bend each rod to fit in the groove, up the back of the runner and over the top at the front; flatten the ends and drill two holes in each for wood screws (a blacksmith can flatten them, he says). Screw the irons on.

Materiais para este passo:

Tábua de madeira de leiTábua de madeira de lei1 peça
Vareta de ferroVareta de ferro4 peças
Parafusos para madeiraParafusos para madeira1 peça

Ferramentas necessárias:

SerroteSerrote

Serra de recortesSerra de recortes
FormõesFormões
Forja a carvãoForja a carvão
BigornaBigorna
Martelo de ferreiroMartelo de ferreiro
Torno de bancadaTorno de bancada
Berbequim de mãoBerbequim de mão
LápisLápis
4

Build the two sleds

Notch the top edges of each pair of runners for the 16 x 3 in crosspieces, near the ends, so the crosspieces lie flush with the runner tops and the notches of each pair line up. Fit them snugly, fasten with long, slim wood screws, and stiffen each joint inside with a small metal brace.

Materiais para este passo:

Tábua de pinhoTábua de pinho1 peça
Parafusos para madeiraParafusos para madeira1 peça
Esquadro de reforçoEsquadro de reforço8 peças

Ferramentas necessárias:

SerroteSerrote
FormõesFormões
Berbequim de mãoBerbequim de mão
5

Make the rocking rear joint

Cut a heavy 2 x 5 in crosspiece sloping across its width, from 2 in thick at one edge to a feather edge at the other. Fix the three large strap hinges to the sloping face, and fasten the piece solidly on the rear sled's runners with its centre 8 in from their front ends. This lets the rear sled rock but not turn sideways.

Materiais para este passo:

Tábua de pinhoTábua de pinho1 peça
Dobradiça de tira de ferroDobradiça de tira de ferro3 peças
Parafusos para madeiraParafusos para madeira1 peça

Ferramentas necessárias:

SerroteSerrote
Plaina manualPlaina manual
Berbequim de mãoBerbequim de mão
6

Mount the front sled crosspiece

Fasten the supporting crosspiece on top of the front sled's runners with its centre 11 in from their front ends.

Materiais para este passo:

Tábua de pinhoTábua de pinho1 peça
Parafusos para madeiraParafusos para madeira1 peça

Ferramentas necessárias:

Berbequim de mãoBerbequim de mão

Fita métricaFita métrica
7

Brace the top board

Round both ends of the top board and plane it smooth. Underneath, fit two crosspieces, each with two 1/2 in holes bored through its width near the ends for the eyebolts: one with its centre 12 in from the rear end, the other 8 in from the front. Screw them on. Set the shore in the centre of the board, run wires over it between the eyebolts, and draw the eyebolts up until the wire is taut over the shore, so the long board cannot sag.

Materiais para este passo:

Tábua de pinhoTábua de pinho1 peça
Olhal roscadoOlhal roscado4 peças
Arame de ferroArame de ferro1 peça
Parafusos para madeiraParafusos para madeira1 peça

Ferramentas necessárias:

SerroteSerrote
Plaina manualPlaina manual
Arco de pua e brocaArco de pua e broca
Fita métricaFita métrica
8

Fit the seat backs and foot rests

Round the top corners of the four backs and cut the bottom ends at a slight angle for a slant. Hinge them to the top board with the small strap hinges every 18 in, starting at the rear. Bore 1 in holes about 1 in deep in the edges of the top board every 18 in, beginning about 5 in from the front, and drive in pins 4 in long cut from the dowel, as foot rests.

Materiais para este passo:

Tábua de pinhoTábua de pinho1 peça
Dobradiça de tira de ferroDobradiça de tira de ferro8 peças
Cavilhas de madeira duraCavilhas de madeira dura1 peça
Parafusos para madeiraParafusos para madeira1 peça

Ferramentas necessárias:

SerroteSerrote
Arco de pua e brocaArco de pua e broca
Fita métricaFita métrica
9

Make the steering

Cut a broom handle to 18 in and fasten one end in a hole bored centrally in the 5 in crosspiece of the front sled. Bore a hole in the top board through the centre of the crosspiece underneath; put two metal washers on the stick and run it up through the hole, then fasten a hardwood collar to it just above the board so the top cannot lift off the sled. For the wheel, fasten a piece of wood across a nail-keg hoop, cover the hoop with garden hose and wrap it with twine; bore the centre of the crosspiece to fit the broom handle and screw it on.

Materiais para este passo:

VassouraVassoura1 peça
Anilha planaAnilha plana2 peças
Tábua de madeira de leiTábua de madeira de lei1 peça
Arco de ferroArco de ferro1 peça
Mangueira de borrachaMangueira de borracha1 peça
Fio de jutaFio de juta1 peça
Parafusos para madeiraParafusos para madeira1 peça

Ferramentas necessárias:

SerroteSerrote
Arco de pua e brocaArco de pua e broca
Berbequim de mãoBerbequim de mão
10

Join the sleds and fit the ropes

Fasten the rear sled to the top board with screws through the free wings of the hinges into the crosspiece. Bore holes in the front ends of all runners and attach a chain or rope: the rear one's loop to the underside of the top board, the front one for drawing the sled.

Materiais para este passo:

Parafusos para madeiraParafusos para madeira1 peça
Corrente de ferroCorrente de ferro1 peça

Ferramentas necessárias:

Arco de pua e brocaArco de pua e broca
Berbequim de mãoBerbequim de mão
11

Troubleshooting

Bobsled troubleshooting.

Flow

Loading...
12

History and honest limits

From "Four-Passenger Coasting Bobsled" by R. H. Allen, in **The Boy Mechanic, Book 2**, Popular Mechanics, 1915 (Project Gutenberg 44585; checked on the archive.org scan boymechanicbook200chic2, pp. 24-26). The runner shape comes from his drawing, not from figures. The scan calls the steering collar a hardwood collar; the Gutenberg text drops "hardwood". The tools and metric figures are ours.

Materiais

15

Ferramentas necessárias

12

Blueprints relacionados

Estes blueprints compartilham conhecimento — técnicas, materiais ou princípios
CC0 Domínio Público

Este blueprint é liberado sob CC0. Você é livre para copiar, modificar, distribuir e usar este trabalho para qualquer finalidade, sem pedir permissão.

Apoie o Maker comprando produtos através do Blueprint, onde ele ganha uma Comissão Maker definida pelos vendedores, ou crie uma nova versão deste Blueprint e inclua-o como conexão no seu próprio Blueprint para compartilhar receita.

Discussão

(0)

Entrar para participar da discussão

Carregando comentários...