Colaboração
ARTE
BELEZA E BEM-ESTAR
ARTESANATO
CULTURA E HISTÓRIA
ENTRETENIMENTO
MEIO AMBIENTE
COMIDA E BEBIDAS
ENGENHARIA REVERSA
CIÊNCIAS
ESPORTES
TECNOLOGIA
TECNOLOGIA VESTÍVEL
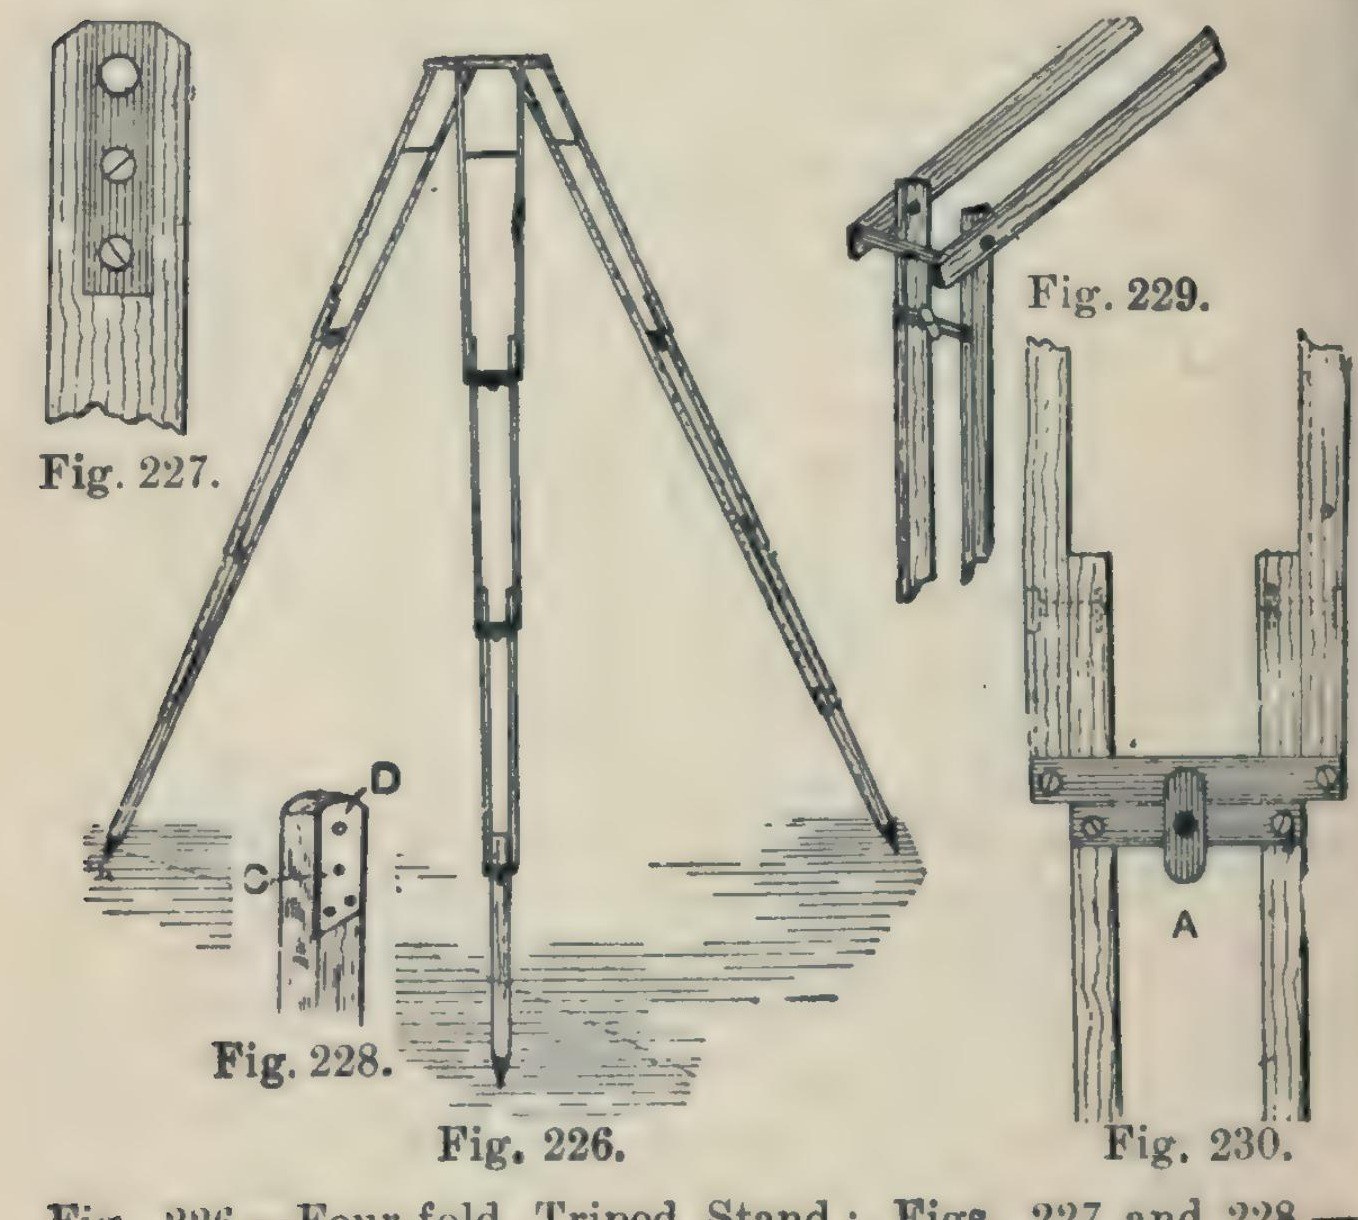


Camera Tripod: a Four-Fold Ash Tripod Stand (Hasluck, 1902)
A light, compact folding camera stand: three legs, each of seven ash laths riveted so it folds in four, locked open by brass buttons, on a triangular ash top with brass pins and a hole for the camera screw.
Hasluck says the same method makes stands that fold in three or two.
Source: Paul N. Hasluck, Photographic Cameras and Accessories (1902), pp. 153-157. Picture: Figs. 226-230 of the book.
Intermediário
Unknown
Instruções
1
1
Cut the ash laths
Cut the ash laths
Cut laths of good ash, true and square or the stand won't be rigid, and round the edges slightly: six 17 1/4 x 5/8 x 3/8 in, six 16 x 5/8 x 3/8 in, six 15 1/2 x 5/8 x 3/8 in, and three 14 x 5/8 x 5/8 in.
Materiais para este passo:
 Tábua de freixo1 21 laths
Ferramentas necessárias:
 Serrote de costas
 Plaina de bloco
2
2
Fit the top ends and stretcher
Fit the top ends and stretcher
On each 17 1/4 in lath let in flush a 1/16 in brass plate, 1 1/4 in long, with a 3/16 in hole 1/4 in from the top, held by two countersunk brass screws; bore the wood to match and take off the top corners. On one lath of each pair cut a groove inside, about 3/16 in deep and 3 1/2 in long, starting 2 in from the top, and hinge a 1/8 in brass rod stretcher in it on a pin. On the other lath cut a curved groove 1 1/2 in long, 3/16 in wide, with a small hole at the bottom where the rod catches.
Materiais para este passo:
 Chapa de latão1 1/16 in plates
 Parafusos para madeira1 small brass screws
 Varão de latão1 1/8 in stretcher
Ferramentas necessárias:
 Arco de serra para metais com lâminas
 Lima para metal
 Berbequim de mão
 Formões
 Chave de fendas
3
3
Bore and rivet the legs
Bore and rivet the legs
Bore the rivet holes: in the long laths 1 3/4 in from the lower end, counterbored so the copper rivet head sits flush, then 1/8 in through; in the 16 in and 15 1/2 in laths 1/2 in and 1 3/4 in from the ends; in each 14 in piece 1/2 in from one end, and taper its other end for a pointed iron shoe or a steel point and ferrule. Rivet the 21 laths into three legs with 1/8 in copper rivets and washers: a 16 in lath inside each 17 1/4 in one, a 15 1/2 in lath inside that, the 14 in foot between the last pair. Rivets flush, just tight enough to fold but not loose.
Materiais para este passo:
 Rebites de cobre1 1/8 in, with washers
 Metal desconhecido3 iron shoes or steel points
Ferramentas necessárias:
 Arco de pua e brocaBerbequim de mão
 Martelo de rebitar
4
4
Add cross strips and lock buttons
Add cross strips and lock buttons
Screw 1/16 in brass strips across the bottom ends of each pair of laths (Fig. 229). Under them screw strips carrying a small brass button riveted at the centre; turned, the button hooks over the strip above and locks the joint open (Fig. 230).
Materiais para este passo:
Chapa de latão1 cross strips, buttonsParafusos para madeira1 peçaFerramentas necessárias:
Arco de serra para metais com lâminasLima para metalChave de fendasMartelo de rebitar5
5
Make the top
Make the top
Plane ash to 1/2 in and draw an equilateral triangle with 8 1/2 in sides. Bisect the angles; 2 in from each corner draw a line at right angles, go 1/2 in in along the sides, and mark three rectangles 2 7/8 x 3/4 in; cut the outline (Fig. 231). Fix a 3/16 in brass rod, one end tapered, across each rectangle, bored 3/8 in from the outer edge and projecting about 1/2 in, for the legs to hang on. Bore a 1/4 in hole in the centre for the camera screw and glue felt on top.
Materiais para este passo:
Tábua de freixo1 topVarão de latão3 3/16 in pins Feltro de lã1 peça
 Cola animal1 peça
Ferramentas necessárias:
Plaina de blocoSerrote de costasArco de pua e brocaBerbequim de mão6
6
Finish
Finish
Glasspaper and varnish the wood, and lacquer the brass.
Materiais para este passo:
 Verniz de goma-laca1 varnish
 Material desconhecido1 brass lacquer
Ferramentas necessárias:
 Lixa
Materiais
10- 1 topReferência
- 1 cross strips, buttonsReferência
- 1 peçaReferência
- 3 3/16 in pinsReferência
- 1 1/8 in, with washersReferência
- 3 iron shoes or steel pointsReferência
- 1 peçaReferência
- 1 peçaReferência
- 1 varnishReferência
- 1 brass lacquerReferência
Ferramentas necessárias
10- Referência
- Referência
- Referência
- Referência
- Referência
- Referência
- Referência
- Referência
- Referência
- Referência
Este projeto faz

CC0 Domínio Público
Este blueprint é liberado sob CC0. Você é livre para copiar, modificar, distribuir e usar este trabalho para qualquer finalidade, sem pedir permissão.
Apoie o Maker comprando produtos através do Blueprint, onde ele ganha uma Comissão Maker definida pelos vendedores, ou crie uma nova versão deste Blueprint e inclua-o como conexão no seu próprio Blueprint para compartilhar receita.