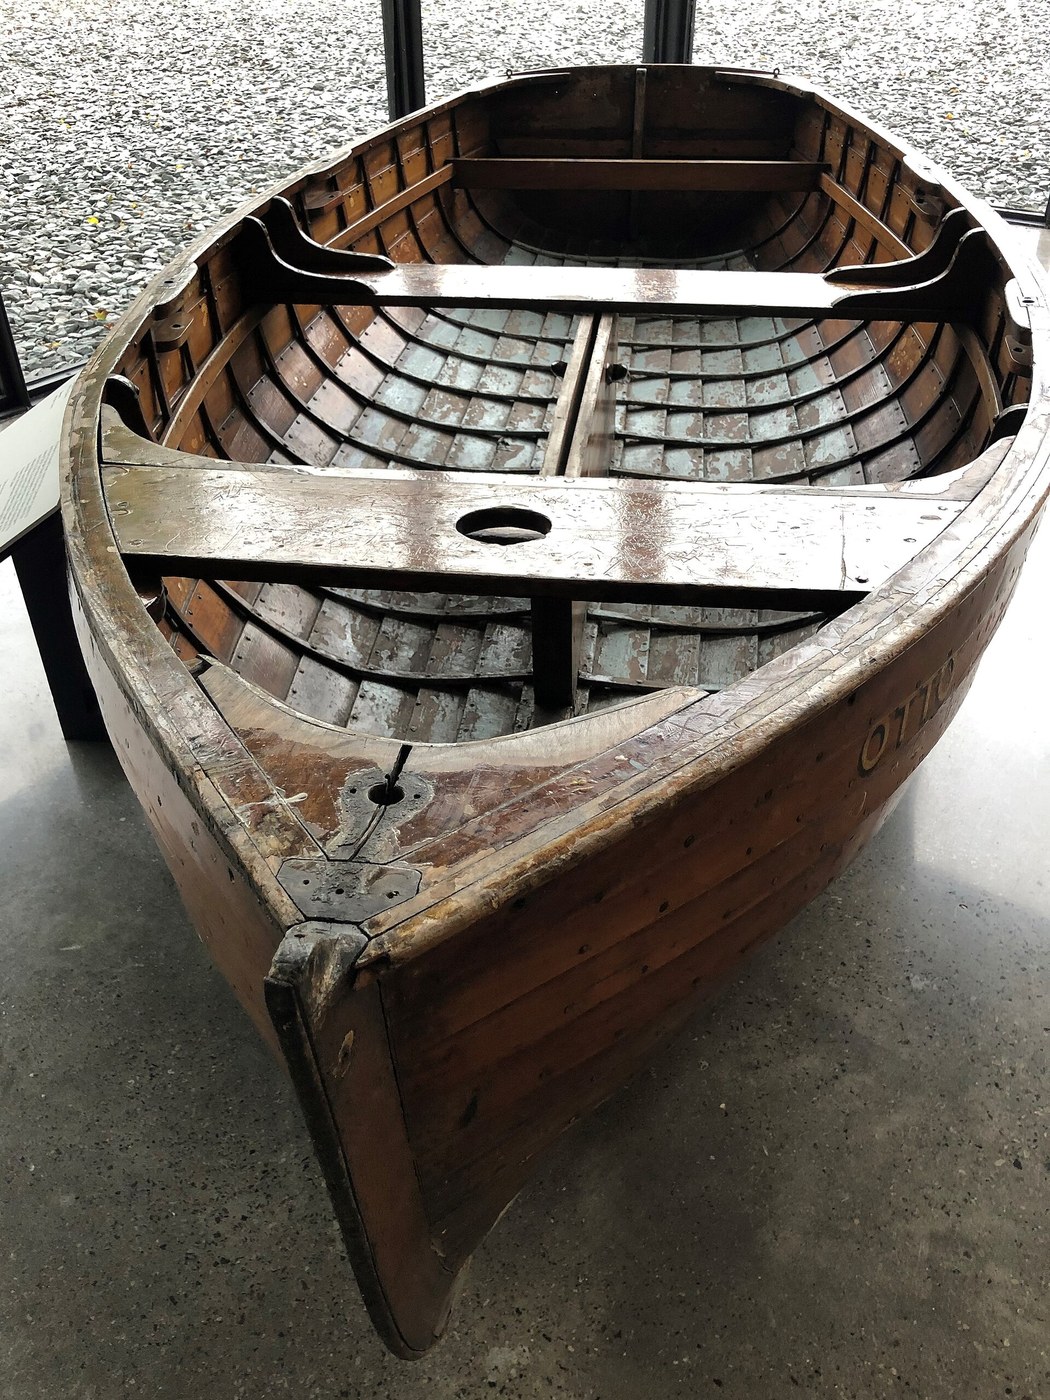


Clinker Planking
Two ways to plank a boat. Set the planks edge to edge and you get a smooth hull that needs a strong internal frame to hold its shape. Overlap them like roof tiles, fasten plank to plank, and the skin becomes the structure — the hull holds its own shape and the frames go in afterwards, fitted to a shape that already exists.
That is clinker, or lapstrake, and it is the construction of the Nordic boat: light, flexible, fast to build, and repairable one plank at a time.
The skill is not in the fastening. It is in spiling — finding the curved shape a flat plank must be cut to in order to lie fair against the one below without being forced. Get that wrong and no amount of clamping will save the boat.
Instruções
Set up the backbone
Set up the backbone
Set the keel, stem and stern post up straight and rigid, braced so nothing can move. Every plank references this backbone, and a backbone that shifts halfway through puts a twist in the whole hull.
Materiais para este passo:
 Tábua de madeira de lei2 peças
Set up moulds at stations
Set up moulds at stations
Erect temporary moulds at marked stations to define the shape. In traditional shell-first building these are guides only — they come out at the end and the boat keeps its shape without them.
Rabbet the keel for the garboard
Rabbet the keel for the garboard
Cut the rabbet along the keel that the first plank — the garboard — lands in. This joint is below the waterline for the boat's whole life, so it is cut carefully and fitted dry before anything is fastened.
Ferramentas necessárias:
 Conjunto de formões para madeira
Spile the garboard — do not measure it
Spile the garboard — do not measure it
Tack a spiling batten in place and transfer the true curve onto it with dividers at intervals, then lift that shape onto your plank stock. A plank is never a straight rectangle; a hull is a curved surface and a flat board must be cut curved to lie on it.
Ferramentas necessárias:
 Régua
RéguaCut proud and fit by trial
Cut proud and fit by trial
Cut the plank slightly outside the line and offer it up repeatedly, taking small amounts off until it lies against the keel and moulds with no forcing. A plank that has to be pulled into place puts permanent stress into the hull.
Ferramentas necessárias:
 Plaina manual
Bevel the landing
Bevel the landing
Plane a bevel along the plank edge where the next plank will overlap, so the two meet in full contact rather than at a line. The bevel angle changes continuously along the boat and has to be cut by eye and feel, checked with the next plank held in place.
Set the overlap and keep it consistent
Set the overlap and keep it consistent
Decide the lap width — commonly around 20-25 mm on a small boat — and hold it the whole way along. An inconsistent lap shows as a wandering line down the finished hull and it is the first thing anyone looks at.
Clamp the next plank and check for fairness
Clamp the next plank and check for fairness
Clamp the next strake in place and sight along the hull. Look for flats and hollows in the run of the planking — fairness is judged by eye along the length, never by measuring at one station.
Bed the lap
Bed the lap
Lay bedding compound, or traditionally tarred wool or hair, into the lap before fastening. The lap is the seam — this is what keeps the boat dry, and it goes in before the fastenings, not after.
Rivet the lap with roves
Rivet the lap with roves
Drill through both planks, drive a copper nail from outside, slip a rove — a small conical washer — over the point inside, cut the nail short and peen it over the rove. Nail and rove is the classic Nordic clinker fastening.
Materiais para este passo:
 Rebites de cobre100 peças
Hold on the inside while riveting
Hold on the inside while riveting
Have a second person hold a heavy dolly against the nail head outside while you peen inside. Peening without backing drives the nail out instead of upsetting it, and splits the plank.
Space the rivets evenly
Space the rivets evenly
Space rivets regularly along the lap, closer near the ends where the curve is sharpest. Wide spacing lets the lap open and work in a seaway.
Work up alternate sides
Work up alternate sides
Add each strake to one side then the matching strake on the other before going further up. Planking one side ahead of the other pulls the whole hull out of symmetry.
Fit the frames last
Fit the frames last
Once the shell is closed, fit ribs into it — steam-bent to follow the shape the planking has already taken. This is the whole logic of shell-first building: the frames are made to fit the hull, not the hull to fit the frames.
Remove the moulds and check it holds
Remove the moulds and check it holds
Take out the temporary moulds. The hull should keep its shape unaided. If it slumps, the shell is not doing its job and the fault is in the laps.
History & Context
History & Context
Shell first, frames after. Clinker building inverts the order most people assume. The planking is assembled into a self-supporting shell, fastened plank to plank, and only then are ribs fitted inside to a shape that already exists. Carvel building — smooth planks edge to edge — does the opposite: the frame defines the shape and the planks are hung on it. Nearly everything else about the two traditions follows from that one difference.
Why the Nordic boats were built this way. A clinker hull is light for its strength and it flexes. A boat that gives a little in a seaway rides differently from a rigid one, and the light weight matters enormously when a crew has to haul the boat up a beach — which Norse crews did constantly. The construction and the way the boats were used are not separable.
The lap is the strength and the seam. The overlap does two jobs at once: it joins the planks structurally and it forms the watertight seam. That is why the bevel matters so much. Two planks meeting along a line rather than a bevelled face have a fraction of the glue-free contact area, and they leak.
Repairable a plank at a time. A damaged strake can be cut out and replaced without dismantling the boat. For working craft maintained by their own crews with limited materials, that is worth more than almost any other property, and it is a large part of why the tradition persisted for a thousand years after better-resourced alternatives existed.
Still alive. Nordic clinker boat building was inscribed on UNESCO's list of intangible cultural heritage in 2021, on a joint nomination from the Nordic countries. It is a living craft with working boatyards, not a reconstruction — which means the technique in this blueprint can still be learned from people who use it.
Materiais
2- 2 peçasReferência
- 100 peçasReferência
Ferramentas necessárias
3- Referência
- Referência
- Referência
Blueprints relacionados
Estes blueprints compartilham conhecimento — técnicas, materiais ou princípios
CC0 Domínio Público
Este blueprint é liberado sob CC0. Você é livre para copiar, modificar, distribuir e usar este trabalho para qualquer finalidade, sem pedir permissão.
Apoie o Maker comprando produtos através do Blueprint, onde ele ganha uma Comissão Maker definida pelos vendedores, ou crie uma nova versão deste Blueprint e inclua-o como conexão no seu próprio Blueprint para compartilhar receita.