Colaboração
ARTE
BELEZA E BEM-ESTAR
ARTESANATO
CULTURA E HISTÓRIA
ENTRETENIMENTO
MEIO AMBIENTE
COMIDA E BEBIDAS
ENGENHARIA REVERSA
CIÊNCIAS
ESPORTES
TECNOLOGIA
TECNOLOGIA VESTÍVEL
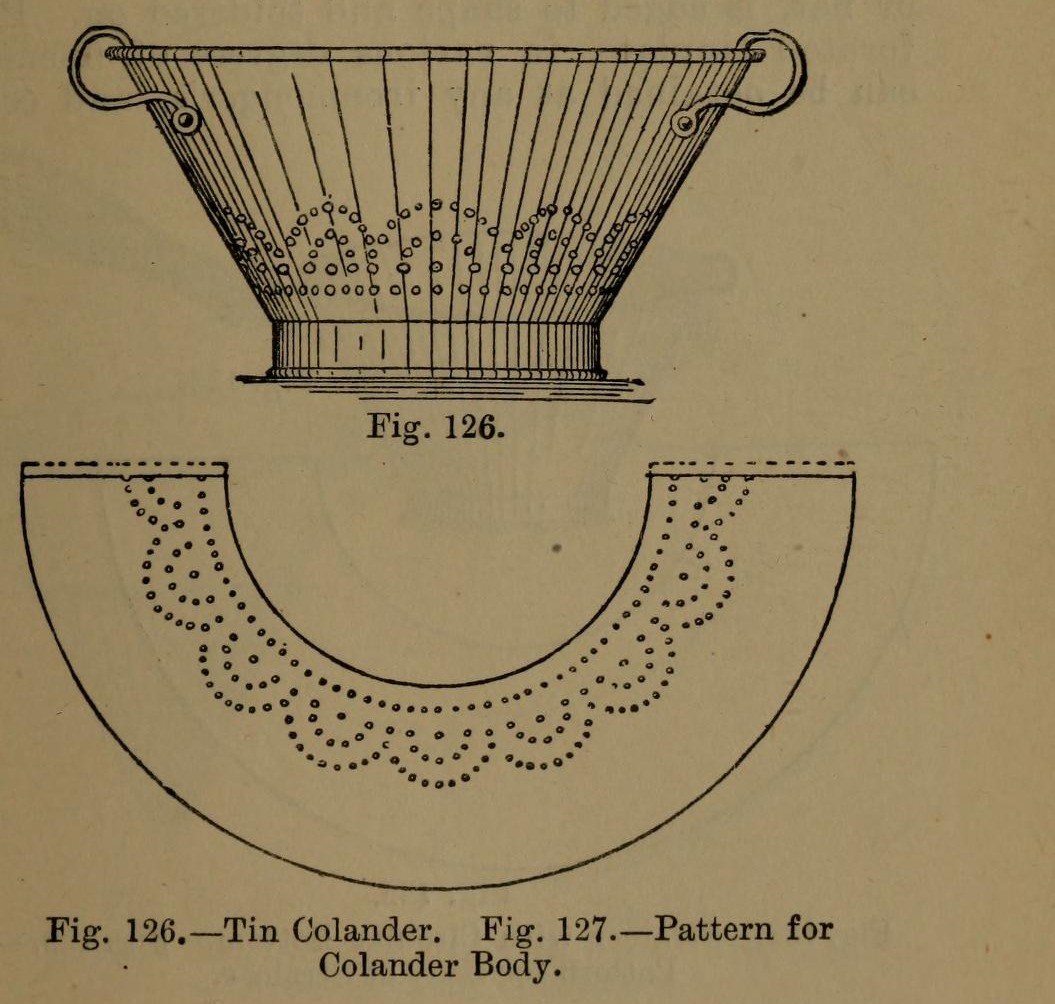


Colander: a Tinplate Colander with Perforated Body and Bottom (Hasluck, 1907)
A tinsmith's colander for straining: a tapered tinplate body and a hollowed bottom, both punched full of holes, standing on a wired hoop, with two bow handles.
The body pattern is a ring segment: outer radius = top diameter, inner radius = bottom diameter, which gives sides at 60 degrees.
Source: Paul N. Hasluck, Tinplate Work (1907), pp. 50-51. Unknown: sizes, solder. Picture: Figs. 126-127 of the book.
Intermediário
Unknown
Instruções
1
1
Set out the body pattern
Set out the body pattern
Choose the top and bottom diameters. On tinplate, strike an arc with radius equal to the top diameter and, from the same centre, one equal to the bottom diameter (Fig. 127); the sides then slope at 60 degrees. Mark the rows of holes, add edges for a grooved seam and the wire, and cut it out.
Materiais para este passo:
 Chapa de folha de flandres1 body
Ferramentas necessárias:
 Compasso de pontas
 Ponta de traçar
 Tesoura de chapa
2
2
Break, punch and planish the body
Break, punch and planish the body
'Break' the pattern through the rollers, turning it the opposite way each pass, so it won't crease when bent. Punch the holes on a hardwood block, then flatten and planish the burrs.
Ferramentas necessárias:
 Calandra de chapa
 Puncionador de furos para chapa
 Bloco de madeira dura
 Martelo de aplanar
3
3
Seam and wire the body
Seam and wire the body
Set off the edges for a grooved seam, bend the body to shape and seam it. Solder the seam inside. Set off an edge on the wide end and wire it with No. 10 B.W.G. wire. If you like, raise a swage about 1 1/2 in below the wired edge: it stiffens the colander and looks better.
Materiais para este passo:
 Arame de ferro1 No. 10 B.W.G.
 Solda de estanho-chumbo1 seam
Ferramentas necessárias:
 Maço de madeira
 Estaca
 Ferro de solda elétrico
 Fluxo
4
4
Make and fit the bottom
Make and fit the bottom
Cut out the bottom, hollow it and edge it to fit the small end. Inside, mark circles from 1 in across at the centre, each 1 in wider than the last, out to the edge. Punch holes at short intervals round them and flatten the burrs on an upturned hollowing hammer. Solder the bottom on.
Materiais para este passo:
Chapa de folha de flandres1 bottomSolda de estanho-chumbo1 bottomFerramentas necessárias:
Compasso de pontasTesoura de chapaPuncionador de furos para chapaMartelo de aplanarFerro de solda elétricoFluxo5
5
Add the hoop and handles
Add the hoop and handles
Cut a strip 1 1/2 in wide, as long as the circumference of the bottom. Wire it with No. 10 B.W.G., round it, seam it and solder it on as the foot. Rivet a pair of bow handles opposite each other at the top.
Materiais para este passo:
Chapa de folha de flandres1 hoopArame de ferro1 hoopSolda de estanho-chumbo1 hoop Cabo2 bow handles
 Rebites de ferro1 number not given
Ferramentas necessárias:
Tesoura de chapaFerro de solda elétricoFluxo Martelo de rebitar
6
6
Clean and scald
Clean and scald
Clean with turpentine and whiting, then polish with dry whiting. Before first use, steep it a short time in boiling water, as for any metal article for the kitchen.
Ferramentas necessárias:
 Terebintina
 Carbonato de cálcio (branco de espanha)
 Água
Materiais
5- Referência
- 1 hoopReferência
- 1 hoopReferência
- 2 bow handlesReferência
- 1 number not givenReferência
Ferramentas necessárias
15- Referência
- Referência
- Referência
- Referência
- Referência
- Referência
- Referência
- Referência
- Referência
- Referência
- Referência
- Referência
- Referência
- Referência
- Referência
Materiais de Blueprints conectados


Este projeto faz
CC0 Domínio Público
Este blueprint é liberado sob CC0. Você é livre para copiar, modificar, distribuir e usar este trabalho para qualquer finalidade, sem pedir permissão.
Apoie o Maker comprando produtos através do Blueprint, onde ele ganha uma Comissão Maker definida pelos vendedores, ou crie uma nova versão deste Blueprint e inclua-o como conexão no seu próprio Blueprint para compartilhar receita.