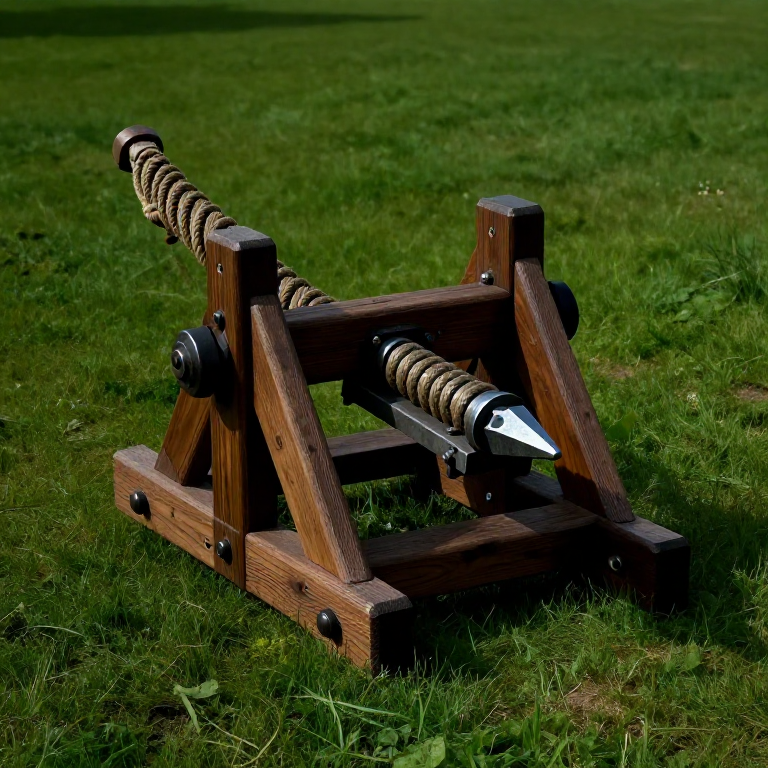
Building a Counterweight Trebuchet — The Medieval Siege Engine That Toppled Castles
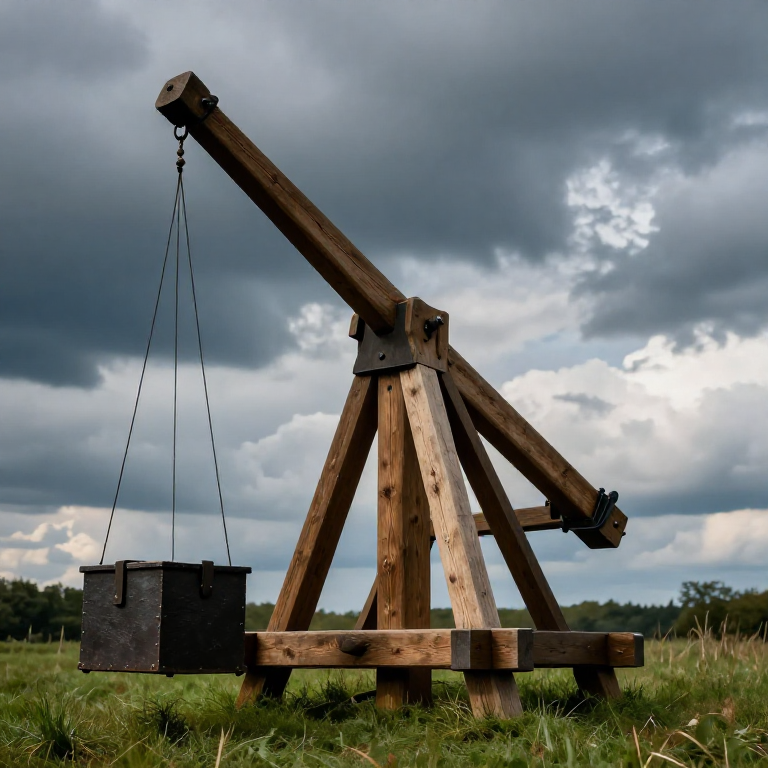
The counterweight trebuchet is the most powerful pre-gunpowder weapon ever built. Developed from earlier traction trebuchets (which used teams of men pulling ropes), the counterweight version appeared in the eastern Mediterranean around 1100-1200 AD and reached its peak during the Crusades. A large trebuchet could hurl a 100-150 kg stone projectile over 300 meters — enough to breach castle walls that had withstood battering rams and siege towers for centuries.
The physics is elegant: a heavy counterweight (often a box filled with stones or sand) is mounted on the short arm of a pivoting beam. The long arm holds a sling containing the projectile. When the counterweight is released, gravity pulls it down, swinging the long arm upward in an arc. The sling extends the effective arm length, adding velocity at the release point. At the optimal moment, one end of the sling slips free, launching the projectile on a high parabolic trajectory.
Edward I of England built the largest known trebuchet — 'Warwolf' — during the 1304 siege of Stirling Castle in Scotland. It reportedly required 30 wagons to transport, took months to assemble, and threw stones weighing over 130 kg. The garrison surrendered before Warwolf was even fully operational — the mere sight of it under construction was enough. The trebuchet made castle-based warfare obsolete a century before gunpowder cannons would complete the transformation.
Instruções
Build the base frame (trestle)
Build the base frame (trestle)
The base frame must be heavy and rigid enough to absorb the violent forces generated when the counterweight drops and the beam swings. For a working scale model (1-2 meter arm), build a rectangular base from hardwood planks approximately 100 cm long, 60 cm wide, and 15 cm tall. Use mortise-and-tenon joints reinforced with wooden pegs — iron bolts were used on full-scale medieval trebuchets but are not strictly necessary for a model.
Two vertical uprights (approximately 80 cm tall) rise from the base, forming an A-frame that supports the pivot axle. The uprights must be braced with diagonal struts on both sides to prevent racking (sideways collapse) when the beam swings. The base can be weighted with stones or staked to the ground to prevent the entire machine from tipping forward when the counterweight drops.
Materiais para este passo:
 Hardwood Block6 peças
Ferramentas necessárias:
 Hand Saw
 Hammer (2 kg)
Shape the throwing beam
Shape the throwing beam
The beam is the trebuchet's central element — a long, strong timber that pivots on an axle through the uprights. The optimal beam ratio is approximately 1:4 (short arm to long arm). For a 1.5-meter beam, the pivot point is placed 30 cm from one end (the counterweight end) and 120 cm from the other (the sling end).
Select a straight-grained hardwood beam — ash or oak — free of knots in the central section where bending stress is greatest. The beam should be approximately 8-10 cm square in cross-section for a model. Drill a smooth hole through the beam at the pivot point for the axle. The axle hole must be aligned perfectly perpendicular to the beam's length — any misalignment causes the beam to wobble during rotation, wasting energy and reducing accuracy.
Materiais para este passo:
 Hardwood Shaft (2m)1 peça
Ferramentas necessárias:
 Awl
AwlBuild the counterweight box
Build the counterweight box
The counterweight is a box or basket hung from the short arm of the beam, filled with heavy material — stones, sand, or lead. For a scale model with a 1.5-meter beam, the counterweight should be approximately 10-20 kg (the optimal ratio is roughly 100:1 counterweight to projectile — so a 20 kg counterweight launches a 200 gram projectile).
Build a sturdy wooden box approximately 25 × 25 × 25 cm with a hinged or removable top for loading. Attach it to the short arm with a pivot so the box can swing freely — this 'hinged counterweight' design significantly improves efficiency over a fixed counterweight because the weight drops nearly vertically (extracting maximum gravitational energy) while the beam rotates in an arc. Medieval engineers discovered this improvement empirically; modern physics analysis confirms it increases range by 20-30%.
Materiais para este passo:
Hardwood Block2 peças Iron Nails20 peças
Make the sling
Make the sling
The sling is a pouch of leather or heavy fabric with two cords — one permanently attached to the tip of the long arm, and one looped over a release pin at the tip. The sling effectively doubles the length of the throwing arm, dramatically increasing the tip velocity and therefore the projectile's launch speed.
Cut a leather or heavy canvas pouch approximately 15 × 20 cm. Attach two cords (approximately 40-50 cm long — roughly one-third the length of the long arm) to opposite ends of the pouch. One cord ties permanently to a hook at the beam tip. The other cord has a loop that slips over a smooth metal pin angled at approximately 35-45 degrees from vertical. As the beam swings and the sling whips overhead, centrifugal force pulls the loop off the pin at the optimal release angle, launching the projectile.
Materiais para este passo:
 Hemp Cord2 metros
Ferramentas necessárias:
 Sharp Knife
Install the trigger mechanism
Install the trigger mechanism
The trigger holds the beam in the cocked position (long arm down, counterweight up) until the operator releases it. The simplest trigger is a wooden peg inserted through a hole in the base frame that hooks under the long arm's tip. Pulling a cord attached to the peg extracts it, freeing the beam to swing.
Cock the trebuchet by pulling the long arm down until the counterweight is raised to its maximum height. Insert the trigger peg to lock the beam in position. Load the projectile into the sling pouch and lay the sling flat on the ground behind the machine, aligned with the beam. The entire sling must be laid straight — any tangle or twist will cause an erratic launch. Stand clear of the swing arc before pulling the release cord.
Test-fire and calibrate
Test-fire and calibrate
Set up in an open field with a clear range of at least 50 meters. Use soft projectiles (tennis balls or cloth bags filled with sand) for initial testing — never use hard projectiles until the machine is calibrated. Pull the trigger cord from a safe position beside (never in front of or behind) the machine.
The first test fires reveal the release angle. If the projectile goes straight up, the release pin angle is too steep — bend it more toward horizontal. If the projectile flies into the ground 5 meters ahead, the pin is too shallow — bend it more vertical. Adjust in small increments. The optimal release produces a 45-degree launch angle, which maximizes range for a given energy input. A well-tuned 1.5-meter trebuchet with a 20 kg counterweight should launch a 200 gram projectile approximately 30-50 meters — and with remarkable consistency once calibrated.
Ferramentas necessárias:
 Chemical Splash Goggles
Materiais
4- 8 peçasReferência
- 1 peçaReferência
- 20 peçasReferência
Materiais de Blueprints conectados
Blueprints relacionados
Estes blueprints compartilham conhecimento — técnicas, materiais ou princípios
Related blueprints
Other builds that share materials, tools, or techniques with this one.

CC0 Domínio Público
Este blueprint é liberado sob CC0. Você é livre para copiar, modificar, distribuir e usar este trabalho para qualquer finalidade, sem pedir permissão.
Apoie o Maker comprando produtos através do Blueprint, onde ele ganha uma Comissão Maker definida pelos vendedores, ou crie uma nova versão deste Blueprint e inclua-o como conexão no seu próprio Blueprint para compartilhar receita.