

Dog Clutch
Instruções
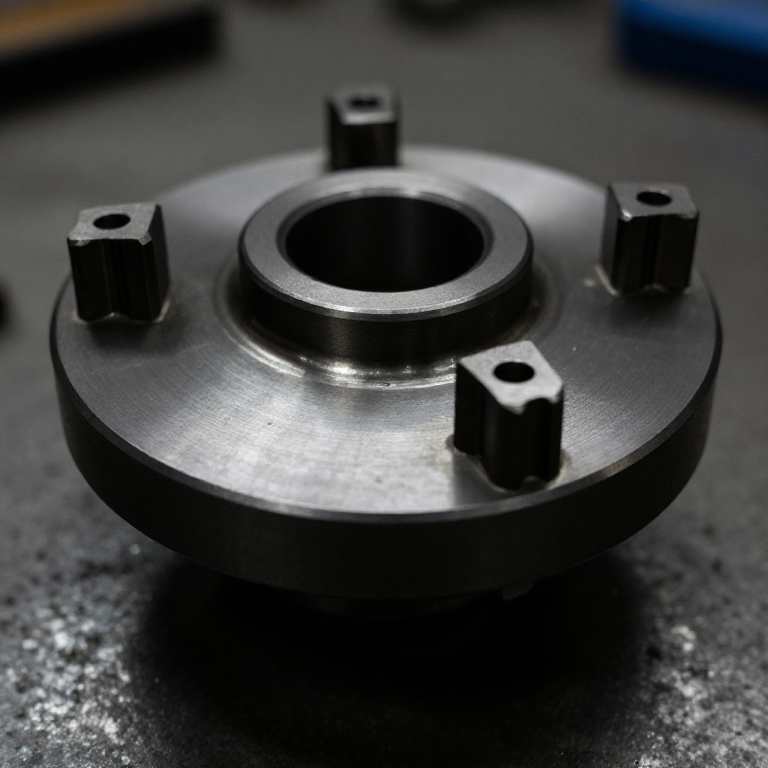
Cut four square dog teeth per face
Cut four square dog teeth per face
Few teeth, big teeth. That is the opposite of a gear and it is deliberate.
- Cut two 70 mm discs from 18 mm ply faced with 6 mm aluminium, or from solid aluminium bar.
- Mark four teeth on each face, 90 degrees apart, each spanning about 30 degrees of arc.
- Cut the gaps between them slightly WIDER than the teeth — about 35 degrees.
- File the tooth flanks square to the face, or with a very slight back-taper.
- Chamfer the leading corners of every tooth.
Why so few teeth. More teeth means each is smaller and weaker, and — more importantly — the clutch can then only engage at more closely matched positions. Four big teeth engage from any of four positions and carry the load on a large area. Gears want many small teeth for smooth motion; a dog clutch wants few large ones for strength and easy engagement, because it never runs meshed-and-rotating relative to its partner.
The clearance between tooth and gap is what lets it engage at all. Cut them the same size and thermal expansion or a speck of dirt will stop it engaging.Materiais para este passo:
 Contraplacado de bétula báltica1 folha
 Barra chata de alumínio1 peça
Ferramentas necessárias:
 Serra de recortes
 Jogo de limas
 Torno de bancada
 Esquadro combinado
 Paquímetro digital de 6 polegadas
 Punção de centro
Mount one half fixed, one half sliding
Mount one half fixed, one half sliding
One disc is keyed to its shaft; the other slides along its own shaft to engage.
- Fix the first disc to the driven shaft with two M5 cup point set screws at 90 degrees.
- File a flat along the driving shaft and fit the second disc with a set screw riding in it.
- Confirm the sliding disc moves 20 mm freely along the shaft but cannot rotate on it.
- Mount both shafts in 608 bearings in ply blocks, fixed with M5 × 40 socket head cap screws × 4, M5 flat washers × 8 and M5 hex nuts × 4.
- Set the two discs coaxial — check with a straightedge across both rims.
Materiais para este passo:
 Varão redondo de alumínio2 peças
 Ball Bearing - Non-Flanged (8mm Bore, 22mm OD)4 peças
 Parafuso sem cabeça de ponta côncava4 peças
 Anilha plana8 peças
 Porca sextavada4 peças
Ferramentas necessárias:
 Berbequim sem fios
 Jogo de brocas
 Jogo de chaves AllenJogo de limasEsquadro combinado
Add the shift fork and its detent
Add the shift fork and its detent
The fork slides the disc; a detent keeps it where you put it.
- Turn a groove in the sliding disc's back face, or fit two collars either side of a fork.
- Cut a fork from 6 mm aluminium and pivot it on an M6 × 40 hex bolt with M6 flat washers × 2.
- Drill two shallow detent dimples in the fork's travel — one for engaged, one for disengaged.
- Fit a spring-loaded ball or pin bearing into those dimples.
The detent is not a convenience. A dog clutch left half engaged carries load on the tooth corners only, and that is how teeth break. The detent makes the two valid positions the only comfortable places for the lever to sit, so the mechanism resists being left in between.
Every gearbox has this. What feels like a positive gear-change action is a detent doing exactly this job, and it exists for exactly this reason.Materiais para este passo:
Barra chata de alumínio1 peça Conjunto de molas de compressão1 conjuntoAnilha plana4 peças
Ferramentas necessárias:
Berbequim sem fiosJogo de brocasJogo de chaves AllenJogo de limas Arco de serra para metais com lâminas
Engage at rest, then engage at speed
Engage at rest, then engage at speed
The second test is the whole lesson, and it is audible.
- With both shafts stationary and roughly aligned, engage. It drops in cleanly.
- Load the output and confirm zero slip — the connection is absolute.
- Now spin the input by hand and try to engage the stationary output.
- Listen. Try again at a bigger speed difference.
Ferramentas necessárias:
 CronómetroPaquímetro digital de 6 polegadas
The synchroniser answer, and history
The synchroniser answer, and history
The gearbox solution is to use both clutches together. A synchroniser is a small cone clutch that engages FIRST, dragging the next gear up to matching speed, after which the dog teeth slide in without clashing. Earl Thompson at Cadillac developed the synchromesh gearbox in the late 1920s, and it turned gear changing from a skill — double-declutching, matching revs by ear — into something anyone could do. The dog clutch did not get better; it got a helper.
Where dog clutches are still used bare: racing sequential gearboxes, where the shock is accepted in exchange for near-instant shifts and no synchroniser drag; tractor power take-offs; and machine tool feed engagement, where positive drive matters and speeds are low or stopped.
Its place in this catalogue: the ratchet and pawl also gives positive, non-slipping engagement — but only in one direction, and it engages at discrete steps with an audible click. The dog clutch is bidirectional and locks fully. The sprag clutch is one-way like a ratchet but silent and stepless. Four ways to connect two rotating parts, and the differences are exactly what a designer chooses between.
Honest limit: aluminium dog teeth will deform under real torque. This build demonstrates the geometry and the engagement behaviour; a working clutch wants hardened steel teeth, because the corners carry enormous local stress at the instant of engagement.
Materiais
8- Referência
- 1 peçaReferência
- 2 peçasReferência
- Ball Bearing - Non-Flanged (8mm Bore, 22mm OD)10% de comissão4 peçasR$6.27
- Referência
- 12 peçasReferência
- 4 peçasReferência
- 1 conjuntoReferência
Ferramentas necessárias
11- Referência
- Referência
- Referência
- Referência
- Referência
- Referência
- 1 vendor sell this, none ship to you yetReferência
- Referência
- Referência
- Referência
- Referência
Blueprints relacionados
Estes blueprints compartilham conhecimento — técnicas, materiais ou princípios
CC0 Domínio Público
Este blueprint é liberado sob CC0. Você é livre para copiar, modificar, distribuir e usar este trabalho para qualquer finalidade, sem pedir permissão.
Apoie o Maker comprando produtos através do Blueprint, onde ele ganha uma Comissão Maker definida pelos vendedores, ou crie uma nova versão deste Blueprint e inclua-o como conexão no seu próprio Blueprint para compartilhar receita.