ARTE
BELEZA E BEM-ESTAR
ARTESANATO
CULTURA E HISTÓRIA
ENTRETENIMENTO
MEIO AMBIENTE
COMIDA E BEBIDAS
ENGENHARIA REVERSA
CIÊNCIAS
ESPORTES
TECNOLOGIA
TECNOLOGIA VESTÍVEL
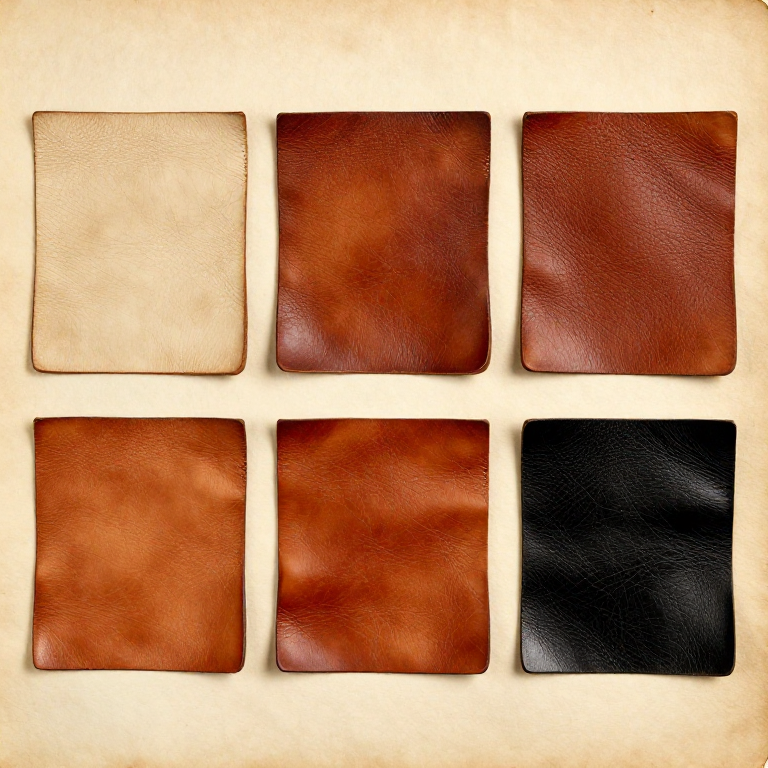


Dyeing and Finishing Leather: Colour Goes In, Protection Goes On
Vegetable-tanned leather comes pale, and almost everything made from it is coloured. Unlike dyeing cloth, there is no mordant, no bath and no fixing — the dye soaks into a porous solid and stays where it lands, which means every streak is permanent.
Three separate operations are involved and they are routinely confused. **Dye** puts colour in. **Oil** puts back the flexibility that dyeing removes. **Finish** goes on top and protects both.
Doing them in that order matters, and skipping the middle one is why so much home-dyed leather ends up stiff and cracked.
Intermediário
4 hours
Instruções
1
1
Preparing, and what stops dye taking
Preparing, and what stops dye taking
**Handle the piece as little as possible before dyeing.** Finger grease is the commonest cause of pale patches, and fingerprints show up as light marks in the shape of fingerprints. Work with clean dry hands or cotton gloves.
**Deglaze or clean the surface** if it has been handled, stamped with an oily tool or stored a long time. Oxalic acid or a proprietary deglazer lifts surface oils and evens the colour. On a clean new hide it is not needed.
**Case it lightly, or do not.** A slightly damp piece takes dye more evenly and less intensely; a dry piece takes it darker and faster. Either is valid — but be consistent across a project, because two pieces dyed at different wetness will not match.
**Dye before assembly, always.** Once a piece is stitched, the dye cannot reach between the layers, and the join shows as a pale line at every edge.
**Test on a scrap from the same hide.** Different parts of the same hide take dye differently — the belly is more absorbent than the bend and comes out darker.
Materiais para este passo:
 Couro curtido ao vegetal2 peças
 Tinta para couro1 peça
2
2
Applying dye without streaks
Applying dye without streaks
Streaking is the whole problem, and it comes from the dye drying at different times in different places.
**Dip dyeing gives the most even result.** In and out of a tray of dye in one movement, fully submerged. It uses a lot of dye and the colour is hard to control, but it cannot streak.
**By hand: work fast, wet on wet, never stop mid-piece.** A wool dauber or a sponge, in overlapping circles, covering the whole piece before any of it starts to dry. A line where the applicator was reloaded is permanent.
**Several thin coats beat one heavy one.** Let each dry, then go again at a right angle to the last. Three light coats give a depth and evenness that one wet coat never does.
**Spirit dyes dry fast and penetrate deep; water dyes are slower and sit shallower.** The fast drying is exactly what makes spirit dye streak, and it is also why it is more colourfast.
**Buff between coats** with a clean cloth. Dye that has dried on the surface rather than soaked in comes off on clothing for years otherwise — this is why cheap black belts mark shirts.
**Let it dry fully before oiling.** A day, not an hour.
Materiais para este passo:
Tinta para couro1 peçaCouro curtido ao vegetal2 peçasFerramentas necessárias:
 Base de corte autocicatrizante
3
3
Oil, because dye takes the life out
Oil, because dye takes the life out
Spirit dye carries alcohol, and alcohol strips the natural oils out of the leather as it evaporates. A freshly dyed piece is noticeably stiffer and drier than it was, and left like that it will crack at the first hard fold.
**Neatsfoot oil** is the traditional answer — rendered from cattle shin bones, and it is what the leather was dressed with at the tannery. One thin coat, rubbed in evenly, then left a day for it to distribute.
**Thin, and once.** Oil keeps travelling through the leather for a day or two, so a piece that looks under-oiled in the first hour is usually right by the next day. Over-oiled leather is limp, dark and greasy, and there is no way to take it back out.
**Oil darkens.** Always, and permanently. Test on a scrap before committing, because the piece will not look the colour it did when the dye dried.
**Oil both sides**, or the piece curls as one face takes up more than the other.
Other dressings: **saddle soap** cleans and conditions lightly, **beeswax and tallow mixtures** condition and waterproof at once, **mink oil** is heavier and very water resistant. Avoid mineral oil and petroleum jelly, which do not bond to the fibres and eventually leach out.
Materiais para este passo:
Couro curtido ao vegetal2 peças Cera de abelha1 peça
4
4
Finish: the layer that takes the wear
Finish: the layer that takes the wear
The finish is the sacrificial top layer. It keeps dye in, water and dirt out, and it is what wears away instead of the leather.
**Resolene and acrylic finishes** are flexible plastic films. Very water resistant, and they seal the dye so it cannot rub off. They also seal the leather, so it stops breathing and stops developing a patina — a matter of taste, not of quality. Apply thinned, in thin coats.
**Wax finishes** — beeswax, carnauba, or a paste of both — buff to a soft sheen, resist water well, and can be renewed for ever. This is what a good belt or a bag gets.
**Oil finishes** leave the surface open and the leather continues to darken and burnish with handling. Least protection, best ageing.
**No finish at all** is a real choice for something that is meant to weather.
Whatever is used: **thin coats, buffed between, on a fully dry piece.** A thick coat of acrylic cracks along every fold within a season, and a finish applied over oil that has not settled goes cloudy.
**The order is fixed: dye, dry, oil, rest, finish, buff, burnish the edges, then assemble.** Every step out of order is visible in the finished piece.
Materiais para este passo:
Cera de abelha1 peçaCouro curtido ao vegetal1 peçaFerramentas necessárias:
 Brunidor de ágata
Materiais
3- 2 peçasReferência
- 2 peçasReferência
- 2 peçasReferência
Ferramentas necessárias
2- Referência
- Referência
Blueprints relacionados
Estes blueprints compartilham conhecimento — técnicas, materiais ou princípios
CC0 Domínio Público
Este blueprint é liberado sob CC0. Você é livre para copiar, modificar, distribuir e usar este trabalho para qualquer finalidade, sem pedir permissão.
Apoie o Maker comprando produtos através do Blueprint, onde ele ganha uma Comissão Maker definida pelos vendedores, ou crie uma nova versão deste Blueprint e inclua-o como conexão no seu próprio Blueprint para compartilhar receita.