
Colaboração
ARTE
BELEZA E BEM-ESTAR
ARTESANATO
CULTURA E HISTÓRIA
ENTRETENIMENTO
MEIO AMBIENTE
COMIDA E BEBIDAS
ENGENHARIA REVERSA
CIÊNCIAS
ESPORTES
TECNOLOGIA
TECNOLOGIA VESTÍVEL
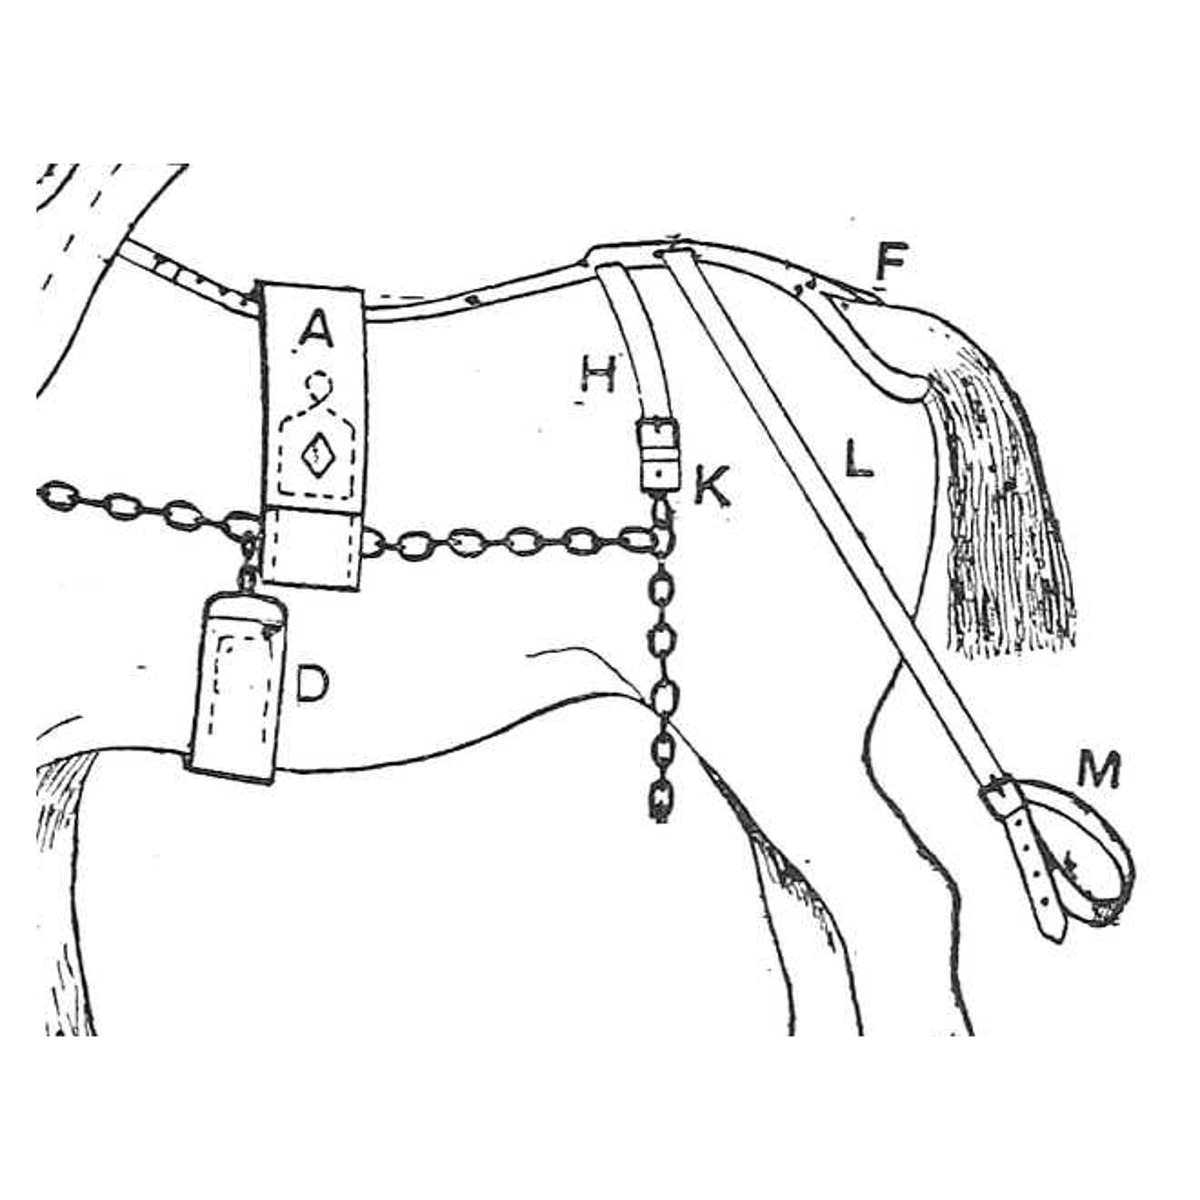
Leader Harness Long Crupper: Folded Dock, Lay, Hip Straps, Carrier Straps and Tugs (Hasluck, Harness Making, 1904)
Tex

Criado por

Tex

13. novembro 2026FO
7
0
0
0
0

Leader Harness Long Crupper: Folded Dock, Lay, Hip Straps, Carrier Straps and Tugs (Hasluck, Harness Making, 1904)

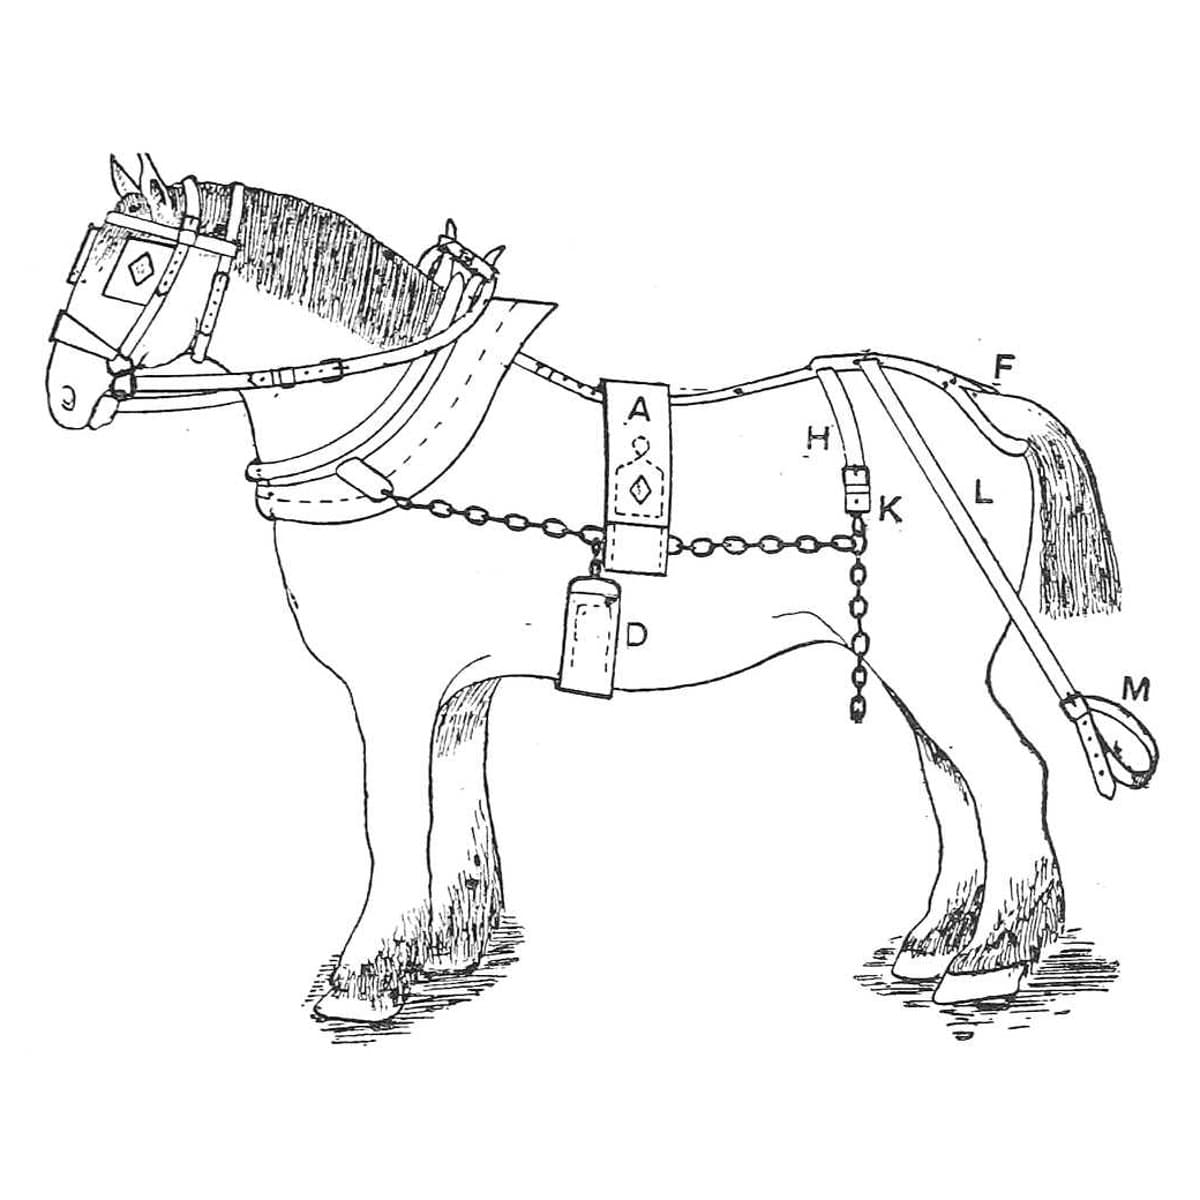
The leader horse's long crupper (F in Fig. 102) runs from the collar straps along the back to the tail, and carries the hip straps (H) that hold up the chain traces and the carrier straps (L) for the stretcher. This is the long crupper from Paul N. Hasluck's Harness Making (1904), with its folded dock, lay, 3 in dee, hip-strap tugs (K) and stretcher strap (M). Every size is his.
Avançado
About 1-2 days

Instruções

1

His sizes in centimetres

A carregar o notebook Jupyter…
2

Read Harness Making, ch. VIII

"Cut the crupper from good leather 3 ft. 8 in. long and 5 in. wide, and make a split 9 in. long at the light end and another, 7 in. long, at the tail end."
3

Cut the body

Cut the crupper 3 ft 8 in by 5 in. Slit the light end 9 in and the tail end 7 in, leaving the points of the slits the full width in front and only cutting a little out of the corners. Narrow the tail-end points gradually to about 1-1/8 in and cut a little from the sides of each slit. Cut a lining for a foot or so of the tail end.

Materiais para este passo:

Couro para arreiosCouro para arreios1 peça

Ferramentas necessárias:

Faca para couroFaca para couro

Fita métricaFita métrica
4

Fold the dock

Cut soft leather 16 in by 3-1/2 in for the dock and shave the ends thin. Damp it well and turn both edges down so they overlap deeply along the centre. Bring both ends together, sides meeting flat but not flat sides together; holding the piece flat in the centre, turn the lower edge inwards and upwards, keeping the points together with the other hand. Nail each point to a board and keep it in shape until dry, when the dock will be firm.

Materiais para este passo:

Carneira curtida (basil)Carneira curtida (basil)1 peça
PregosPregos1 peça

Ferramentas necessárias:

Faca para couroFaca para couro
EsponjaEsponja
MarteloMartelo
Tábua de pinhoTábua de pinho
5

Finish the body and put in the dock

Edge, crease and black the body, making two rows all round; rub the edges well and hot-crease the lines. At the tail end prick the second line as far as the double runs. When the dock is dry, put it between the lining and body at each end of the slit, tack it down round the lining and stitch. A few egg-shaped stitches inside the outer stitches, through the body and dock points, keep the dock in place. Trim the edges and black, rub and tallow them, and the inside edges of the slits too.

Materiais para este passo:

Tinta para couroTinta para couro1 peça
SeboSebo1 peça
Tachas de montarTachas de montar1 peça
Fio de couroFio de couro1 peça
Cera de abelhaCera de abelha1 peça

Ferramentas necessárias:

Biselador de bordosBiselador de bordos
DobradeiraDobradeira
Maçarico a propanoMaçarico a propano
Brunidor de bordos de couroBrunidor de bordos de couro
Vazador de costuraVazador de costura
MarteloMartelo
SovelaSovela
Duas agulhas de correeiroDuas agulhas de correeiro
Torno de seleiroTorno de seleiro
6

Fit the front buckles

Cut two chapes to hold the buckles in front that fasten the crupper to the collar straps; bend them down about 4 in, shave one end and point the other, and cut a hole for the buckle. Tack two loops about 1-1/2 in wide in place, keeping the outside of each buckle exactly level with the end of its slit and the chapes right in the centre. Stitch them down, put a cross stitch on each side of the buckle, and shape and crease the loops.

Materiais para este passo:

Couro para arreiosCouro para arreios1 peça
Fivela de ferro com fuzilhãoFivela de ferro com fuzilhão2 peças
Fio de couroFio de couro1 peça
Cera de abelhaCera de abelha1 peça

Ferramentas necessárias:

Faca para couroFaca para couro

Forma de passadoresForma de passadores
DobradeiraDobradeira
Maçarico a propanoMaçarico a propano
SovelaSovela
Duas agulhas de correeiroDuas agulhas de correeiro
Torno de seleiroTorno de seleiro
7

Make the lay, hip straps and carrier straps

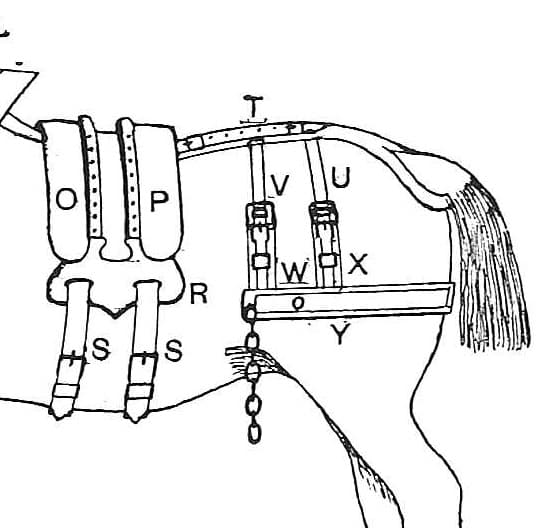
Cut the lay 1 ft 3 in by 3 in, turn it down for about 1 ft at the good end, shave the end of the short turn thin and round the other end; edge, crease and black it. Cut two hip straps 2 ft by 1-1/2 in, turn them down 3 in at the heavy end, shave the turn-down, point the buckle end, and crease and black them. Attach them to a 3 in japanned or tinned dee, one on each side, with four rows of stitching in the double of each; rub and finish the edge. Make two carrier straps the same way, each 2 ft 10 in by 1-1/4 in, and stitch them in the middle round part of the dee between the hip straps.

Materiais para este passo:

Couro para arreiosCouro para arreios1 peça
Argola em D de arreioArgola em D de arreio1 peça
Tinta para couroTinta para couro1 peça
Fio de couroFio de couro1 peça
Cera de abelhaCera de abelha1 peça

Ferramentas necessárias:

Faca para couroFaca para couro
Biselador de bordosBiselador de bordos
DobradeiraDobradeira
Maçarico a propanoMaçarico a propano
Brunidor de bordos de couroBrunidor de bordos de couro
SovelaSovela
Duas agulhas de correeiroDuas agulhas de correeiro
Torno de seleiroTorno de seleiro
Fita métricaFita métrica
8

Stitch the dee and lay to the body

Put the straight part of the dee in the bend of the lay and place it on the centre of the crupper body, the same distance from each side, with the extreme point of the dee within 8 in of the points of the tail slits. Tack down and stitch two rows 1/4 in apart all round, eight per inch, with three-cord thread; then stitch the lay coarse, or spot it across just to the dee. Some makers put a pad under the crupper, as on the cart-saddle crupper, from the end of the tail slit to 1 in beyond the point of the lay.

Materiais para este passo:

Tachas de montarTachas de montar1 peça
Fio de couroFio de couro1 peça
Cera de abelhaCera de abelha1 peça

Ferramentas necessárias:

MarteloMartelo
Vazador de costuraVazador de costura
SovelaSovela
Duas agulhas de correeiroDuas agulhas de correeiro
Torno de seleiroTorno de seleiro
9

Make the hip-strap tugs and stretcher strap

With a pair of 1-1/2 in hip-strap chains, cut the tugs 10 in by 1-1/2 in; bend them so the points meet in the centre, cut a hole for the buckle in one end, stitch the points together and put in two narrow loops (one hides the joint) or one broad loop. Stitch a safe underneath. For the stretcher carrier tug, cut a strap 1-1/4 in by 1 ft 2 in, bend a chape in it and cut a hole for the buckle; stitch the buckle on with a loop, and make a running loop and a hole 1 in from the point of the strap.

Materiais para este passo:

Corrente de ferroCorrente de ferro2 peças
Couro para arreiosCouro para arreios1 peça
Fivela de ferro com fuzilhãoFivela de ferro com fuzilhão3 peças
Fio de couroFio de couro1 peça
Cera de abelhaCera de abelha1 peça

Ferramentas necessárias:

Faca para couroFaca para couro
Forma de passadoresForma de passadores
Vazador para couroVazador para couro
SovelaSovela
Duas agulhas de correeiroDuas agulhas de correeiro
Torno de seleiroTorno de seleiro
10

Put the gear together

Fix a loop on each end of the stretcher and nail its ends, leaving room for the strap to pass. Put the runner loop on the strap, run the strap down through the stretcher loop and back through the runner to the buckle; secure the carrier straps to the same buckle, their points down in the loop, and keep the runner down by the stretcher. Buckle the hip straps into the tug buckles, hook the chain traces on, and buckle the collar straps into the front buckles. The dock under the tail is optional: the hip straps fastened in the dee keep the crupper in place.

Materiais para este passo:

Couro para arreiosCouro para arreios1 peça
PregosPregos1 peça

Ferramentas necessárias:

MarteloMartelo
Faca para couroFaca para couro
11

Troubleshooting

Long crupper troubleshooting.

Flow

Loading...
12

History and honest limits

From **Harness Making**, edited by Paul N. Hasluck, Cassell, 1904 (Project Gutenberg 70169), chapter VIII, "Fore Gear or Leader Harness", pp. 101-104, Figs. 102-104; every fraction was checked on the archive.org scan (harnessmaking00hasl). The stretcher (the bar that keeps the traces apart) is not made here. Basil for the "soft leather" dock, the buckle count in the list, the tools and metric figures are ours.

Materiais

11

Ferramentas necessárias

15

CC0 Domínio Público

Este blueprint é liberado sob CC0. Você é livre para copiar, modificar, distribuir e usar este trabalho para qualquer finalidade, sem pedir permissão.

Apoie o Maker comprando produtos através do Blueprint, onde ele ganha uma Comissão Maker definida pelos vendedores, ou crie uma nova versão deste Blueprint e inclua-o como conexão no seu próprio Blueprint para compartilhar receita.

Discussão

(0)

Entrar para participar da discussão

Carregando comentários...