
Colaboração
ARTE
BELEZA E BEM-ESTAR
ARTESANATO
CULTURA E HISTÓRIA
ENTRETENIMENTO
MEIO AMBIENTE
COMIDA E BEBIDAS
ENGENHARIA REVERSA
CIÊNCIAS
ESPORTES
TECNOLOGIA
TECNOLOGIA VESTÍVEL
Plough Back-Band With Hooks: Faced, Flock-Padded Back-Band With a Rein Dee (Hasluck, Harness Making, 1904)
Tex

Criado por

Tex

13. novembro 2026FO
6
0
0
0
0

Plough Back-Band With Hooks: Faced, Flock-Padded Back-Band With a Rein Dee (Hasluck, Harness Making, 1904)

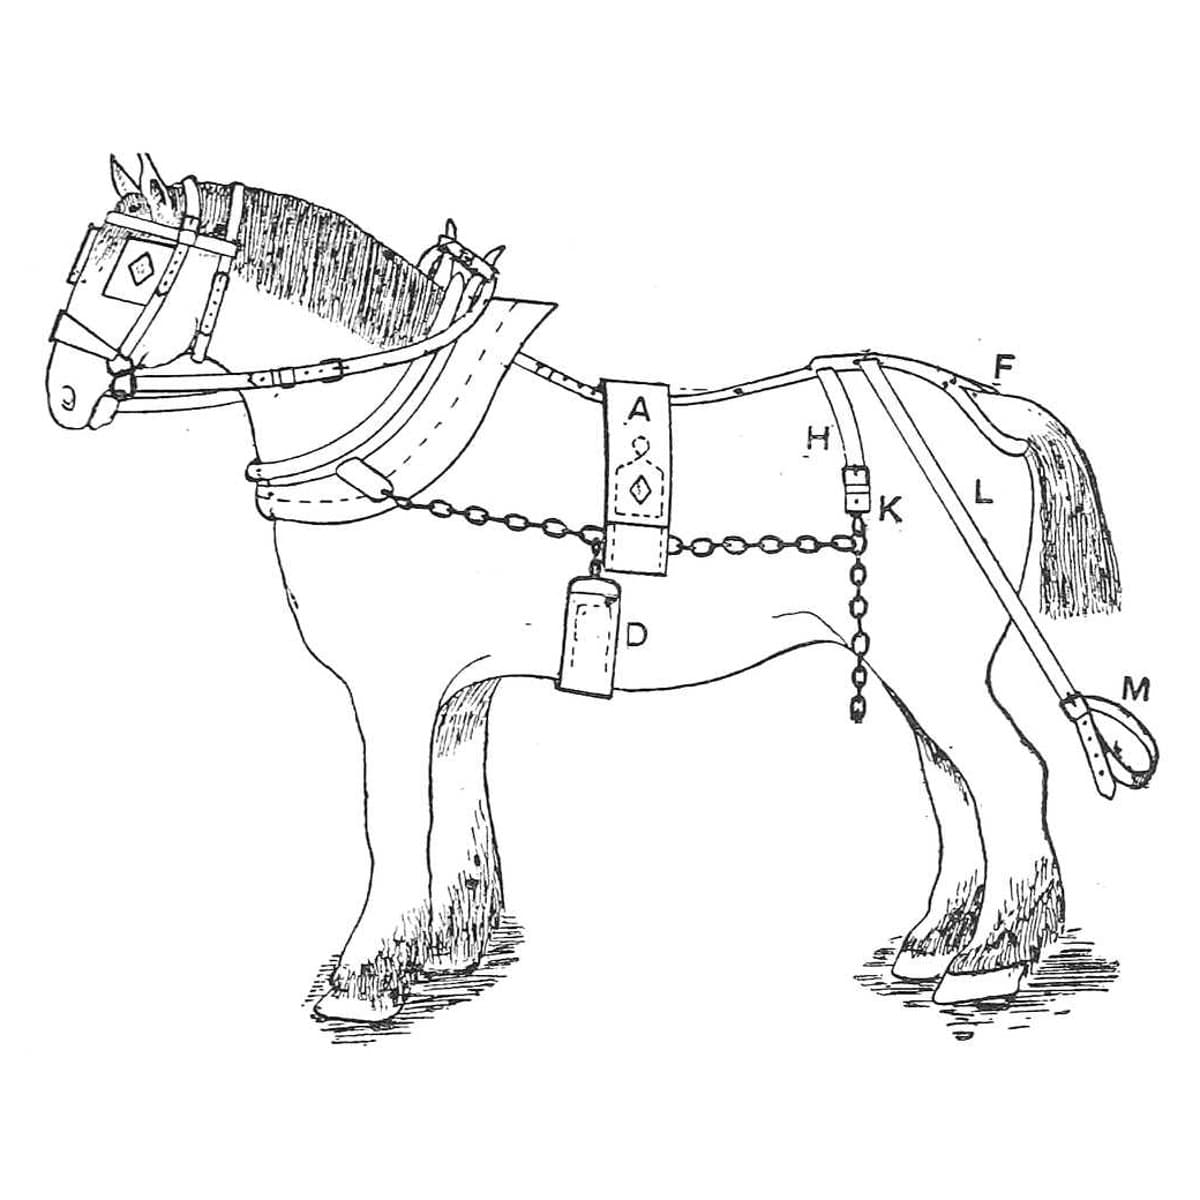
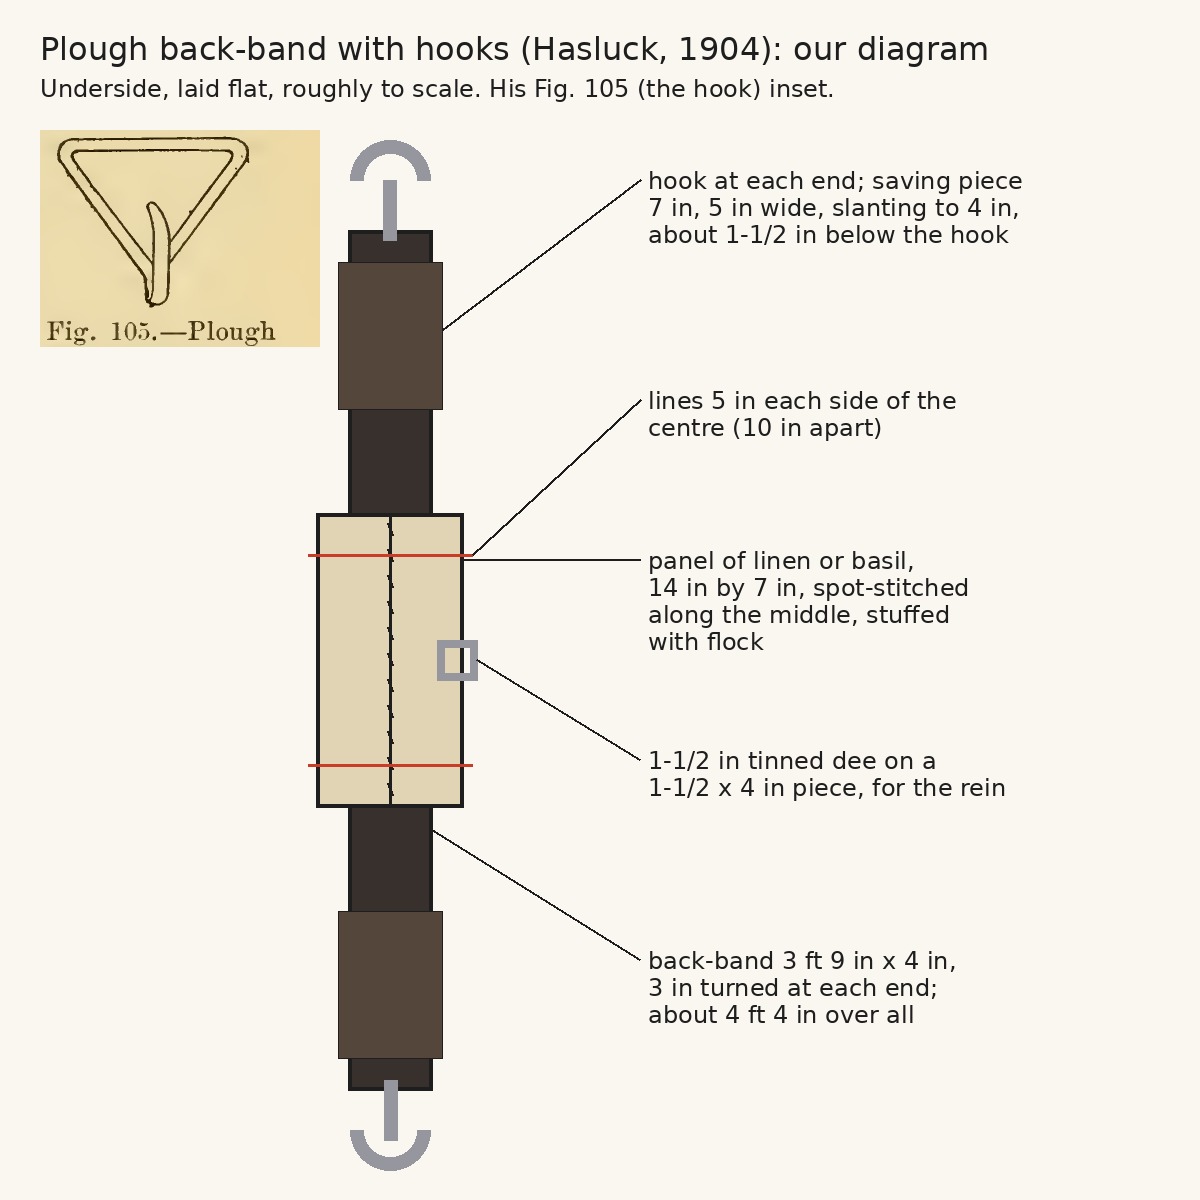
In plough harness the back-band carries the traces over the horse's back. This is the plough back-band with hooks from Paul N. Hasluck's Harness Making (1904): a 4 in band about 4 ft 4 in over all, with leather facings, a flock-stuffed panel to stop the back getting sore, a dee for the plough rein, and a hook sewn into each end. Every size is his; the picture is our diagram with his Fig. 105 inset.
Intermediário
About 1 day

Instruções

1

His sizes in centimetres

A carregar o notebook Jupyter…
2

Read Harness Making, ch. IX

"In plough gears the ordinary bridle and collar are employed. The back-band is made in various ways. The method with hooks is taken first. The eye of the hook (Fig. 105) is 4 in. wide."
3

Cut and mark the back-band

Cut the leather 3 ft 9 in long and 4 in wide. Turn down 3 in at each end, beat the bend slightly with the hammer to keep it down, and crease it with the screw race, two rows on each side. Mark the centre from each end and draw a line straight across there, then two lines 5 in each side of the centre, 10 in apart.

Materiais para este passo:

Couro para arreiosCouro para arreios1 peça

Ferramentas necessárias:

Faca para couroFaca para couro
MarteloMartelo
DobradeiraDobradeira
Maçarico a propanoMaçarico a propano
LápisLápis
Fita métricaFita métrica
4

Stitch on the facings

Cut two pieces 10-1/2 in long and 3/4 in wide; cut a small piece out of each corner of the working side, then dye and crease that side. Draw a line along the centre of each with the compasses and mark across the centre. Prick out where they go on the back-band, then place one underneath the back-band, centre to centre, as far as the drawn line, and tack it down; place the other the same way on the other side, so the pieces run a little over both lower lines at each end. Stitch, keeping the line close to the edge of the back-band, with thread of three or four cords of coarse hemp.

Materiais para este passo:

Couro para arreiosCouro para arreios1 peça
Tinta para couroTinta para couro1 peça
Tachas de montarTachas de montar1 peça
Cordel de cânhamoCordel de cânhamo1 peça
Cera de abelhaCera de abelha1 peça

Ferramentas necessárias:

Faca para couroFaca para couro
DobradeiraDobradeira
Compasso de riscar de seleiroCompasso de riscar de seleiro
Vazador de costuraVazador de costura
MarteloMartelo
SovelaSovela
Duas agulhas de correeiroDuas agulhas de correeiro
Torno de seleiroTorno de seleiro
5

Fit the rein dee

Cut a piece of leather 1-1/2 in by 4 in, shave and point both ends, and crease, black and prick it like the side, eight or ten marks per inch. Put a 1-1/2 in tinned dee in the centre of it, lay it flat on the back-band in the centre (measured from both sides, or from the top line to either line below), tack it and stitch. The plough rein runs through this dee; for a pair of horses put the dee on the opposite side of each back-band, for a single horse one on each side of the same back-band.

Materiais para este passo:

Argola em D de arreioArgola em D de arreio1 peça
Couro para arreiosCouro para arreios1 peça
Tinta para couroTinta para couro1 peça
Cordel de cânhamoCordel de cânhamo1 peça
Cera de abelhaCera de abelha1 peça

Ferramentas necessárias:
Faca para couroFaca para couro
Vazador de costuraVazador de costura
SovelaSovela
Duas agulhas de correeiroDuas agulhas de correeiro
Torno de seleiroTorno de seleiro
6

Make the panel

Take linen (or basil) 14 in by 7 in and lay the back-band on it centre to centre, even on both sides. Spot-stitch across the back-band and through the linen along the middle line, like this: // // //. Turn in the linen all round about 1/2 in (basil needs no turning). Make a pleat at each corner at the end of the facing, both exactly the same length, and another opposite each, so the width equals the back-band and facing together (for basil, cut the corner off and stitch the cut instead). Stitch all round, starting about 1-1/2 in from the centre on one side to leave an opening for stuffing, along the cross lines at the bottom, to within 1-1/2 in of the centre on the other side.

Materiais para este passo:

Tecido de linhoTecido de linho1 peça
Cordel de cânhamoCordel de cânhamo1 peça
Cera de abelhaCera de abelha1 peça

Ferramentas necessárias:

TesouraTesoura
SovelaSovela
Duas agulhas de correeiroDuas agulhas de correeiro
7

Stuff the panel

Lay the back-band flat on the bench, leather side underneath, openings near the bench edge. Stuff each side rather tightly with flock through the openings, using the stuffing stick; smooth it well towards the sides, flatten with a mallet, and stitch along the openings to the starting point.

Materiais para este passo:

Enchimento de lãEnchimento de lã1 peça
Cordel de cânhamoCordel de cânhamo1 peça
Cera de abelhaCera de abelha1 peça

Ferramentas necessárias:

Vara de encherVara de encher
Maço de madeiraMaço de madeira
SovelaSovela
Duas agulhas de correeiroDuas agulhas de correeiro
8

Sew in the hooks

Cut two saving pieces from a thick, firm face of hide (the face of a gear hide is best), 7 in long and, for a 4 in back-band, 5 in wide. Cut one end slanting to 4 in, the back-band's width, and shave it; round the corners of the other end, leaving it full width; black and crease the edges. Put the hooks in place with the saving pieces under them about 1-1/2 in lower than the end of the hook, and tack them down exactly in the centre. Mark and prick four rows from the hook up to the end of the saving pieces, stitch with four-cord thread, nine or ten stitches per inch, and stitch a line across close to the hook to bind it all together.

Materiais para este passo:

Gancho de dorsalGancho de dorsal2 peças
Couro para arreiosCouro para arreios1 peça
Tinta para couroTinta para couro1 peça
Tachas de montarTachas de montar1 peça
Cordel de cânhamoCordel de cânhamo1 peça
Cera de abelhaCera de abelha1 peça

Ferramentas necessárias:

Faca para couroFaca para couro
DobradeiraDobradeira
Maçarico a propanoMaçarico a propano
Vazador de costuraVazador de costura
MarteloMartelo
SovelaSovela
Duas agulhas de correeiroDuas agulhas de correeiro
Torno de seleiroTorno de seleiro
9

Troubleshooting

Plough back-band troubleshooting.

Flow

Loading...
10

History and honest limits

From **Harness Making**, edited by Paul N. Hasluck, Cassell, 1904 (Project Gutenberg 70169), chapter IX, "Plough Harness", pp. 107-110, Fig. 105; every fraction was checked on the archive.org scan (harnessmaking00hasl). The back-band with chains instead of hooks and the coupling straps are not made here. Linen for the panel (he allows basil), the tools and metric figures are ours; the picture is our diagram with his Fig. 105 inset.

Materiais

9

Ferramentas necessárias

14

CC0 Domínio Público

Este blueprint é liberado sob CC0. Você é livre para copiar, modificar, distribuir e usar este trabalho para qualquer finalidade, sem pedir permissão.

Apoie o Maker comprando produtos através do Blueprint, onde ele ganha uma Comissão Maker definida pelos vendedores, ou crie uma nova versão deste Blueprint e inclua-o como conexão no seu próprio Blueprint para compartilhar receita.

Discussão

(0)

Entrar para participar da discussão

Carregando comentários...