Colaboração
ARTE
BELEZA E BEM-ESTAR
ARTESANATO
CULTURA E HISTÓRIA
ENTRETENIMENTO
MEIO AMBIENTE
COMIDA E BEBIDAS
ENGENHARIA REVERSA
CIÊNCIAS
ESPORTES
TECNOLOGIA
TECNOLOGIA VESTÍVEL
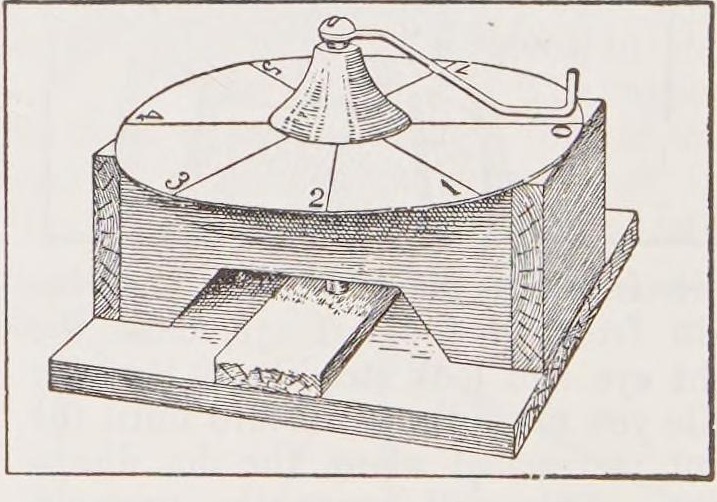


Home-Made Screw Micrometer: a Fine-Threaded Bolt and a Paper Dial (Boy Mechanic, 1913)
A simple micrometer for measuring thin things: a fine-threaded bolt turns through a nut set in a small wooden bench, a wire pointer soldered to its head sweeps a graduated pasteboard dial, and each turn moves the tip down by one thread.
Iniciante
Two hours
Instruções
1
1
Reading the dial
Reading the dial
A carregar o notebook Jupyter…
2
2
Read the Boy Mechanic
Read the Boy Mechanic
"A simple, fairly accurate, and easily made apparatus of the micrometer form may be constructed."
3
3
Choose the bolt
Choose the bolt
Get an iron or brass bolt about 1/4 in across and 2-1/2 in long with as fine a thread as possible, threaded nearly to the head, with its nut. Cut a screwdriver slot in the head.
Materiais para este passo:
 Parafusos de máquina1 peça
 Porca sextavada1 peça
Ferramentas necessárias:
 Serra de arco para metais
 Torno de bancada
4
4
Make the bench
Make the bench
Clamp two square-cornered wood blocks (about 1 x 3/4 x 2-1/2 in) side by side and nail small pieces across the ends; together they are about 2 in wide. Bore a 1/4 in hole through the centre in the 2 in direction. Unclamp, set the nut into one block in line with the hole, then cut a piece out so the blocks form a little bench. Glue its legs to a thin board about 2-1/2 in square.
Materiais para este passo:
 Tábua de madeira de lei1 peça
 Pregos1 peça
 Cola de madeira1 peça
Ferramentas necessárias:
 Serrote
 Arco de pua e broca
 Sargento de barra
 Formões
 Martelo
5
5
Pointer and dial
Pointer and dial
Solder a stiff wire about 2 in long to the bolt head at right angles. Cut a disc of heavy pasteboard with a radius equal to the wire, divide its edge into equal spaces, and fix it on top of the bench. Screw the bolt down through the nut.
Materiais para este passo:
 Arame de ferro1 peça
 Solda de estanho-chumbo1 peça
 Cartão colado1 peça
Ferramentas necessárias:
 Ferro de soldar
 Bússola
6
6
Anvil
Anvil
Fix a small piece of wood on the base between the bench legs and glue a small piece of metal on it where the bolt meets it.
Materiais para este passo:
Tábua de madeira de lei1 peçaCola de madeira1 peça7
7
Calibrate and measure
Calibrate and measure
Count the threads in one inch of the bolt on a rule: one turn moves the tip one thread. To measure, screw down onto the object, remove it, screw down to the base, and note how far the wire travels over the dial. Turns (with the part of a turn) divided by threads per inch = thickness in inches.
Ferramentas necessárias:
 Régua
8
8
Troubleshooting
Troubleshooting
Micrometer troubleshooting.
Flow
Loading...
9
9
History and honest limits
History and honest limits
From **The Boy Mechanic, Book 1** (Popular Mechanics, 1913), p. 130, credited to the Scientific American (checked on the archive.org scan boymechanic0000unse_n5a8). The 1/4-20 bolt and 50-division dial are our example.
Materiais
8- 1 peçaReferência
- 1 peçaReferência
- 1 peçaReferência
- 1 peçaReferência
- 2 peçasReferência
- 1 peçaReferência
- 1 peçaReferência
- 1 peçaReferência
Ferramentas necessárias
10- Referência
- Referência
- Referência
- Referência
- Referência
- Referência
- Referência
- 2 vendors sell this, none ship to you yetReferência
- Referência
- Referência
Este projeto faz

CC0 Domínio Público
Este blueprint é liberado sob CC0. Você é livre para copiar, modificar, distribuir e usar este trabalho para qualquer finalidade, sem pedir permissão.
Apoie o Maker comprando produtos através do Blueprint, onde ele ganha uma Comissão Maker definida pelos vendedores, ou crie uma nova versão deste Blueprint e inclua-o como conexão no seu próprio Blueprint para compartilhar receita.