ARTE
BELEZA E BEM-ESTAR
ARTESANATO
CULTURA E HISTÓRIA
ENTRETENIMENTO
MEIO AMBIENTE
COMIDA E BEBIDAS
ENGENHARIA REVERSA
CIÊNCIAS
ESPORTES
TECNOLOGIA
TECNOLOGIA VESTÍVEL
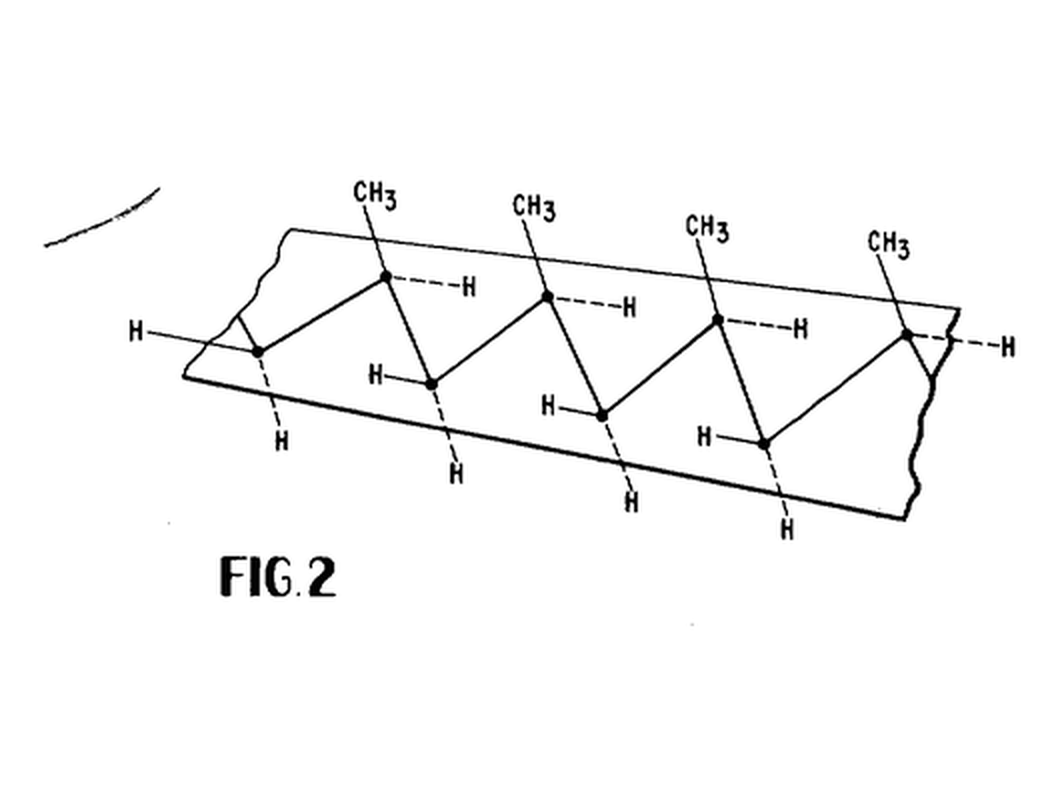


Isotactic Polypropylene
Propylene had always polymerised into a useless sticky mass. In March 1954 Giulio Natta's group at the Milan Polytechnic, using catalysts of the kind Karl Ziegler had just found for ethylene, made polypropylene in which every methyl group sits on the same side of the chain. They called it isotactic. The ordered chains crystallise, and a sticky nothing became a stiff, light, tough plastic. Natta and Ziegler shared the 1963 Nobel Prize in Chemistry.
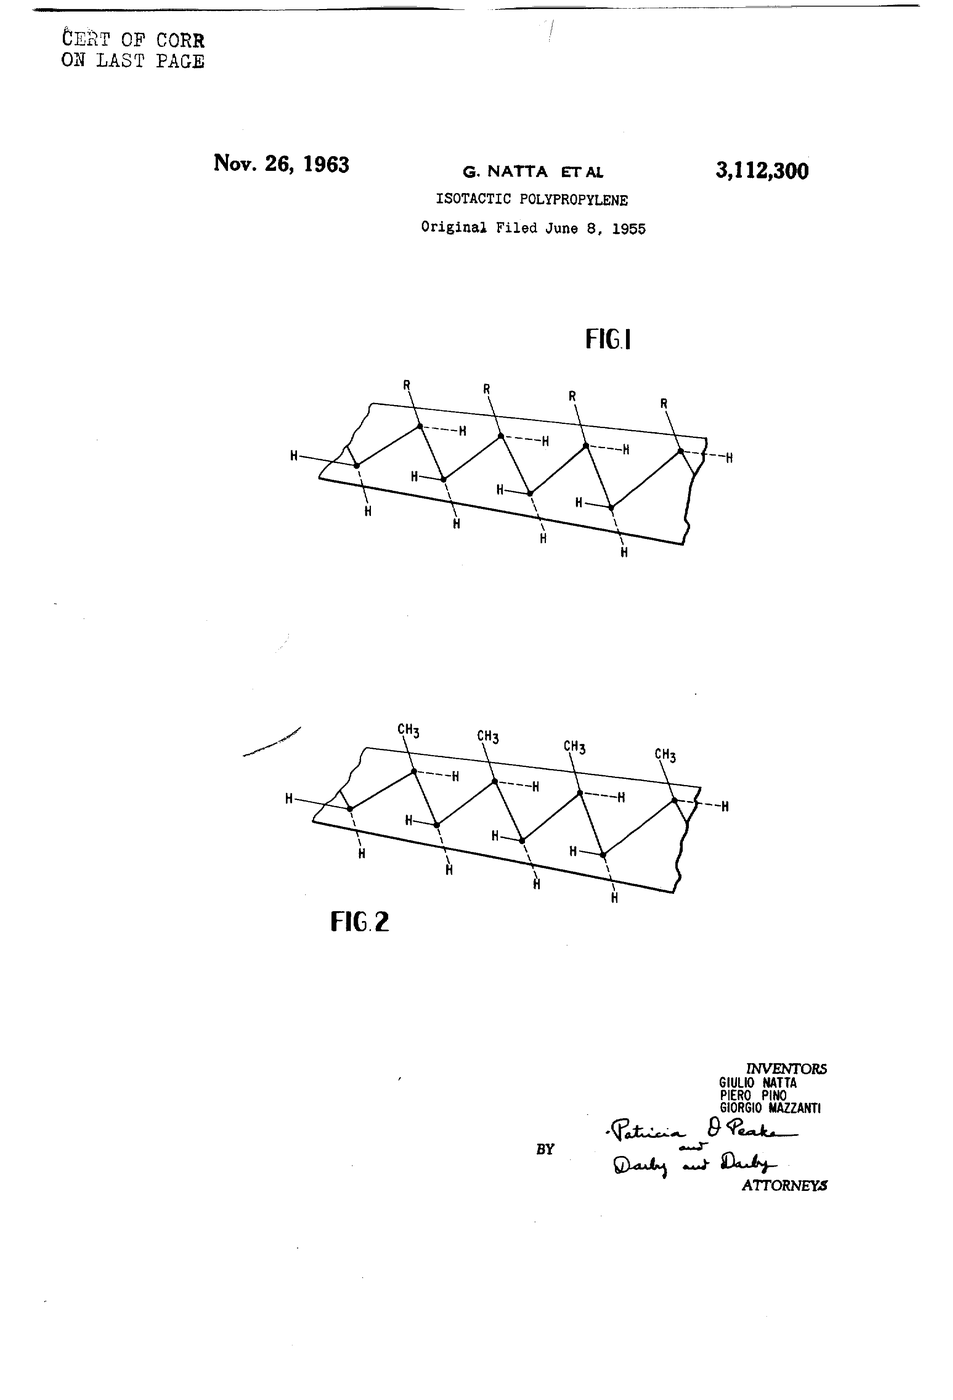
**US 3,112,300**, "Isotactic polypropylene", Natta, Pino and Mazzanti, assigned to Montecatini, filed 9. December 1957 (continuing an application of 8. June 1955), granted 26. November 1963. Its single claim is the arrangement itself: macromolecules "insoluble in boiling n-heptane" with the structure "shown in FIGURE 2 of the accompanying drawing".
**You build the property that made it famous**: an Arduino servo rig that folds a polypropylene living hinge thousands of times, beside PET film.
Intermediário
3 hours plus flex runs
Instruções
1
1
Cut the hinges
Cut the hinges
Cut 80 x 20 mm strips from 0.5 mm polypropylene and from PET film. Measure both thicknesses. Fold each sharply across the middle once and flatten the crease with a fingernail - flexing it right away is how moulded hinges are made too.
Materiais para este passo:
 Placa de polipropileno (A4)1 folha
 Folha de estêncil de mylar1 folha
Ferramentas necessárias:
 X-ato de oficina
 Régua
Régua Paquímetro digital de 6 polegadas
2
2
Build the fixture
Build the fixture
Screw two 100 x 50 mm pine blocks side by side. Hot-glue the servo to one so its shaft sits exactly on the crease line. Clamp one leaf of the hinge to the other block with a binder clip; hot-glue the free leaf to the servo horn.
Materiais para este passo:
 Tábua de pinho1 peça
 Parafusos para madeira2 peças
 Micromotor servo SG90 (5 unidades)1 pacote
Ferramentas necessárias:
 Pistola de cola quente
 Molas de papel grandes
 Conjunto de chaves de fendas
3
3
Wire and flash the counter
Wire and flash the counter
Servo signal to D9, power to 5V and GND; microswitch between D2 and GND. One SG90 can run from the Uno's 5 V pin - if the board resets under load, power the servo separately with a shared GND. Open the serial monitor at 115200.
living_hinge_flex_counter.inocpp
Materiais para este passo:
 Microinterruptor (accionado por alavanca)1 peça
 Conjunto de cabos Dupont (macho-fêmea)1 conjunto
Ferramentas necessárias:
 Arduino Uno R3
 Breadboard - Classic
 SparkFun Cerberus USB Cable - 1.8 meter
4
4
Run and inspect
Run and inspect
Press the switch to start. Every 1000 cycles it stops: look at the crease under the loupe. Whitening is normal; a crack you can see through is failure. Record the last intact count, then run the other material.
Ferramentas necessárias:
 Lupa de joalheiro
5
5
Strain, counts, siblings
Strain, counts, siblings
A carregar o notebook Jupyter…
6
6
History & Context
History & Context
**What the patent specifies:** high-molecular polypropylene made of isotactic macromolecules, insoluble in boiling n-heptane, with the structure of its FIGURE 2 (shown here). **Modern build (derived):** commercial PP sheet, creased by hand into a hinge.
Montecatini began production in 1957. Moulded PP hinges now close most flip-top caps, and PP makes crates, car bumpers, rope and food tubs. Its limits: it turns brittle in deep cold, degrades in sunlight without stabilisers, and is hard to glue or paint.
Materiais
7- 1 folhaReferência
- 1 folhaReferência
- 1 peçaReferência
- 2 peçasReferência
- Referência
- Referência
- 1 conjuntoReferência
Ferramentas necessárias
10- Referência
- Referência
- Referência
- Referência
- Referência
- Referência
- Arduino Uno R310% de comissãoMagento Legacy Storeships internationallyReferência
- Breadboard - Classic10% de comissãoR$48.77
- SparkFun Cerberus USB Cable - 1.8 meter10% de comissãoR$29.18
- Referência
Blueprints relacionados
Estes blueprints compartilham conhecimento — técnicas, materiais ou princípios



CC0 Domínio Público
Este blueprint é liberado sob CC0. Você é livre para copiar, modificar, distribuir e usar este trabalho para qualquer finalidade, sem pedir permissão.
Apoie o Maker comprando produtos através do Blueprint, onde ele ganha uma Comissão Maker definida pelos vendedores, ou crie uma nova versão deste Blueprint e inclua-o como conexão no seu próprio Blueprint para compartilhar receita.