Colaboração
ARTE
BELEZA E BEM-ESTAR
ARTESANATO
CULTURA E HISTÓRIA
ENTRETENIMENTO
MEIO AMBIENTE
COMIDA E BEBIDAS
ENGENHARIA REVERSA
CIÊNCIAS
ESPORTES
TECNOLOGIA
TECNOLOGIA VESTÍVEL
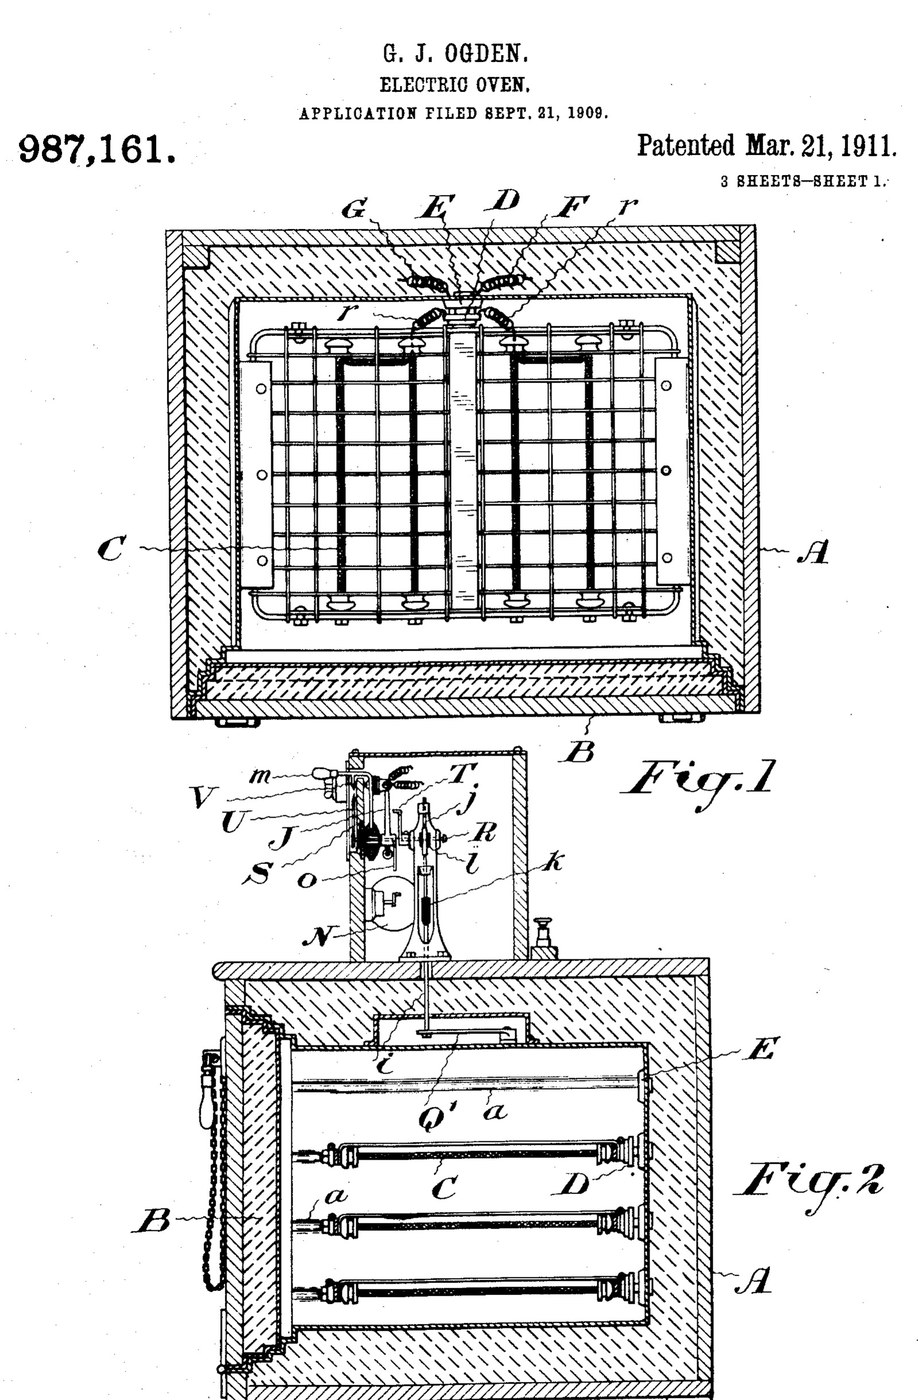


Oven: Insulated Electric Oven with Plug-In Grid Heaters and a Thermostat (Ogden, US 987,161, 1911)
An electric oven built to waste as little heat as possible: a double-walled, packed box with a packed door that seals like a strong-room door. Grid-shaped heating elements slide into grooves in the walls and plug into sockets at the back, and the food rests on them. A thermostat cuts the current when the set temperature is reached and switches it on again as the oven cools.
Result: an oven that bakes, roasts or dries at a set temperature with any number of heating grids.
Source: G. J. Ogden, US 987,161 (1911). Unknown: sizes, metals, packing and temperatures. Picture: the patent drawing.
Avançado
Unknown
Instruções
1
1
Build the insulated casing and door
Build the insulated casing and door
Make the oven chamber as a double-walled casing with packing between the walls, and grooves on the inner side walls to take the heating grids. Fit a door that closes like a fire-proof vault door, also packed, so the casing seals closely. Ours: mild steel sheet. Not given: sizes, the packing.
Materiais para este passo:
 Chapa de aço macio1 inner and outer walls, door
 Material isolante desconhecido1 packing
Ferramentas necessárias:
 Tesoura de chapa
 Engenho de furar
 Dimensões desconhecidas
2
2
Make the plug-in heating grids
Make the plug-in heating grids
Make heating elements in the form of grids that slide into the grooves and on which the food can rest. Fix a porcelain plug to each, carrying spring fingers that push into a socket with matching spring fingers in the back wall. Wire the sockets so all the elements are in parallel; use as many as the temperature and amount of food need. Ours: nichrome wire. Not given: the element type.
Materiais para este passo:
 Fio de nicrómio1 heating grids
 Material desconhecido1 porcelain plugs and sockets
 Fio de aço para molas1 spring fingers
 Fio de ligação1 circuit wiring
Ferramentas necessárias:
 Ferro de soldar
3
3
Fit the thermostat control
Fit the thermostat control
Put a thermostat that bends with heat inside the oven, working a contact finger that plays between two contacts a few degrees above and below the set temperature. A switch-changing device, a small rotary motor, throws the main switch off and on as the finger touches one contact or the other. Mount a setting arm with a pointer over a scale marked in degrees, and a second pointer driven by the thermostat. Add a hand switch to turn the current on or off independently, and a lamp with its own switch to light the oven. Ours: a bimetal strip, toggle switches. Not given: temperatures.
Materiais para este passo:
 Lâmina bimetálica1 thermostat
 Motor elétrico1 switch-changing motor
 Interruptor de alavanca3 main, hand and lamp switches
 Metal desconhecido1 contacts, arm, scaleMaterial desconhecido1 incandescent oven lamp
Ferramentas necessárias:
Ferro de soldar Termómetro
Materiais
10- 1 inner and outer walls, doorReferência
- 1 packingReferência
- 1 heating gridsReferência
- 1 incandescent oven lampReferência
- 1 spring fingersReferência
- Referência
- 1 thermostatReferência
- 1 switch-changing motorReferência
- Referência
- 1 contacts, arm, scaleReferência
Ferramentas necessárias
5- Referência
- Referência
- Referência
- 2 vendors sell this, none ship to you yetReferência
- Referência
Materiais de Blueprints conectados

Este projeto faz

CC0 Domínio Público
Este blueprint é liberado sob CC0. Você é livre para copiar, modificar, distribuir e usar este trabalho para qualquer finalidade, sem pedir permissão.
Apoie o Maker comprando produtos através do Blueprint, onde ele ganha uma Comissão Maker definida pelos vendedores, ou crie uma nova versão deste Blueprint e inclua-o como conexão no seu próprio Blueprint para compartilhar receita.