
Colaboração
ARTE
BELEZA E BEM-ESTAR
ARTESANATO
CULTURA E HISTÓRIA
ENTRETENIMENTO
MEIO AMBIENTE
COMIDA E BEBIDAS
ENGENHARIA REVERSA
CIÊNCIAS
ESPORTES
TECNOLOGIA
TECNOLOGIA VESTÍVEL
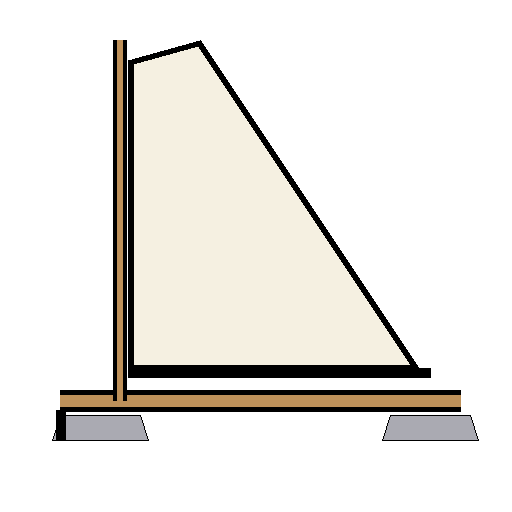
Wishbone-Mast Ice Yacht: 16 ft Backbone, Twin-Pole Mast and Double Lateen Booms (Boy Mechanic, 1919)
Woody

Criado por

Woody

13. novembro 2026NO
7
0
0
0
0

Wishbone-Mast Ice Yacht: 16 ft Backbone, Twin-Pole Mast and Double Lateen Booms (Boy Mechanic, 1919)

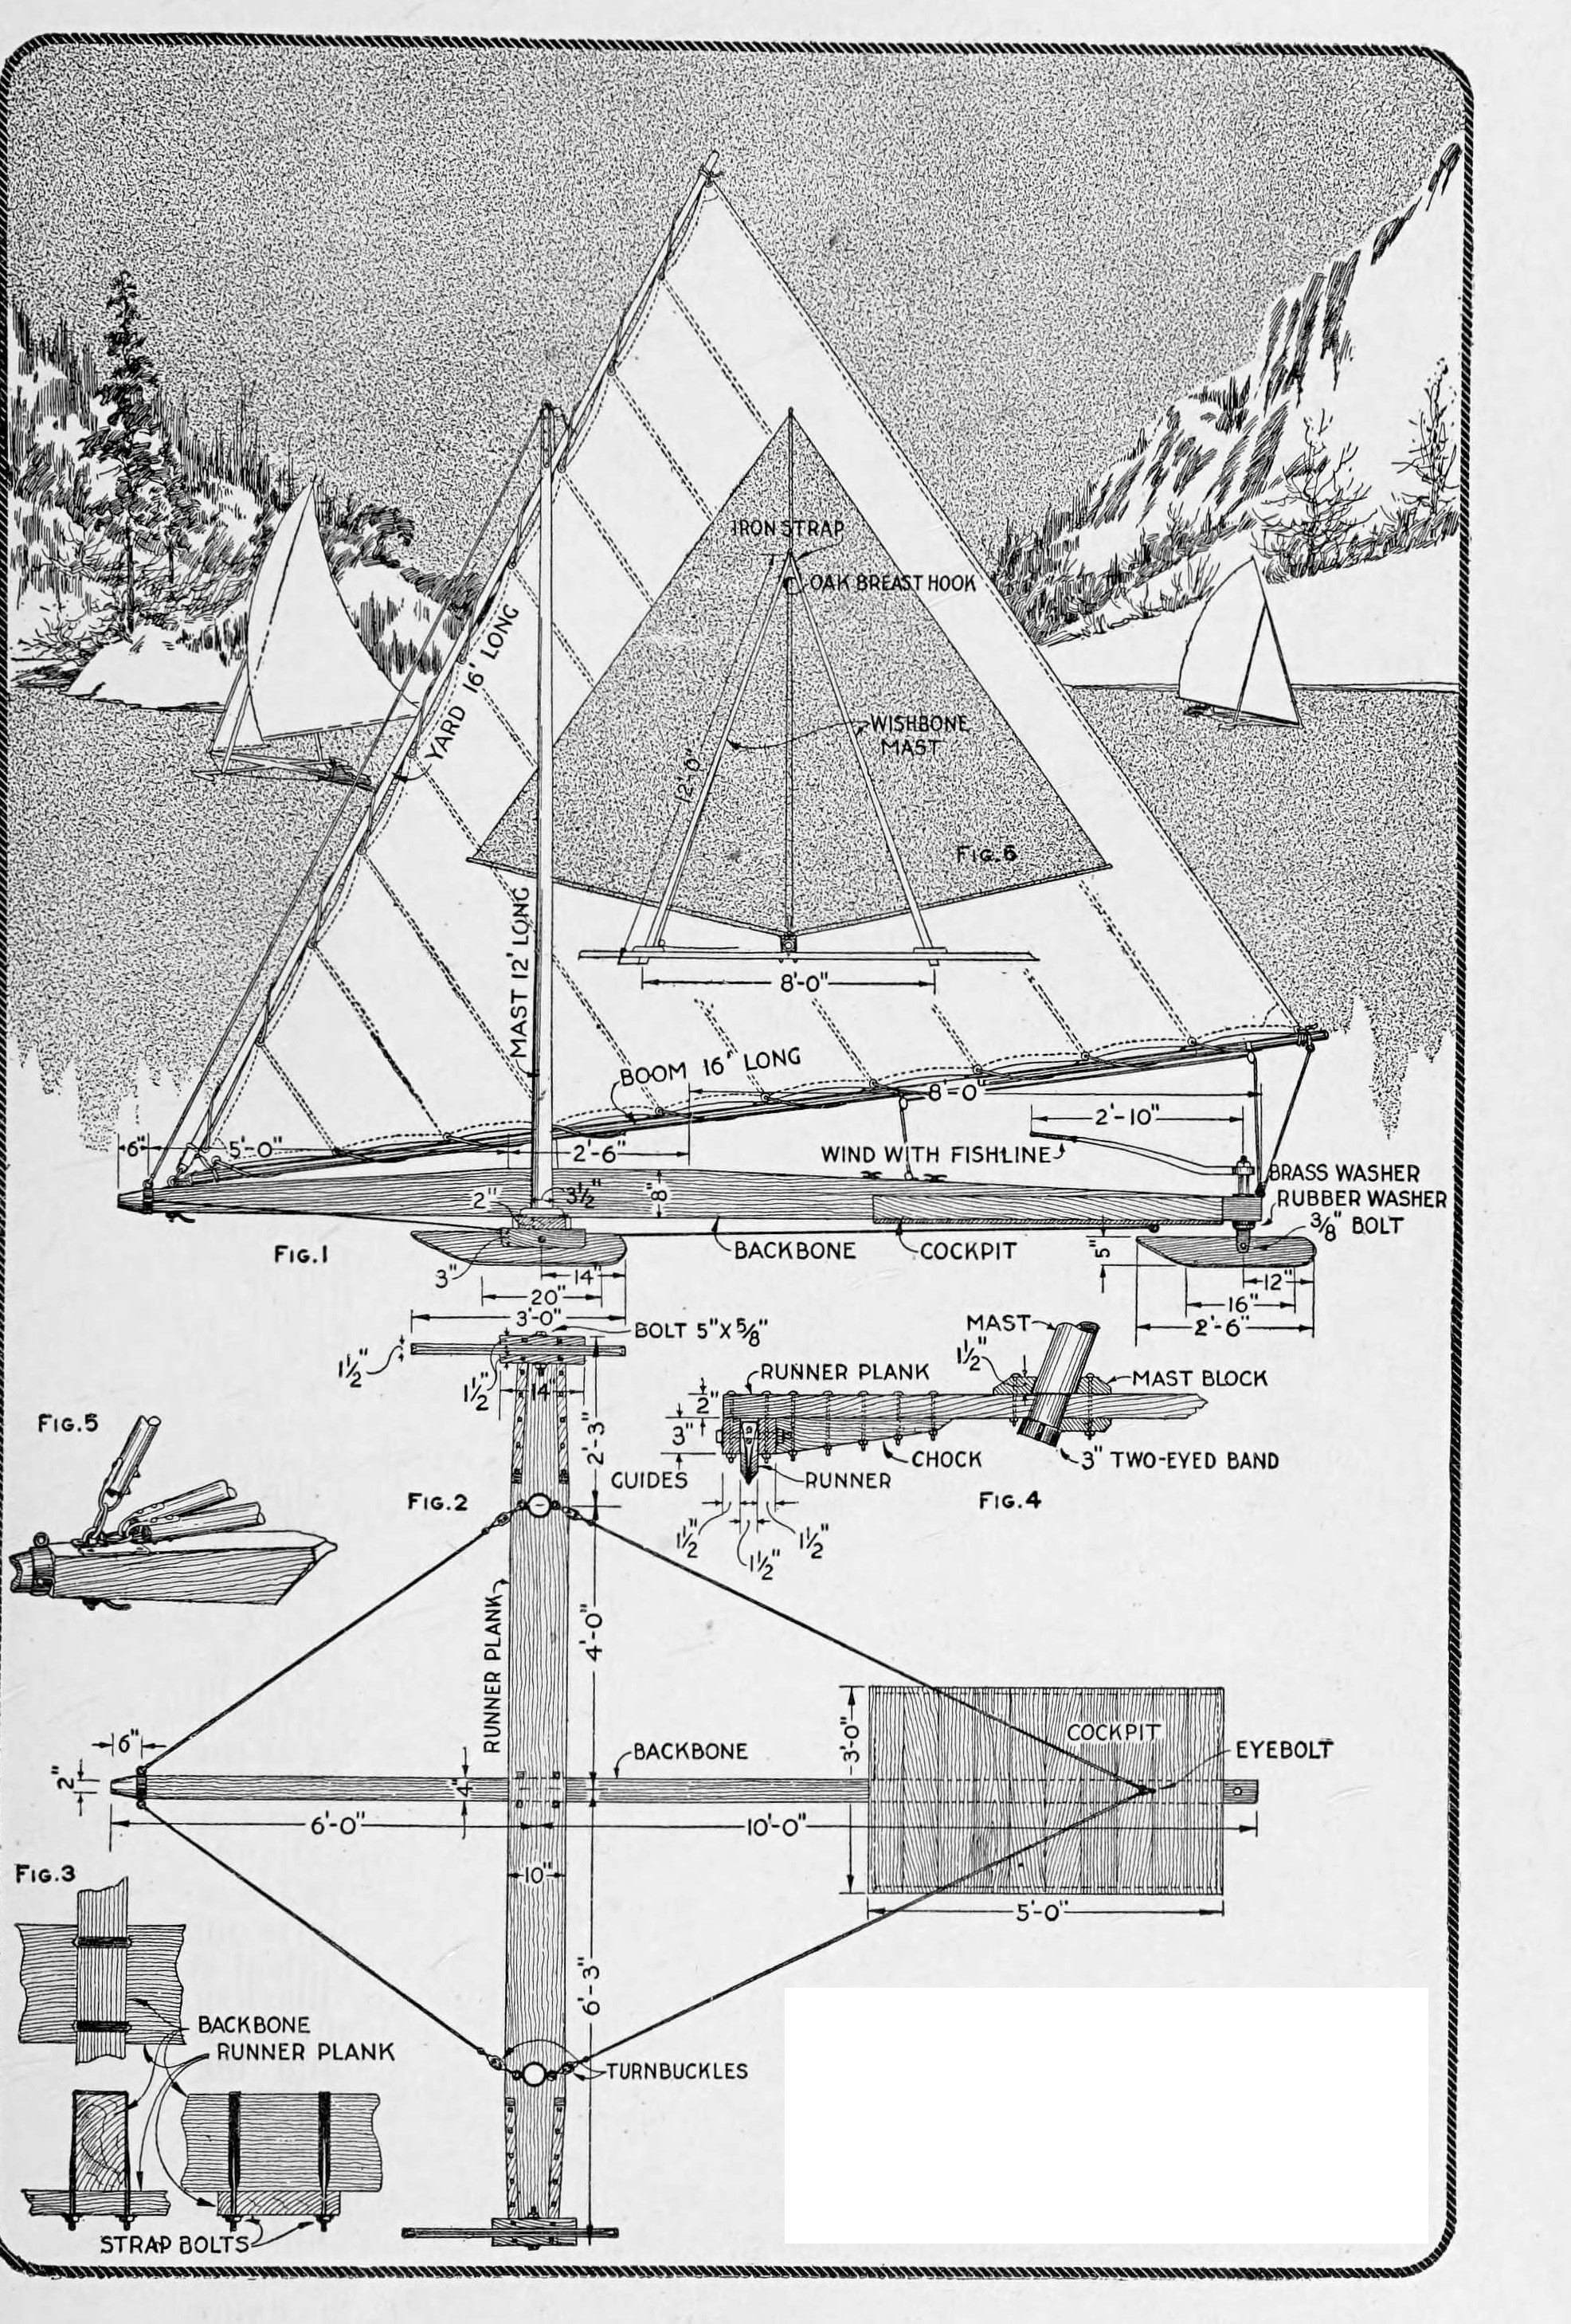
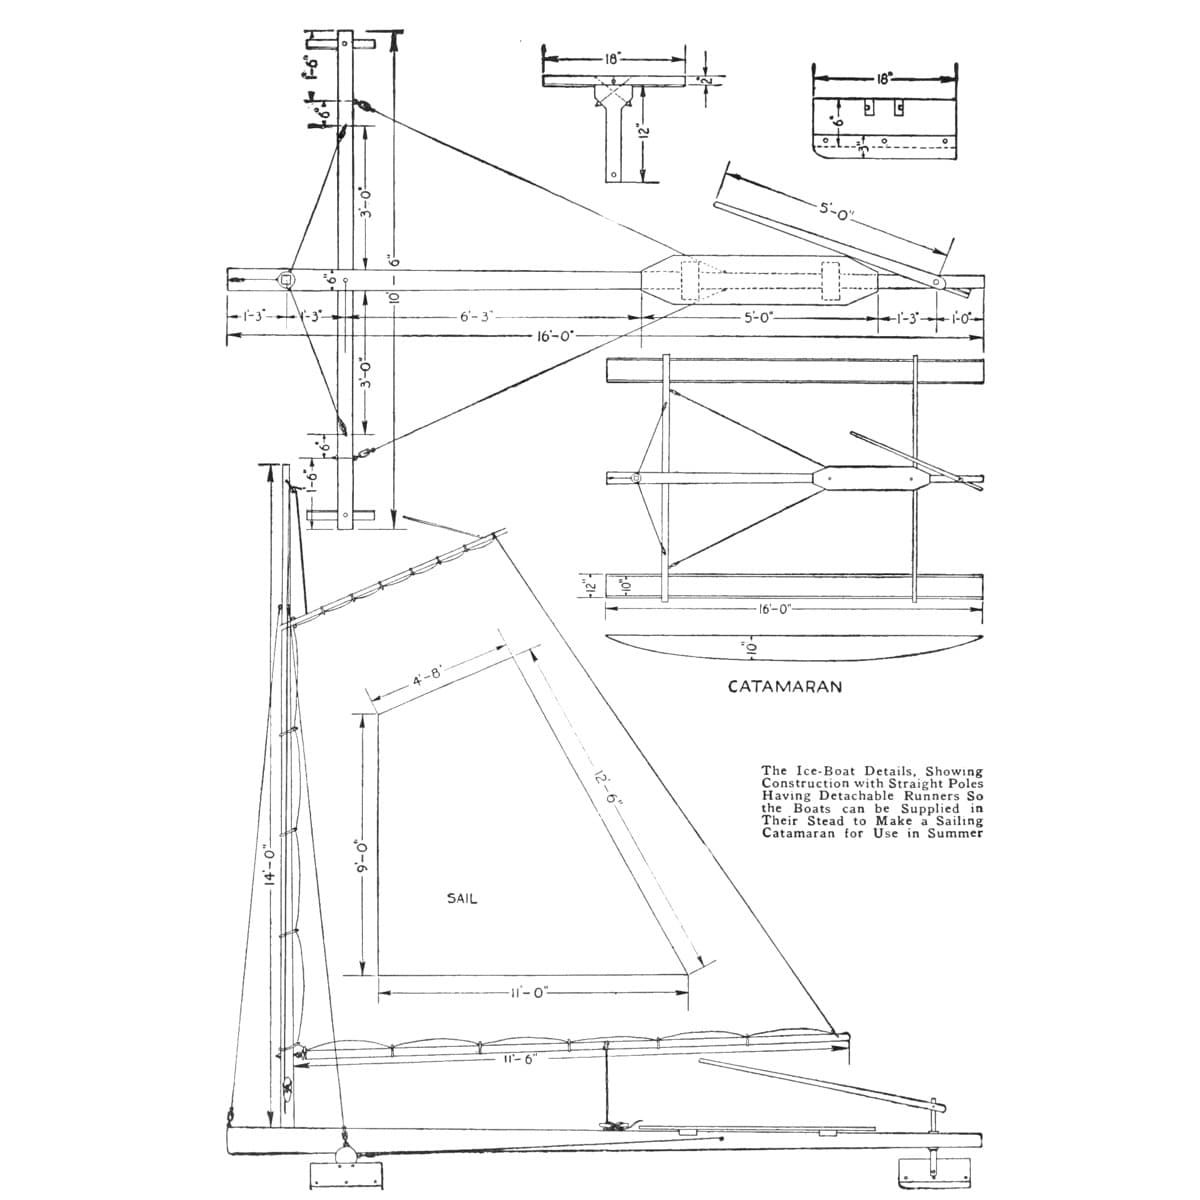
John F. Pjerrou's ice yacht from The Boy Mechanic, Book 3 (1919), for one or two passengers: a 16 ft spruce backbone on a 12 ft 6 in runner plank, oak runners shod with half-round iron, a mast of two 12 ft poles joined at the head, and two lateen sails on a yard and two 16 ft booms that spread into a V when running before the wind. It takes down for storage.
Avançado
Several weeks

Instruções

1

Main sizes and the mast's height

A carregar o notebook Jupyter…
2

Read The Boy Mechanic, Book 3

"The dimensions given are for a small yacht, and care must be taken, in adapting the design, to maintain proper proportions for stability and safety."
3

Make the backbone and runner plank

Use only the best straight-grained spruce or white pine. Backbone: 4 in thick, 16 ft long and 8 in high at the centre, with a ridge 8 in high and 2 ft 6 in long; taper it from the middle, 5 ft 6 in from the forward end, to 4 in at each end, and fit a three-eye metal ring at the bow (Figs. 1, 5). Runner plank: 2 in thick, 10 in wide, 12 ft 6 in long, tapered to 8 in at the ends. Set the backbone on the plank at right angles, 6 ft from the bow, and clamp them with two strap bolts, washers and nuts (Figs. 2, 3).

Materiais para este passo:

Madeira de pinhoMadeira de pinho2 peças
Anel metálicoAnel metálico1 peça
Abraçadeira em UAbraçadeira em U2 peças
Anilha planaAnilha plana4 peças
Porca sextavadaPorca sextavada4 peças

Ferramentas necessárias:

SerroteSerrote
Plaina manualPlaina manual
Faca de dois cabosFaca de dois cabos
Arco de pua e brocaArco de pua e broca
Chave inglesa ajustávelChave inglesa ajustável
Fita métricaFita métrica
LápisLápis
4

Fit the guides and forward runners

Bolt guides of straight-grained oak, 1-1/2 by 3 by 14 in, to the plank ends with 5/16 in carriage bolts, and bolt oak chocks at each tapered edge (Fig. 4). Make the forward runners of oak, 1-1/2 by 5 by 36 in, shaped at the ends as drawn, and shoe them with half-round strap iron held by screws with carefully countersunk heads. Pivot them on 5/8 in bolts (5 in long in Fig. 1), nuts to the inner side, with washers and jam nuts, or rivet the bolt ends slightly so the nuts cannot work loose.

Materiais para este passo:

Tábua de carvalho-brancoTábua de carvalho-branco3 peças
Parafuso de carroçariaParafuso de carroçaria8 peças
Barra de ferro meia-canaBarra de ferro meia-cana2 peças
Parafusos para madeiraParafusos para madeira1 peça
Anilha planaAnilha plana4 peças
Porca sextavadaPorca sextavada4 peças

Ferramentas necessárias:

SerroteSerrote
Plaina manualPlaina manual
Arco de pua e brocaArco de pua e broca
Berbequim de mãoBerbequim de mão
Conjunto de brocas de escarearConjunto de brocas de escarear
Serra de arco para metaisSerra de arco para metais
Chave inglesa ajustávelChave inglesa ajustável
5

Make the stern runner and steering

Make the stern runner of oak, 1-1/2 by 5 by 30 in, shod like the others. Pivot it on a 3/8 in bolt in a hanger of heavy iron strip bent into a U and riveted to a vertical shaft. Put a heavy rubber washer, protected by a metal one, on the shaft; thread its upper end for a washer and nut, slip a section of pipe over the shaft, and clamp the steering handle (2 ft 10 in in Fig. 1) on a squared part of the shaft. The hanger may be forged, or made by a blacksmith.

Materiais para este passo:

Tábua de carvalho-brancoTábua de carvalho-branco1 peça
Barra de ferro meia-canaBarra de ferro meia-cana1 peça
Barra chata de aço macioBarra chata de aço macio1 peça
Barra redonda de aço macioBarra redonda de aço macio1 peça
Rebites de ferroRebites de ferro2 peças
Parafuso de carroçariaParafuso de carroçaria1 peça
Anilha de borrachaAnilha de borracha1 peça
Anilha planaAnilha plana2 peças
Porca sextavadaPorca sextavada2 peças
Tubo de aço galvanizadoTubo de aço galvanizado1 peça

Ferramentas necessárias:
ForjaForja
BigornaBigorna
MarteloMartelo
Torno de bancadaTorno de bancada
Serra de arco para metaisSerra de arco para metais
Berbequim de mãoBerbequim de mão
Limas (lima de mão)Limas (lima de mão)
Chave inglesa ajustávelChave inglesa ajustável
6

Build the cockpit

Fix a cockpit 5 ft long and 3 ft wide, with 4 in coaming, to the lower side of the backbone toward the stern; fasten its floor to the backbone with lag screws and fasten the coaming securely. Square corners are easiest; rounded ends with steamed, bent coaming are better. Larger craft may carry it on ribs.

Materiais para este passo:

Tábua de pinhoTábua de pinho4 peças
TirafundoTirafundo6 peças
Parafusos para madeiraParafusos para madeira1 peça

Ferramentas necessárias:

SerroteSerrote
Arco de pua e brocaArco de pua e broca
Chave inglesa ajustávelChave inglesa ajustável
Fita métricaFita métrica
7

Square up and stay the frame

Line up runners, plank and backbone at right angles so the craft tracks true. Hold them with four 1/4 in wire-rope stays with turnbuckles, from eyes on the bow band and on the bands at the plank ends to an eyebolt below the cockpit (Fig. 2). Loop each rope end and clamp the eye with steel clamps made for the purpose (wire-rope clips); metal thimbles in the loops make a better finish.

Materiais para este passo:

Cabo de açoCabo de aço1 peça
Esticador (macaco)Esticador (macaco)4 peças
DedalDedal8 peças
Grampo para cabo de açoGrampo para cabo de aço8 peças
Olhal roscadoOlhal roscado1 peça

Ferramentas necessárias:

Serra de arco para metaisSerra de arco para metais
Chave inglesa ajustávelChave inglesa ajustável
Fita métricaFita métrica
8

Make the wishbone mast

Shape two poles of hickory or ash, 3-1/2 in thick at the base and 2 in at the top (12 ft in Fig. 6). Join them carefully at the masthead, bolt them together into an oak breast hook, and reinforce the joint with an iron strap with an eye at its upper end for the forward stay. Step the lower ends in sockets in the runner plank, about 8 ft apart, reinforced with oak mast blocks, and fit their projecting ends with 3 in two-eyed bands for the stays (Figs. 4, 6).

Materiais para este passo:

Vara de madeiraVara de madeira2 peças
Tábua de carvalho-brancoTábua de carvalho-branco1 peça
Barra chata de aço macioBarra chata de aço macio1 peça
Parafuso de carroçariaParafuso de carroçaria2 peças
Porca sextavadaPorca sextavada2 peças

Ferramentas necessárias:

Faca de dois cabosFaca de dois cabos
Plaina manualPlaina manual
SerroteSerrote
Arco de pua e brocaArco de pua e broca
FormõesFormões
ForjaForja
BigornaBigorna
MarteloMartelo
9

Make the yard and booms

Make the yard and two booms of hickory or ash, each 16 ft long, 2-3/4 in at the middle tapering to 1-1/2 in at the ends, with metal rings on the ends against splitting. Bolt loops to their forward ends to engage an eyebolt and ring on the backbone at the bow; set the eyebolt in a slotted plate of 3/16 in sheet iron, fastened by a lever nut (Fig. 5).

Materiais para este passo:

Vara de madeiraVara de madeira3 peças
Anel metálicoAnel metálico6 peças
Olhal roscadoOlhal roscado1 peça
Chapa de aço macioChapa de aço macio1 peça
Barra chata de aço macioBarra chata de aço macio1 peça
Parafuso de carroçariaParafuso de carroçaria3 peças
Porca sextavadaPorca sextavada3 peças

Ferramentas necessárias:

Faca de dois cabosFaca de dois cabos
Plaina manualPlaina manual
Serra de arco para metaisSerra de arco para metais
Berbequim de mãoBerbequim de mão
Limas (lima de mão)Limas (lima de mão)
Torno de bancadaTorno de bancada
10

Sew the sails

Make two lateen sails of 8-oz unbleached cotton duck: lap the breadths about 1 in and stitch along the edge (or fold 1 in and double-stitch), the seams parallel to the leech. Reinforce each corner with a triangular patch of duck and bind the edges with 1/4 in tarred rope, using a sailor's palm, a diamond-pointed needle and sail twine, well waxed (the wax is ours: beeswax). Along the yard and boom edges punch holes, set two 3/4 in brass grommet rings in each, one each side, and overcast them with buttonhole stitch. Sew in reef points of 1/8 in cotton rope, whipped at the ends.

Materiais para este passo:

Lona de algodãoLona de algodão1 peça
Fio de veleiroFio de veleiro1 peça
Cera de abelhaCera de abelha1 peça
Cabo alcatroadoCabo alcatroado1 peça
Ilhó de latãoIlhó de latão40 peças
Corda de algodãoCorda de algodão1 peça

Ferramentas necessárias:
Palmo de veleiroPalmo de veleiro
Agulha de veleiroAgulha de veleiro
Furador de papelFurador de papel
TesouraTesoura
Fita métricaFita métrica
11

Set up and rig

Fit the forward ring and strap bolts, the runners and steering, then step the mast, clamp the masthead and fit the bands; set the bottom stays and the masthead stay with the turnbuckles. Lace the sails to yard and booms and fix the forward ends at the bow. Run a 3/8 in halyard from the yard through a pulley at the masthead and a second on the runner plank to cleats by the cockpit, and haul up so the sails set. Lash the main sheets to the boom ends, through pulleys at the stern of the backbone and on the booms about 1 ft and 5 ft from their ends, then to cleats at the cockpit; the second boom needs a duplicate set. Taking down is the reverse.

Materiais para este passo:

CordaCorda1 peça
RoldanaRoldana6 peças
CunhoCunho4 peças
Parafusos para madeiraParafusos para madeira1 peça

Ferramentas necessárias:

Chave inglesa ajustávelChave inglesa ajustável
Berbequim de mãoBerbequim de mão
12

Finish

Smooth the masts, yard and booms, sandpaper them lightly and give them several coats of spar varnish; paint the other woodwork. He gives the metal fittings two coats of red lead "or other good paint for use on metals exposed to the weather": red lead is a lead poison, so use the other paint.

Materiais para este passo:

LixaLixa1 peça
Verniz marítimoVerniz marítimo1 peça
Tinta de óleoTinta de óleo1 peça

Ferramentas necessárias:

Trincha largaTrincha larga
13

Sailing and troubleshooting

Ice yacht sailing.

Flow

Loading...
14

History and honest limits

From "A Wishbone-Mast Ice Yacht" by John F. Pjerrou, in **The Boy Mechanic, Book 3**, Popular Mechanics, 1919 (Project Gutenberg 71856; checked on the archive.org scan boymechanic0003unse, pp. 17-20). He gives no sail outline sizes. The tools, the metric figures and the choice of the non-lead paint he allows are ours.

Materiais

35

Ferramentas necessárias

21

Blueprints relacionados

Estes blueprints compartilham conhecimento — técnicas, materiais ou princípios
CC0 Domínio Público

Este blueprint é liberado sob CC0. Você é livre para copiar, modificar, distribuir e usar este trabalho para qualquer finalidade, sem pedir permissão.

Apoie o Maker comprando produtos através do Blueprint, onde ele ganha uma Comissão Maker definida pelos vendedores, ou crie uma nova versão deste Blueprint e inclua-o como conexão no seu próprio Blueprint para compartilhar receita.

Discussão

(0)

Entrar para participar da discussão

Carregando comentários...