Building a Rainwater Collection System — Gravity-Fed Rain Barrel
Instruções
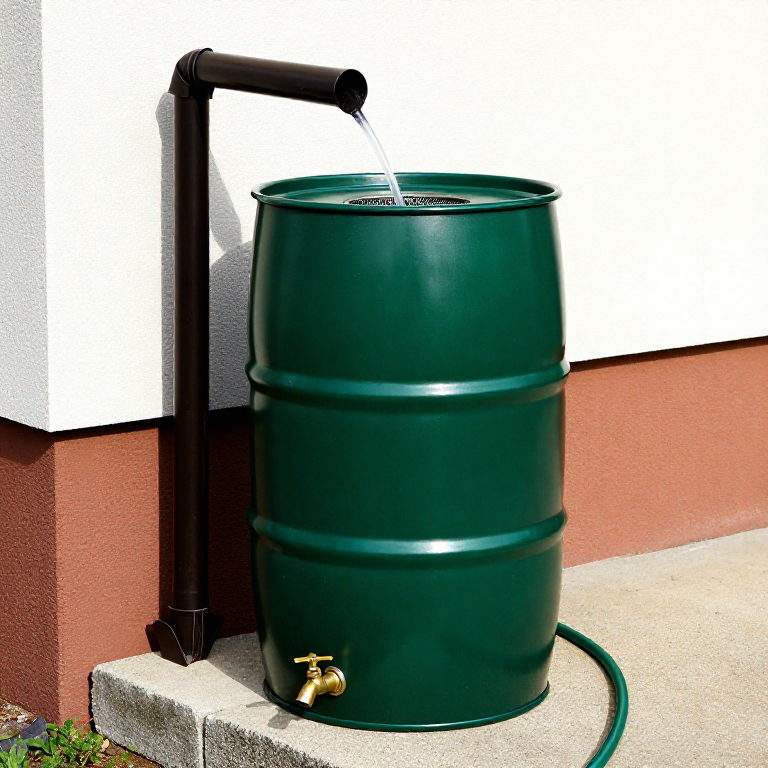
Position and Elevate the Barrel
Position and Elevate the Barrel
Place the barrel on a stable, level platform of concrete blocks or a purpose-built wooden stand directly beneath an existing gutter downspout. Elevate the barrel 30-50cm above ground level — height provides water pressure at the spigot (every 30cm of elevation provides approximately 0.03 bar of pressure). A full 200-litre barrel weighs approximately 200 kg, so the platform must be structurally sound and level. Position it close to the garden area you intend to irrigate to minimize hose length. If the ground is soft, place the blocks on a paving slab to prevent them from sinking under the weight.
Materiais para este passo:
 Rain Barrel (200L, HDPE)1 peça
 Concrete Block2-4 peça
Cut the Inlet and Install the Filter
Cut the Inlet and Install the Filter
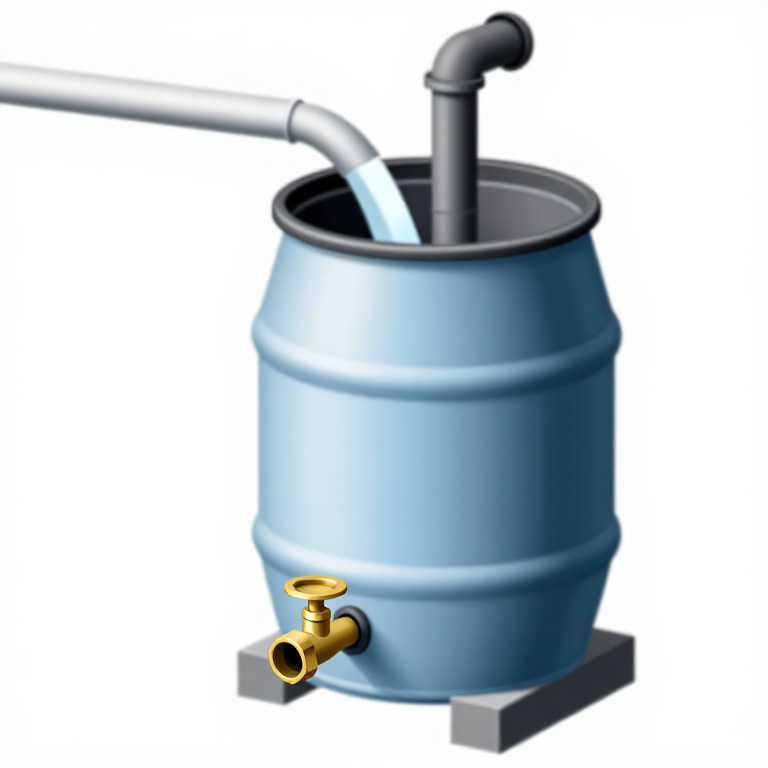
Cut a hole in the barrel lid (or near the top of the barrel) large enough to receive the downspout or a diverter fitting. The inlet must be screened with fine mesh (window screen mesh or finer) to prevent mosquitoes from breeding in the standing water and to filter out leaves, shingle grit, and debris from the roof. A removable screen basket is easier to clean than a fixed screen. Mosquito prevention is critical — standing water is a breeding habitat, and a sealed barrel with screened openings eliminates this risk entirely. The barrel lid should fit tightly with no unsealed gaps where mosquitoes could enter.
Materiais para este passo:
 Fine Metal Mesh Screen1 peça
Ferramentas necessárias:
 Hole Saw Kit
Install the Spigot
Install the Spigot
Drill a hole near the bottom of the barrel (5-10cm above the base, to keep sediment below the outlet) sized to accept the threaded spigot fitting. Install the spigot with a rubber washer on the inside, thread through the hole, and tighten with a nut and second washer on the outside. Apply plumber's tape to the threads and a bead of silicone sealant around the barrel hole for a watertight seal. The spigot should accept a standard garden hose fitting for convenient attachment. Test for leaks by filling the barrel with tap water before connecting to the downspout.
Materiais para este passo:
 Brass Spigot1 peça
 Plumber's Tape (PTFE)1 rolo
 Silicone Sealantsmall amount peça
Ferramentas necessárias:
 Drill Press
 Adjustable Wrench
Install the Overflow Outlet
Install the Overflow Outlet
Cut a hole near the top of the barrel (5-10cm below the rim) and install an overflow fitting — a bulkhead fitting with a short length of PVC pipe that directs excess water away from the barrel and house foundation. During heavy rain, the barrel fills quickly (25mm of rain on a 50-square-metre roof section produces approximately 1,250 litres — far more than a single barrel holds). Without an overflow, water backs up through the inlet and overflows in an uncontrolled manner, potentially eroding soil around the foundation. Direct the overflow pipe to a garden bed, dry well, or back into the regular stormwater drainage system.
Materiais para este passo:
 PVC Overflow Fitting1 fitting + 1m pipe peça
Ferramentas necessárias:
 HacksawDrill Press
Connect the Downspout and Test
Connect the Downspout and Test
Cut the existing gutter downspout at the height of the barrel inlet and redirect it into the barrel through the screened inlet. Use a downspout diverter fitting if available — this allows you to switch between the barrel and the original downspout when the barrel is full or during winter. Alternatively, simply direct the cut downspout into the barrel opening. Fill the barrel with a garden hose to test all fittings for leaks and verify the overflow works correctly. Rainwater collected from roofs is suitable for garden irrigation, toilet flushing, and laundry. It is not potable without treatment (roof surfaces harbour bird droppings, dust, and other contaminants). In freezing climates, drain the barrel before winter to prevent ice expansion from cracking the barrel and fittings.
Ferramentas necessárias:
HacksawMateriais
7- 1 peçaReferência
- 1 peçaReferência
- 1 fitting plus 1m pipe peçaReferência
- 1 piece to cover inlet peçaReferência
- 1 roll peçaReferência
- small amounts peçaReferência
- 2-4 blocks peçaReferência
Required Equipment
Equipment this kind of build typically needs — buy from any maker below.
- RecommendedDust Mask / Respirator·
 Full-Face Gas Mask (ABEK multi-gas cartridge)
 Dust Mask
 Venetian Mask Blank (Papier-Mache)
 Full-Face Respirator
 Respirator Fit Test Kit
 Respirator with Acid Gas Cartridge
 - RecommendedSafety Glasses·
 Safety Sign (Caution/Warning)
 Splash-Proof Safety Goggles
 Reflective Safety Vest Kit (DIY)
 Chemical Splash Goggles
 Safety Netting for Rockfall
 Steel-Toed Safety Boots
 - RecommendedWork Gloves·
 Boxing Gloves (Training)
 Leather Gauntlet Gloves
 Cotton Gloves
 Welding Gloves
 Heavy-Duty Gloves
 Leather Work Gloves
 - OptionalFire Extinguisher·
 ABC Fire Extinguisher
 Fire Extinguisher
 - OptionalFirst Aid Kit·
 First Aid Kit
 Mountain First Aid Kit (Altitude)
 Workshop First Aid Kit
 Bow Release Aid
You can swap these in
Can't get one of the materials? Swap it for an equivalent — these work just as well.
- Instead of Plumber's Tape (PTFE), try:
 Barrier Tape
 Bias Tape
 Measuring Tape 3m
 Measuring Tape (30m)
 - Instead of Drill Press, try:
 Cloth Screw Press
 - Instead of Adjustable Wrench, try:
 Combination Wrench Set
 Pipe Wrench
 Spoke Wrench
 - Instead of Fine Metal Mesh Screen, try:
 Coarse Mesh Screen
 - Instead of Hole Saw Kit, try:
 Portable Band Saw
 Band Saw (9-inch, Benchtop)
 - Instead of PVC Overflow Fitting, try:
 Pneumatic Fitting Set (PC4-M6/M10, 10-Pack)
Recommended for this build
Products makers often use with builds like this one.
 Sloyd Carving KnifeFrequently used with this build's materials
 AwlFrequently used with this build's materials
 PVA Wood GlueFrequently used with this build's materials
 Drill Bit SetFrequently used with this build's materials
 Deer Antler SectionFrequently used with this build's materials
 Sandpaper (400 Grit)Frequently used with this build's materials
 Sandpaper (120 Grit)Frequently used with this build's materials
 Bench ViseFrequently used with this build's materials
Related blueprints
Other builds that share materials, tools, or techniques with this one.


CC0 Domínio Público
Este blueprint é liberado sob CC0. Você é livre para copiar, modificar, distribuir e usar este trabalho para qualquer finalidade, sem pedir permissão.
Apoie o Maker comprando produtos através do Blueprint, onde ele ganha uma Comissão Maker definida pelos vendedores, ou crie uma nova versão deste Blueprint e inclua-o como conexão no seu próprio Blueprint para compartilhar receita.