ARTE
BELEZA E BEM-ESTAR
ARTESANATO
CULTURA E HISTÓRIA
ENTRETENIMENTO
MEIO AMBIENTE
COMIDA E BEBIDAS
FUTURO VERDE
ENGENHARIA REVERSA
CIÊNCIAS
ESPORTES
TECNOLOGIA
TECNOLOGIA VESTÍVEL
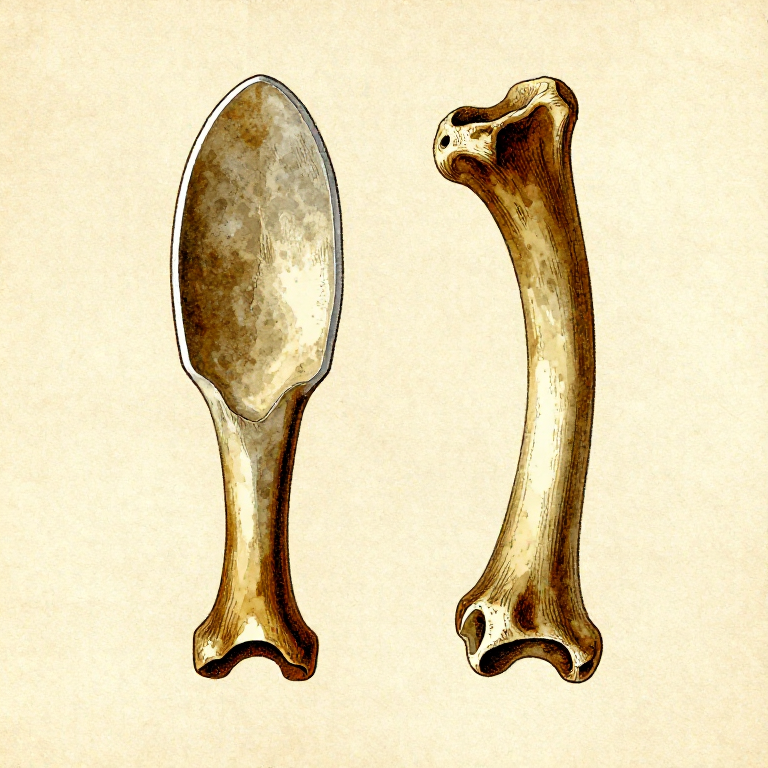
Making a Bone Hide Scraper — Smooth-Edged Fleshing Tool
A bone scraper is a hide-working tool made from a large animal leg bone, split to create a broad, smooth working edge. Unlike stone scrapers which can cut and nick a hide if used carelessly, bone scrapers have a naturally blunt edge that pushes flesh, fat, and membrane off the skin without risk of puncturing. This makes bone the preferred material for fleshing — the critical first stage of hide preparation where the inner surface must be cleaned completely without damaging the skin. Plains Native Americans, Inuit, and prehistoric European peoples all independently developed bone fleshing tools from the same source: the cannon bone (metapodial) or tibia of deer, elk, bison, or cattle, split lengthwise to expose a broad, slightly curved working surface.
Iniciante
1-2 hours
Instruções
1
1
Select a Large Leg Bone
Select a Large Leg Bone
Choose a large animal leg bone at least 20 cm long — deer tibia, elk cannon bone (metapodial), or a similar dense long bone. The bone must be fresh or recently cleaned, not weathered or sun-bleached, as old bones become brittle and shatter unpredictably when split. A cannon bone is ideal because it is straight, dense, and has a naturally flat inner surface.
Materiais para este passo:
 Animal Bones1 peça
2
2
Score a Lengthwise Line Along the Bone
Score a Lengthwise Line Along the Bone
Using a sharp flint flake, score a straight line lengthwise along the full length of the bone. Press firmly and draw the flake repeatedly along the same groove to deepen the score. This weakens the bone along a controlled line and guides the split, preventing it from spiralling or fracturing unevenly.
3
3
Place the Scored Bone on a Flat Stone Anvil
Place the Scored Bone on a Flat Stone Anvil
Position the scored bone on a flat, stable stone surface with the scored line facing upward. The anvil stone must be large enough to fully support the bone and heavy enough not to shift under impact. Place the bone so the scored line runs parallel to the anvil surface.
4
4
Split the Bone Lengthwise with a Hammerstone
Split the Bone Lengthwise with a Hammerstone
Strike firmly along the scored line with a hammerstone, working from one end to the other. Use controlled, moderate blows — too much force shatters the bone rather than splitting it cleanly. The bone should crack along the scored line, separating into two roughly equal halves. If the split runs off-line, re-score and try again on the deviated section.
Ferramentas necessárias:
 Hammerstone
5
5
Select the Better Half
Select the Better Half
Choose the half with the smoother, more concave inner surface. This inner curvature is the working surface — the concavity helps the scraper conform to the curves of a hide stretched on a frame or beam. The selected half should be free of cracks and have a relatively even thickness along its length.
6
6
Clean the Inner Surface
Clean the Inner Surface
Scrape the marrow and periosteum (the tough membrane coating bone surfaces) from the inside of the bone half using a flint flake. Remove all soft tissue and fatty residue. Clean bone grips hide better than greasy bone, and residual marrow will rot and weaken the tool over time.
7
7
Grind the Working Edge Smooth on Wet Sandstone
Grind the Working Edge Smooth on Wet Sandstone
Grind the split edge (the working edge) on a wet sandstone slab using long, even strokes. The goal is a uniformly smooth edge that is slightly rounded — not sharp. Remove any jagged splinters, ridges, or rough patches left from the splitting process. Wet the sandstone frequently to prevent the bone from overheating and cracking.
Ferramentas necessárias:
 Sandstone (Abrasive)
8
8
Check the Edge Profile
Check the Edge Profile
Run your thumb along the entire working edge. It should be uniformly smooth and slightly rounded — sharp enough to push flesh and fat off a hide but too dull to cut or puncture the skin. If any section catches or feels sharp, return to the sandstone and grind further. The edge should feel like a butter knife, not a blade.
9
9
Grind the Handle End to a Comfortable Grip
Grind the Handle End to a Comfortable Grip
Grind the opposite end (the handle end) smooth on sandstone to remove any sharp edges that would dig into your palm during extended use. Round the corners and smooth any rough spots. The handle end does not need to be shaped elaborately — just comfortable enough to grip firmly for prolonged fleshing work.
Ferramentas necessárias:
Sandstone (Abrasive)10
10
Test on a Piece of Fresh Hide
Test on a Piece of Fresh Hide
Test the scraper on a piece of fresh hide draped over a fleshing beam or log. Hold the bone scraper with both hands and push it firmly across the inner (flesh) side of the hide at a 30 to 45 degree angle. The scraper should push flesh, fat, and membrane off cleanly without snagging, tearing, or cutting into the skin. If it snags, the edge needs more smoothing.
Materiais
1- Referência
Ferramentas necessárias
2- Referência
- Referência
Materiais de Blueprints conectados
Blueprints relacionados
Estes blueprints compartilham conhecimento — técnicas, materiais ou princípios
Related blueprints
Other builds that share materials, tools, or techniques with this one.
Making Pine Pitch — Waterproofing Compoundmaterials-science
Bark Tanning Animal Hides — Vegetable Tanned Leather from Oak Barkmaterials-science
Preparing a Raw Animal Hide — Cleaning and Stretching Before Tanningmaterials-science
Extracting Birch Tar — Stone Age Adhesivematerials-science

Making a Stone Chisel — Splitting and Grooving Toolstoneworking

Making a Bronze Awl — The Leatherworker's Piercing ToolMetalworking
CC0 Domínio Público
Este blueprint é liberado sob CC0. Você é livre para copiar, modificar, distribuir e usar este trabalho para qualquer finalidade, sem pedir permissão.
Apoie o Maker comprando produtos através do Blueprint, onde ele ganha uma Comissão Maker definida pelos vendedores, ou crie uma nova versão deste Blueprint e inclua-o como conexão no seu próprio Blueprint para compartilhar receita.