ARTE
BELEZA E BEM-ESTAR
ARTESANATO
CULTURA E HISTÓRIA
ENTRETENIMENTO
MEIO AMBIENTE
COMIDA E BEBIDAS
ENGENHARIA REVERSA
CIÊNCIAS
ESPORTES
TECNOLOGIA
TECNOLOGIA VESTÍVEL
Making a Bone Toggle Fastener — The Earliest Button for Closing Garments
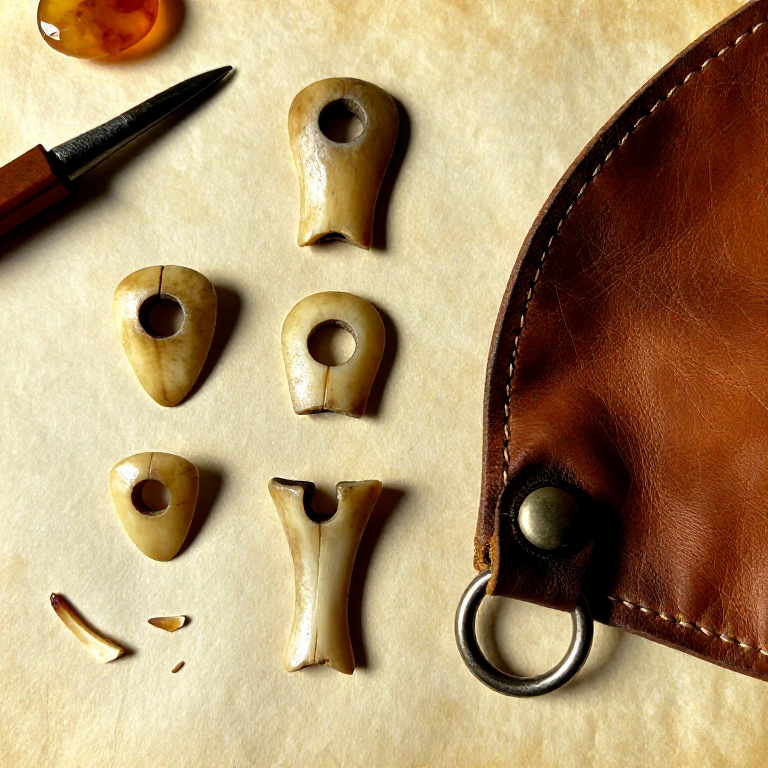
The toggle fastener is one of humanity's oldest clothing closure devices, predating the sewn button by thousands of years. Archaeological examples from Upper Palaeolithic sites in Europe date to at least 25,000 years ago. A toggle is elegantly simple: a short, polished bone or antler peg with a central hole or groove, threaded onto a cord loop and turned sideways to lock through a corresponding loop on the opposite side of a garment opening. This principle — a bar that passes through a loop lengthwise and then turns to lock — is still used today in duffle coat toggles and Chinese frog closures. Bone is the ideal material: it is hard enough to resist abrasion, smooth enough not to snag hides or woven fabric, and easily shaped with stone tools. This blueprint teaches the selection of suitable bone, the shaping and drilling process, and the attachment method for securing cloaks, pouches, and wrapped garments.
Iniciante
1-2 hours
Instruções
1
1
Select a Suitable Bone Section
Select a Suitable Bone Section
Choose a long bone from a medium to large animal — deer metapodials (cannon bones) are ideal because they are dense, straight, and have thick cortical walls with minimal marrow cavity. The mid-shaft section provides the most uniform, solid bone. Avoid spongy epiphyses (joint ends) and thin-walled rib bones. You need a section at least 6 cm long and 1.5 cm wide.
Materiais para este passo:
 Animal Long Bones1 peça
2
2
Score and Snap the Bone to Length
Score and Snap the Bone to Length
Using a sharp flint flake, deeply score a groove around the circumference of the bone at the desired length — 4 to 5 cm for a garment toggle, or 3 cm for a pouch closure. Score the same groove from both sides until the cut is about 2 mm deep all the way around. Place the scored line over the edge of a flat stone and press down sharply — the bone will snap cleanly along the scored line.
Ferramentas necessárias:
 Flint Knife
3
3
Shape the Toggle into a Rounded Bar
Shape the Toggle into a Rounded Bar
Grind the snapped bone piece against a flat sandstone slab, rotating as you work, to shape it into an elongated cylinder or slightly tapered bar approximately 4 cm long and 1 cm in diameter. Round both ends so there are no sharp edges that could cut through cord or snag on leather. The shape should resemble a small dowel or thick pencil stub.
Ferramentas necessárias:
 Sandstone
4
4
Mark the Centre for Drilling
Mark the Centre for Drilling
Find the exact centre of the toggle length by balancing it on a finger or measuring by eye. Mark this point with a shallow scratch using a flint flake. The hole must be centred — an off-centre hole causes the toggle to hang lopsidedly and may weaken one end. Also mark the drilling axis: the hole should pass through the narrowest dimension of the toggle (through the thickness, not the length).
Ferramentas necessárias:
Flint Knife5
5
Drill the Cord Hole with a Bone Awl
Drill the Cord Hole with a Bone Awl
Place the toggle on a flat stone surface. Using a bone awl or a sharp-tipped flint drill, bore into the centre mark with a steady twisting motion, applying moderate downward pressure. Drill from one side until halfway through (about 4 to 5 mm), then flip the toggle and drill from the opposite side to meet in the middle. This two-sided approach prevents blowout and gives a cleaner hole. The finished hole should be 3 to 4 mm in diameter.
Ferramentas necessárias:
 Bone Awl
6
6
Smooth the Drill Hole
Smooth the Drill Hole
Insert a thin twig or a twist of sinew through the hole and work it back and forth to remove bone dust and smooth any rough edges inside the hole. Rough edges inside the hole will abrade the cord over time and eventually cut through it. Run a dampened piece of fine sandy grit through the hole on a thin cord to polish the interior surface.
7
7
Final Surface Polish
Final Surface Polish
Polish the entire toggle surface by rubbing it vigorously against a piece of damp leather sprinkled with fine sand, or against a smooth river pebble. A polished surface is not merely decorative — it prevents the toggle from catching on garment fibres and reduces moisture absorption that could cause the bone to crack over time. Continue until the surface has a uniform, slightly glossy finish.
Ferramentas necessárias:
Sandstone8
8
Thread the Attachment Cord
Thread the Attachment Cord
Cut a length of sinew thread approximately 15 cm long. Thread it through the centre hole and fold it in half, creating a doubled loop on one side with the two free ends on the other. The loop should extend about 2 cm beyond the toggle surface — long enough to pass the toggle through, but short enough to hold snugly when locked.
Materiais para este passo:
 Sinew Thread1 peça
9
9
Attach the Toggle to the Garment Edge
Attach the Toggle to the Garment Edge
Using a bone awl, punch two small holes through the garment edge (hide cloak, leather pouch flap, or woven fabric) approximately 1 cm apart, positioned 2 cm from the opening edge. Thread the two free sinew ends through these holes from the outside and tie them off securely on the inside with a double overhand knot. The toggle should hang freely from the garment on its cord loop.
Materiais para este passo:
Sinew Thread1 peçaFerramentas necessárias:
Bone Awl10
10
Create the Receiving Loop on the Opposite Edge
Create the Receiving Loop on the Opposite Edge
On the opposing garment edge, create a cord loop large enough for the toggle to pass through lengthwise but too small for it to pass through sideways. Make a loop from sinew or rawhide approximately 5 cm in circumference (just wider than the toggle length). Sew both ends of this loop to the garment edge with sinew, reinforcing the attachment point with several passes.
Materiais para este passo:
Sinew Thread1 peçaFerramentas necessárias:
Bone Awl11
11
Test the Toggle Closure
Test the Toggle Closure
To fasten: push the toggle lengthwise through the receiving loop, then turn it 90 degrees so it lies across the loop. The toggle bar is now wider than the loop opening and cannot pull back through. To unfasten: turn the toggle parallel to the loop and slide it out. Test the closure 20 to 30 times to ensure the loop is sized correctly — it should hold firmly without requiring excessive force to open or close. Adjust loop size if needed by restitching.
Materiais de Blueprints conectados

Blueprints relacionados
Estes blueprints compartilham conhecimento — técnicas, materiais ou princípios


CC0 Domínio Público
Este blueprint é liberado sob CC0. Você é livre para copiar, modificar, distribuir e usar este trabalho para qualquer finalidade, sem pedir permissão.
Apoie o Maker comprando produtos através do Blueprint, onde ele ganha uma Comissão Maker definida pelos vendedores, ou crie uma nova versão deste Blueprint e inclua-o como conexão no seu próprio Blueprint para compartilhar receita.