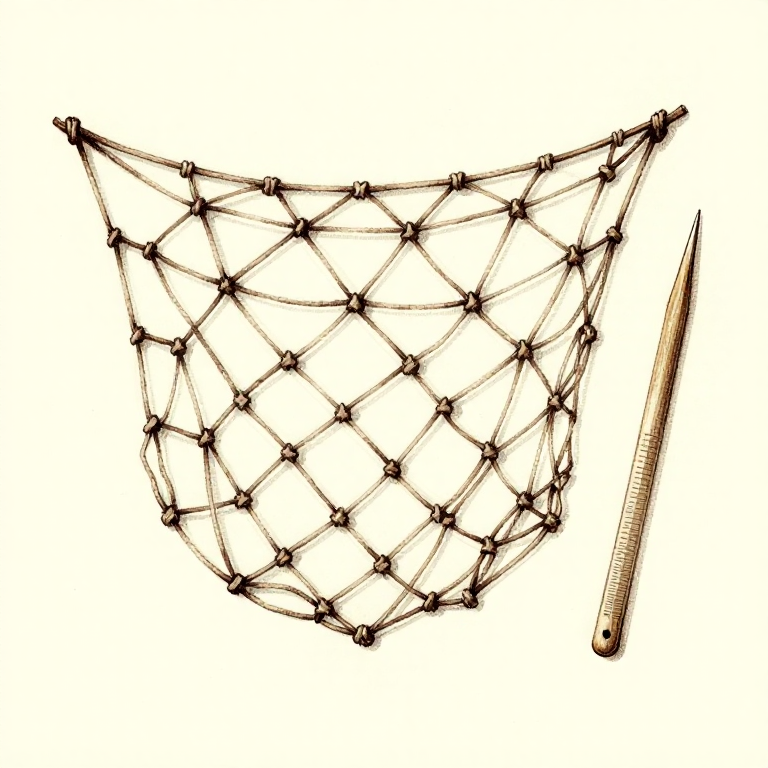
Knotting a Cord Fishing Net — Mesh Netting from Plant Fiber
Instruções
Prepare Cordage and Tools
Prepare Cordage and Tools
You need a large quantity of thin, strong cordage — 50-80 metres for a net roughly 2m x 1m. Reverse-wrap cordage from nettle bast, lime inner bark, or hemp fiber works well. The cord should be about 2mm diameter — thin enough to be nearly invisible in water but strong enough to hold a thrashing fish. Carve a flat netting shuttle from a thin piece of hardwood — this holds a length of cord and passes through the mesh loops. Also carve a mesh gauge — a flat stick whose width determines the size of each mesh opening. For general river fish, a gauge width of 3-4cm produces suitable mesh.
Materiais para este passo:
 Cordage50-80m total m
 Mesh gauge stick1 (determines mesh size) peça
Ferramentas necessárias:
 Wooden Mallet
Set Up the Headline
Set Up the Headline
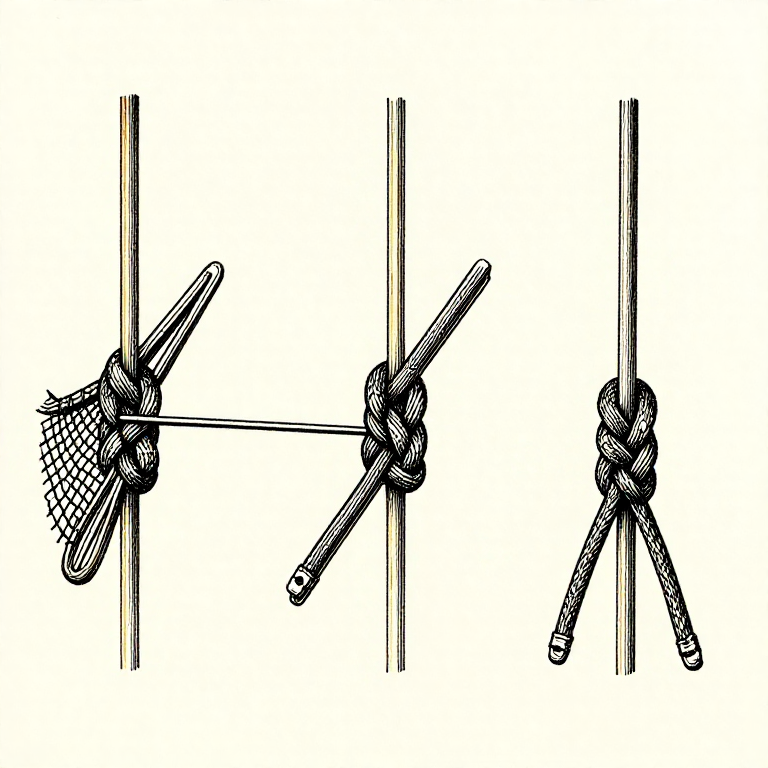
Stretch a thicker cord (the headline) horizontally between two fixed points at working height. This is the top edge of the net. Tie a series of foundation loops onto the headline, spaced at intervals equal to twice the gauge width. These loops form the first row of meshes. The number of loops determines the net width — 20-30 loops creates a net about 1.5-2 metres across.
Knot the Mesh Rows
Knot the Mesh Rows
Load the shuttle with cordage. Working left to right, pass the shuttle down through the first loop, around the gauge stick, and tie a sheet bend knot (also called a mesh knot). The gauge stick ensures every mesh is the same size. Continue across the row, knotting into each loop. At the end of the row, turn and work back right to left, knotting into the loops of the previous row. This creates the characteristic diamond pattern of netting. Keep consistent tension — loose knots create uneven mesh that fish escape through.
Finish the Net Edges
Finish the Net Edges
After reaching the desired depth (typically 0.5-1m for a river gill net), finish the bottom edge by running a cord through the final row of loops and tying each one off. Reinforce the side edges by running a vertical cord through the outermost meshes. For a gill net, attach small stone weights to the bottom edge and small floats (bark or hollow reed sections) to the headline. The weights pull the net vertical in the water while the floats hold the top edge at the surface.
Set the Net
Set the Net
Stretch the net across a stream or river channel, securing both ends to stakes driven into the bank or to heavy stones. The net should hang vertically in the water column like a curtain. Fish swimming into the mesh become entangled by their gill covers (hence 'gill net'). Check the net every few hours — fish left too long may be taken by scavengers or begin to deteriorate. A well-made net lasts for an entire fishing season with minor repairs.
Materiais
4- 5 m peçaReferência
Ferramentas necessárias
2- Referência
- Referência
CC0 Domínio Público
Este blueprint é liberado sob CC0. Você é livre para copiar, modificar, distribuir e usar este trabalho para qualquer finalidade, sem pedir permissão.
Apoie o Maker comprando produtos através do Blueprint, onde ele ganha uma Comissão Maker definida pelos vendedores, ou crie uma nova versão deste Blueprint e inclua-o como conexão no seu próprio Blueprint para compartilhar receita.