Colaboração
ARTE
BELEZA E BEM-ESTAR
ARTESANATO
CULTURA E HISTÓRIA
ENTRETENIMENTO
MEIO AMBIENTE
COMIDA E BEBIDAS
ENGENHARIA REVERSA
CIÊNCIAS
ESPORTES
TECNOLOGIA
TECNOLOGIA VESTÍVEL
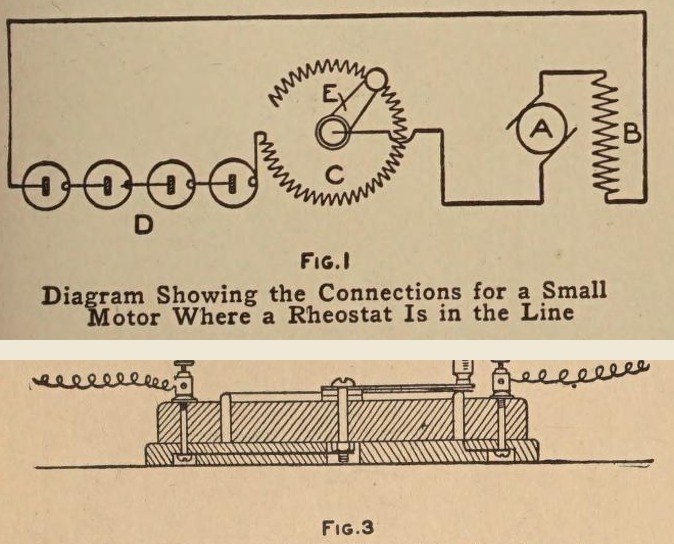


Rheostat: a Small Ring Rheostat for Toy Motors (Boy Mechanic, 1915)
A small variable resistor to set the speed of a toy motor: resistance wire wound on a fibre strip bent into a ring, set in a groove in a hardwood base, with a brass arm that slides round the bared top of the winding.
Wired in series with the motor, it works like a valve in a water pipe.
Source: The Boy Mechanic, Book 2 (1915), pp. 393-394. Unknown: wire alloy. Picture: Figs. 1 and 3 of the book.
Intermediário
Unknown
Instruções
1
1
Wind the resistance strip
Wind the resistance strip
Smooth a strip of thin fibre about 1/16 in thick, 1/2 in wide and 10 in long. Wind it with No. 22 cotton-covered resistance wire, close turns from 1/4 in from one end to 1/4 in from the other, securing the ends through small drilled holes and leaving 3 to 4 in free. Bend the strip into a ring round a round object, winding outward, and note its inside and outside diameters.
Materiais para este passo:
 Material desconhecido1 fibre strip
 Fio de resistência de alpaca1 No. 22
Ferramentas necessárias:
 Berbequim de mão
2
2
Make the base
Make the base
Round the corners and top edges of a seasoned hardwood block 1/2 x 4 1/2 x 4 1/2 in, mark the ring's two diameters from the centre, and saw out the circles so the ring fits between them. Screw this onto a second board 1/4 x 4 3/4 x 4 3/4 in from below with countersunk screws. Drill a hole for one wire end, fit two back-connected binding posts in the corners, and cut grooves underneath for the leads; one post goes to the winding, the other to the centre bolt.
Materiais para este passo:
 Tábua de madeira de lei2 1/2 and 1/4 in
 Parafusos para madeira1 peça
 Borne de painel2 peças
Ferramentas necessárias:
 Compasso de pontas
 Serrote de costasBerbequim de mão
 Chave de fendas
3
3
Make and mount the arm
Make and mount the arm
Cut the arm from 1/16 in sheet brass, 2 in long, 1/2 in wide at one end and 1/4 in at the other. Under the narrow end solder thin spring brass to bear on the ring; fit a small handle on top. Mount it on a 1/8 in brass bolt about 1 in long through the centre, with washers under it, the base hole countersunk underneath 1/2 in wide and 1/4 in deep. Solder a short brass strip to the nut, set in a recess, and lock with a second nut or a spring washer.
Materiais para este passo:
 Chapa de latão1 arm, spring
 Metal desconhecido1 1/8 in brass bolt
 Anilha plana3 peças
 Spring Washer1 peça
 Solda de estanho-chumbo1 peça
Ferramentas necessárias:
 Tesoura de chapaBerbequim de mão
 Ferro de solda elétrico
4
4
Bare the track and finish
Bare the track and finish
Set the ring in its groove. Sand the insulation off the top edge of the winding so the spring contact touches the wire. Give the wood a coat of shellac.
Materiais para este passo:
 Verniz de goma-laca1 peça
Ferramentas necessárias:
 Lixa
 Pincéis finos
Materiais
11- 1 fibre stripReferência
- 1 No. 22Referência
- 2 1/2 and 1/4 inReferência
- 1 peçaReferência
- Referência
- 1 arm, springReferência
- 1 1/8 in brass boltReferência
- 3 peçasReferência
- 1 peçaReferência
- 1 peçaReferência
- 1 peçaReferência
Ferramentas necessárias
8- Referência
- Referência
- Referência
- Referência
- Referência
- Referência
- Referência
- Referência
Este projeto faz
CC0 Domínio Público
Este blueprint é liberado sob CC0. Você é livre para copiar, modificar, distribuir e usar este trabalho para qualquer finalidade, sem pedir permissão.
Apoie o Maker comprando produtos através do Blueprint, onde ele ganha uma Comissão Maker definida pelos vendedores, ou crie uma nova versão deste Blueprint e inclua-o como conexão no seu próprio Blueprint para compartilhar receita.