ARTE
BELEZA E BEM-ESTAR
ARTESANATO
CULTURA E HISTÓRIA
ENTRETENIMENTO
MEIO AMBIENTE
COMIDA E BEBIDAS
ENGENHARIA REVERSA
CIÊNCIAS
ESPORTES
TECNOLOGIA
TECNOLOGIA VESTÍVEL
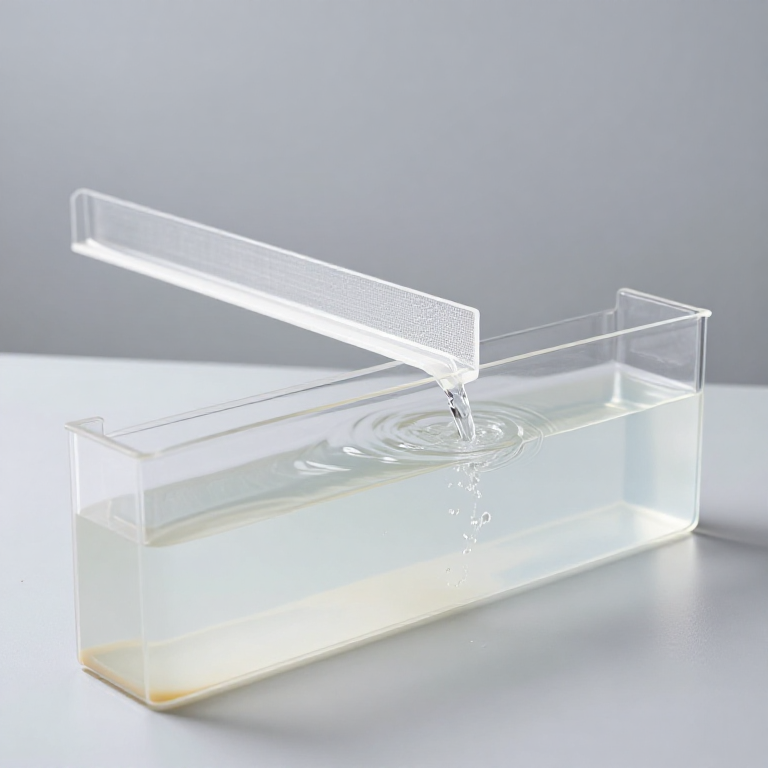


The Sedimentation Tank
The cheapest treatment process is gravity, and a sedimentation tank is a device for buying time so gravity can act. Nothing is added, nothing is powered, and the tank does not care what the particles are made of — only how fast they fall.
That makes the design arithmetic unusually clean, and it produces a result that surprises people the first time they meet it. The tank's performance does not depend on its depth. A particle is captured if it can fall from the surface to the floor in the time the water takes to cross the tank; make the tank deeper and the particle has further to fall, but the water also moves more slowly, and the two effects cancel exactly. What decides capture is the surface area alone.
That single fact — the overflow rate, expressed as flow divided by plan area — is the whole design parameter, and it explains why settling tanks are broad and shallow rather than deep, and why the shallowest tank of all, a stack of closely spaced inclined plates, outperforms a tank many times its volume.
The other half of the subject is everything that stops the ideal from happening: currents, wind, temperature layers and inlet jets that let water cross the tank in a fraction of the time it should. You will build a tank, measure its real residence time with dye, and find out how much of it is doing nothing.
Intermediário
5 hours
Instruções
1
1
Overflow rate, and why depth does not matter
Overflow rate, and why depth does not matter
A carregar o notebook Jupyter…
Ferramentas necessárias:
 Desktop Computer
2
2
Build a tank you can see through
Build a tank you can see through
Make a rectangular tank from clear sheet, roughly a metre long, two hundred millimetres wide and three hundred deep. Clear is essential — every interesting result in this blueprint is a flow pattern, and you cannot see a flow pattern through a wall.
The inlet is the part that decides whether the tank works. Water arriving as a jet will shoot across the tank and out of the outlet in a fraction of the design time, carrying its particles with it, and the rest of the tank will sit there doing nothing at all. So the inlet must dissipate that momentum: feed into a full-width chamber behind a baffle with the water passing through a perforated plate or under a submerged wall, so it enters the tank body slowly and evenly across the whole cross-section.
The outlet has the same problem in reverse. Draw off through a single pipe and you create a suction that pulls flow preferentially from nearby. Real tanks use a long weir across the full width, sometimes a V-notch weir, so the withdrawal is spread out. Make yours a full-width weir plate.
Fit a sludge zone at the bottom — a hopper or simply a flat floor with a drain — and keep it well below the outlet. Settled solids that get re-entrained have wasted the entire process.
Mark the tank at ten equal stations along its length so you can describe where things happen.
Materiais para este passo:
 PVC Sheet (3mm)2 folhas
 Acrylic Sheet2 folhas
 PVC Solvent Cement250 millilitre
 Clear PVC Pipe (32mm)2 metre
Ferramentas necessárias:
 Hacksaw
 Digital Calipers - 152.4 mm
 Bucket
3
3
Find out how much of your tank is actually working
Find out how much of your tank is actually working
This is the measurement that separates the design from the reality, and it is the most valuable thing in the blueprint.
Run the tank at a steady, measured flow until conditions settle. Calculate the theoretical residence time: tank volume divided by flow. Write it down.
Now inject a slug of dye at the inlet, as fast and as compactly as you can, and record the dye concentration leaving the outlet against time. A photodiode and an LED across the outlet pipe gives you a curve; a series of samples in numbered jars gives you the same thing more slowly.
What comes out is the residence time distribution, and it will not be a spike at the theoretical time. Expect dye to appear at the outlet far earlier than theory says — that is short-circuiting, water crossing the tank on a fast path. Expect a long tail — that is dead space, water trapped in corners and eddies, leaving late. The ratio of the time to first appearance against the theoretical time is a direct measure of how badly the tank is short-circuiting, and anything below about a third is poor.
Then go and fix it. Add or improve the inlet baffle. Lengthen the outlet weir. Add intermediate baffles to lengthen the flow path. Re-run the dye test after each change and watch the curve tighten up.
Most real tanks achieve considerably less than their theoretical residence time, and knowing your number is the difference between a tank you designed and a tank you understand.
Materiais para este passo:
 Food Colouring (Concentrated)1 garrafa
 Distilled Water20 litros
Ferramentas necessárias:
 Stopwatch
 Turbidity MeterBucket
4
4
Everything that stops gravity from working
Everything that stops gravity from working
The ideal tank in the notebook assumes water crosses in plug flow, evenly, undisturbed. Real tanks fail that assumption in half a dozen specific ways, and each has a recognisable signature in the dye curve you just measured.
This diagram names each, gives its cause, and gives the fix. Density currents are the subtle one and worth reading twice: water even slightly colder or siltier than the tank contents will run along the floor as a distinct layer and out of the outlet, having barely mixed at all. A tank can be well baffled, well loaded and still fail this way on a sunny afternoon when the surface warms.
Work through your own dye curve against the signatures listed. Whichever one you have, the diagram tells you what to change.
Flow
Loading...
Materiais para este passo:
PVC Sheet (3mm)1 folha5
5
Add plates, then read the limit
Add plates, then read the limit
Build a plate pack and drop it in. Cut rectangles of thin sheet to fit the tank cross-section, space them fifty millimetres apart with strips of the same material, and set the whole pack at about fifty-five degrees to the horizontal.
The angle is a compromise you can test. Shallower plates settle better because the sludge has less distance to fall, but below about fifty degrees the sludge stops sliding off and the pack blinds with accumulated solids. Try forty-five, fifty-five and sixty-five degrees and see for yourself where sliding fails — that failure is the reason the angle is always in the fifties.
Run the same clay suspension through the tank with and without the pack, at the same flow, and measure outlet turbidity. Then find the flow at which each configuration reaches the same outlet quality. The ratio of those two flows is the real gain, measured on your bench, and it should be several times.
Where this stops. You have built a clarifier and measured its hydraulic efficiency, which is genuine process engineering and transfers directly to any separation by density — brewing, casting slurries, machining coolant, aquaculture, rainwater harvesting. What it is not is drinking water treatment. Settling removes what settles, and what settles is not what makes people ill. Bacteria and viruses are far too small to be caught by gravity in any practical tank, which is precisely why every process after this one in the batch exists. Clear water from this tank is clarified, not treated. Use it for irrigation, for washing, for process water, or as feed to a filter — and never assume the clarity means anything more than clarity.
Materiais para este passo:
PVC Sheet (3mm)2 folhas Kaolin Clay Powder500 gram
Ferramentas necessárias:
Turbidity MeterStopwatchDigital Calipers - 152.4 mmMateriais
7- 5 folhasReferência
- 2 folhasReferência
- 250 millilitreReferência
- 2 metreReferência
- 1 garrafaReferência
- 20 litrosReferência
- 500 gramReferência
Blueprints relacionados
Estes blueprints compartilham conhecimento — técnicas, materiais ou princípios

CC0 Domínio Público
Este blueprint é liberado sob CC0. Você é livre para copiar, modificar, distribuir e usar este trabalho para qualquer finalidade, sem pedir permissão.
Apoie o Maker comprando produtos através do Blueprint, onde ele ganha uma Comissão Maker definida pelos vendedores, ou crie uma nova versão deste Blueprint e inclua-o como conexão no seu próprio Blueprint para compartilhar receita.