ARTE
BELEZA E BEM-ESTAR
ARTESANATO
CULTURA E HISTÓRIA
ENTRETENIMENTO
MEIO AMBIENTE
COMIDA E BEBIDAS
ENGENHARIA REVERSA
CIÊNCIAS
ESPORTES
TECNOLOGIA
TECNOLOGIA VESTÍVEL


The Ferrule Fitting: Gripping and Sealing With One Nut
A tapered thread joins a pipe to a fitting. It does not help at all with **tube** — thin-wall seamless tube has no thread on it and cannot be given one.
The answer is a nut that drives a tapered ring, a **ferrule**, down a matching cone in the fitting body. The cone squeezes the ferrule inward until it is plastically formed around the tube: it seals against the body and grips the tube at the same time, with no thread, no solder and no flare.
Sealing and gripping want opposite things, though — one wants a smooth wide contact, the other a sharp edge driven into the metal — so the better fittings use **two** ferrules and give each job its own part. That is the patent on this page, and this rung makes one up, sections it, and finds out what a quarter turn too many does.
Intermediário
About 3 hours
Instruções
1
1
Read the claim, and look at the two ferrules
Read the claim, and look at the two ferrules
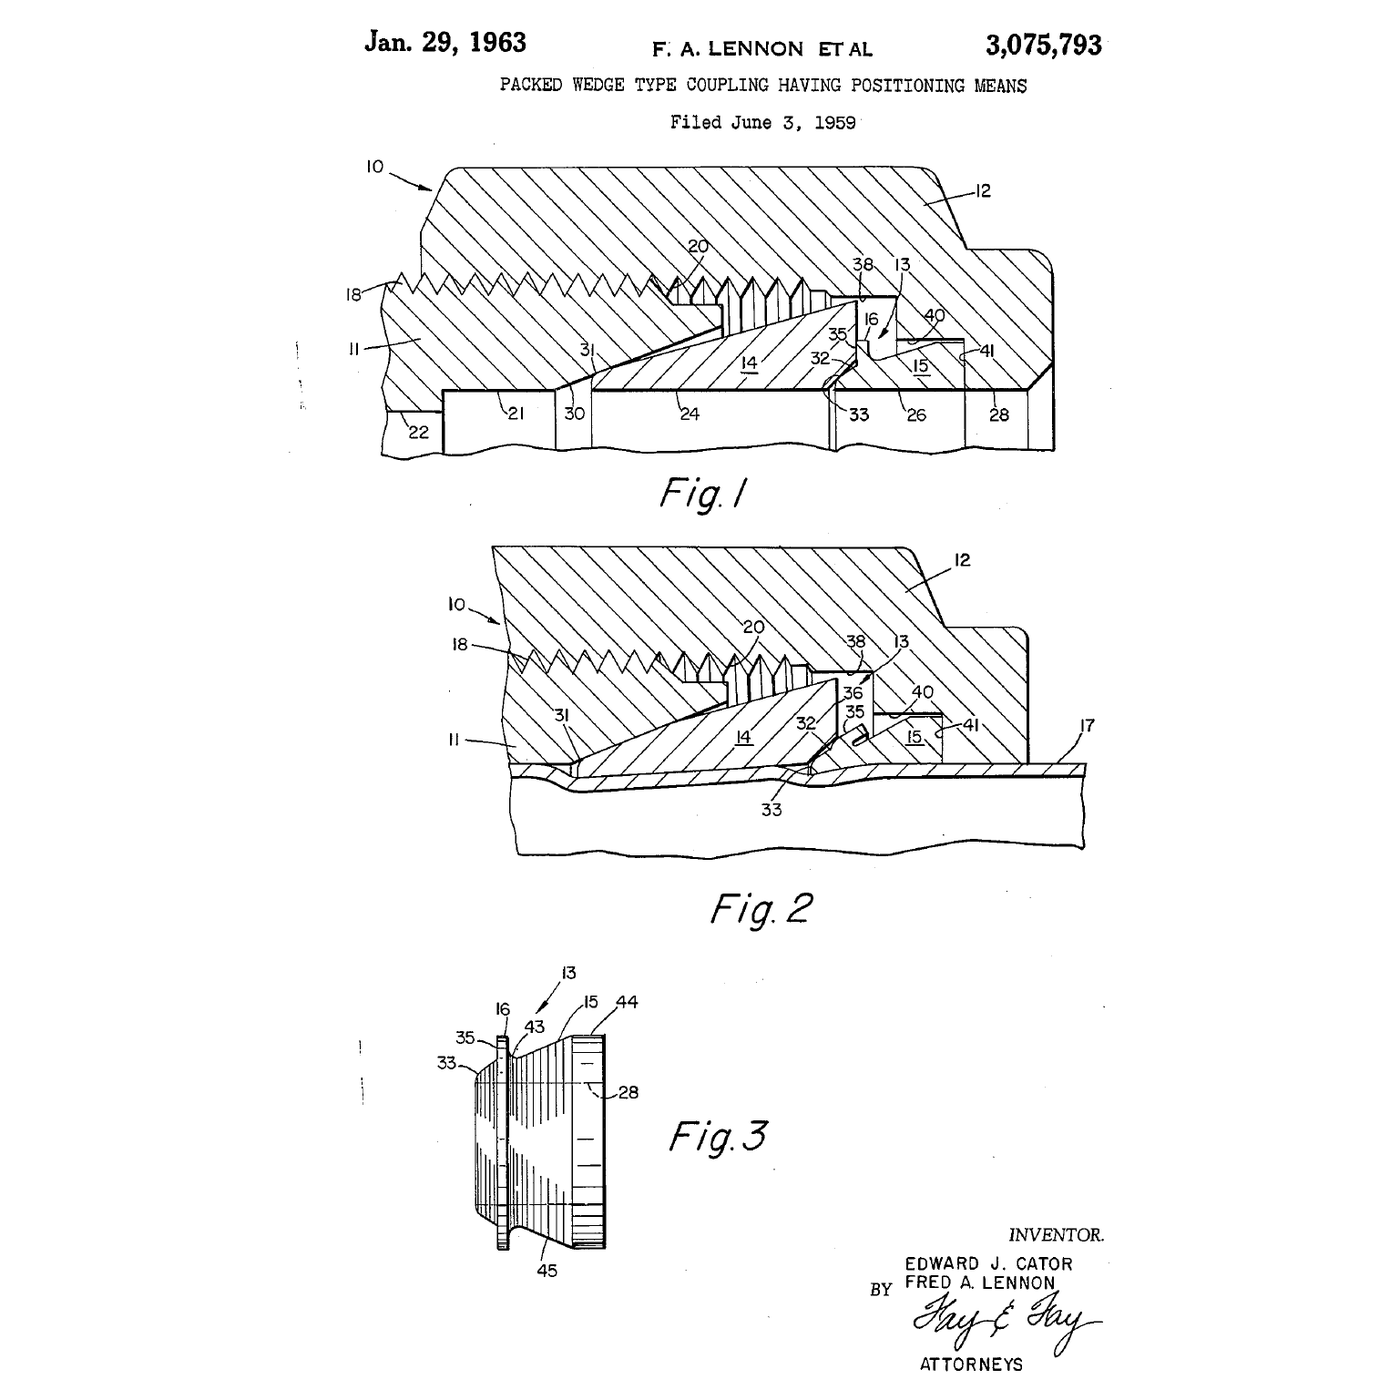
**US 3,075,793**, *Packed wedge type coupling having positioning means*, **Fred A. Lennon** of Pepper Pike and **Edward J. Cater** of Cleveland, assignors to the **Crawford Fitting Company**; filed **3 June 1959**, Serial No. 817,924, granted **29 January 1963**. Expired. The drawing on this page is the patent's own sheet 1.
The specification states both jobs in one sentence: a *ferrule adapted to coact with a tube* so as to make a *tight seal* **and** *to tightly grip the tube for preventing its* withdrawal. Note that it is a *wedge type* coupling, and that the claims are concerned with **positioning** — where the ferrule sits before it is driven, which is what makes the result repeatable.
Now take a two-ferrule fitting apart and lay out the four pieces: body, front ferrule, back ferrule, nut.
- **The front ferrule** is the one that meets the body's cone. Its nose is smooth and it makes two seals at once — against the body cone on the outside, and against the tube on the inside.
- **The back ferrule** sits behind it, usually with a sharper internal edge and a shape that lets it hinge. It drives the front ferrule forward and **bites** the tube.
Under the microscope you can see the difference in edge geometry clearly. That difference is the whole reason for having two: the front one is free to seal smoothly because it is not also being asked to dig in.
Ferramentas necessárias:
 União de compressão (duas anilhas)
 Chave inglesa ajustável
 Conjunto de chaves de boca
 Paquímetro digital de 6 polegadas
 Microscópio digital
 Torno de bancada
2
2
Make one up properly, and count the turns
Make one up properly, and count the turns
Cut a piece of soft copper or stainless tube with a **tube cutter**, not a hacksaw. This matters more than it sounds: the joint depends on the tube being round, square and clean, and a sawn end is none of those.
Ream the burr out of the bore, wipe the outside, and check the end is square against a small square. Any ovality here becomes a leak later.
Assemble in order — nut, back ferrule, front ferrule, tube fully home against the body's shoulder — and hold the tube against that shoulder while you tighten. **If the tube is not bottomed, the ferrule sets in the wrong place and the joint is scrap.**
Now: finger tight, mark the nut and the body with a line, then **a turn and a quarter**.
Do it again on a fresh piece at three quarters of a turn, and again at two turns, and again at three. Keep all four.
Step 4 explains why the instruction is in turns and never in torque: turns depend only on the pitch, which is a property of the fitting, while torque depends on the finish, the lubricant and the operator. It is the same reasoning as the previous rung's pipe thread, arrived at from the opposite direction.
Materiais para este passo:
 Tubo de cobre tipo L de 1/2"2 peças
Ferramentas necessárias:
União de compressão (duas anilhas) Corta-tubos
 Rebarbador manualChave inglesa ajustávelConjunto de chaves de bocaTorno de bancadaPaquímetro digital de 6 polegadas
 Óculos de segurança transparentes
3
3
Section the four joints and see the swage
Section the four joints and see the swage
Cut each of your four made-up joints lengthwise — hacksaw, then file and polish the cut face — and look at all four in a row under the microscope. This is the most informative twenty minutes in the rung.
**Three quarters of a turn.** The front ferrule has contacted the cone but barely deformed. The back ferrule has not bitten. There is a visible gap where there should be metal-to-metal contact. This joint holds low pressure and pulls apart.
**A turn and a quarter.** The front ferrule's nose is wrapped down onto the tube and sits flush against the body cone with no gap. The back ferrule's edge has made a shallow, even groove in the tube. The tube's wall is barely thinned. This is what right looks like.
**Two turns.** The groove is deep, the tube wall is visibly reduced under it, and the bore may be slightly necked.
**Three turns.** The tube is necked, the ferrule may be cracked, and the joint is weaker than the correct one despite being far tighter. This is the counterintuitive result worth carrying away: **past the correct point, more tightening makes the joint worse, not safer.**
Then pull-test them. Clamp the body in the vise and pull the tube with a slide hammer or a lever. The correctly made joint will resist far more than the under-tightened one and more than the over-tightened one.
Pressure-test with water only, and behind a shield. A tube ejected from a fitting is a projectile with a weight behind it — step 4 computes how much.
Materiais para este passo:
Tubo de cobre tipo L de 1/2"2 peçasFerramentas necessárias:
União de compressão (duas anilhas) Serra de arco para metais
 Limas (lima de mão)Microscópio digitalPaquímetro digital de 6 polegadasTorno de bancada
 Manómetro
 Bomba manual de ensaio de pressão
 Balde
Balde Protetor facialÓculos de segurança transparentes
 Luvas de nitrilo
4
4
Ejection force, the wedge, and why the instruction is turns
Ejection force, the wedge, and why the instruction is turns
A carregar o notebook Jupyter…
5
5
History and context
History and context
**Attribution.** US 3,075,793, *Packed wedge type coupling having positioning means*, Fred A. Lennon and Edward J. Cater, assignors to the Crawford Fitting Company, Cleveland; filed 3 June 1959, granted 29 January 1963, expired. The drawing on this page is the patent's own. Crawford Fitting was founded in 1947 by Lennon and Cullen B. Crawford to make exactly this kind of fitting; Lennon bought Crawford out a year later.
**What it replaced.** Before compression fittings, joining small tube meant soldering, brazing, or flaring the end and clamping the flare. All three need heat or a special tool, all three are hard to do well in a confined space, and a flare is a thinned, work-hardened section exactly where the stress is. A ferrule fitting needs a spanner and a tube cutter.
**Two ferrules, one insight.** The single-ferrule fitting still exists and is cheaper, and it is a genuine compromise: a ring that must both seal and bite does neither as well. Splitting the job — a smooth front ferrule that only seals, a sharp back ferrule that only grips and also acts as a spring holding the assembly under load through vibration and thermal cycling — is a clean example of a pattern worth naming: **when one part has two conflicting requirements, the fix is often two parts, not a better material.**
**Honest limits.** Swaging is permanent — the ferrules are formed onto the tube and the joint cannot be returned to components, though it can be remade onto the same tube end a limited number of times. It is unforgiving of tube quality: out-of-round, scored, work-hardened or wrong-wall tube will not seal, and the fitting will be blamed. The correct tightening is a narrow window and both errors are invisible from outside, which is why gap-inspection gauges exist. And ferrules and bodies from different makers look interchangeable and are **not** — the cone angles and ferrule geometries differ, and mixing them produces a joint that assembles perfectly and fails under pressure.
Materiais
1- 2 peçasReferência
Ferramentas necessárias
16- Referência
- Referência
- Referência
- Referência
- Referência
- Referência
- Referência
- Referência
- Referência
- Referência
- Referência
- Referência
- Referência
- Referência
- Referência
- Referência
Blueprints relacionados
Estes blueprints compartilham conhecimento — técnicas, materiais ou princípios


CC0 Domínio Público
Este blueprint é liberado sob CC0. Você é livre para copiar, modificar, distribuir e usar este trabalho para qualquer finalidade, sem pedir permissão.
Apoie o Maker comprando produtos através do Blueprint, onde ele ganha uma Comissão Maker definida pelos vendedores, ou crie uma nova versão deste Blueprint e inclua-o como conexão no seu próprio Blueprint para compartilhar receita.