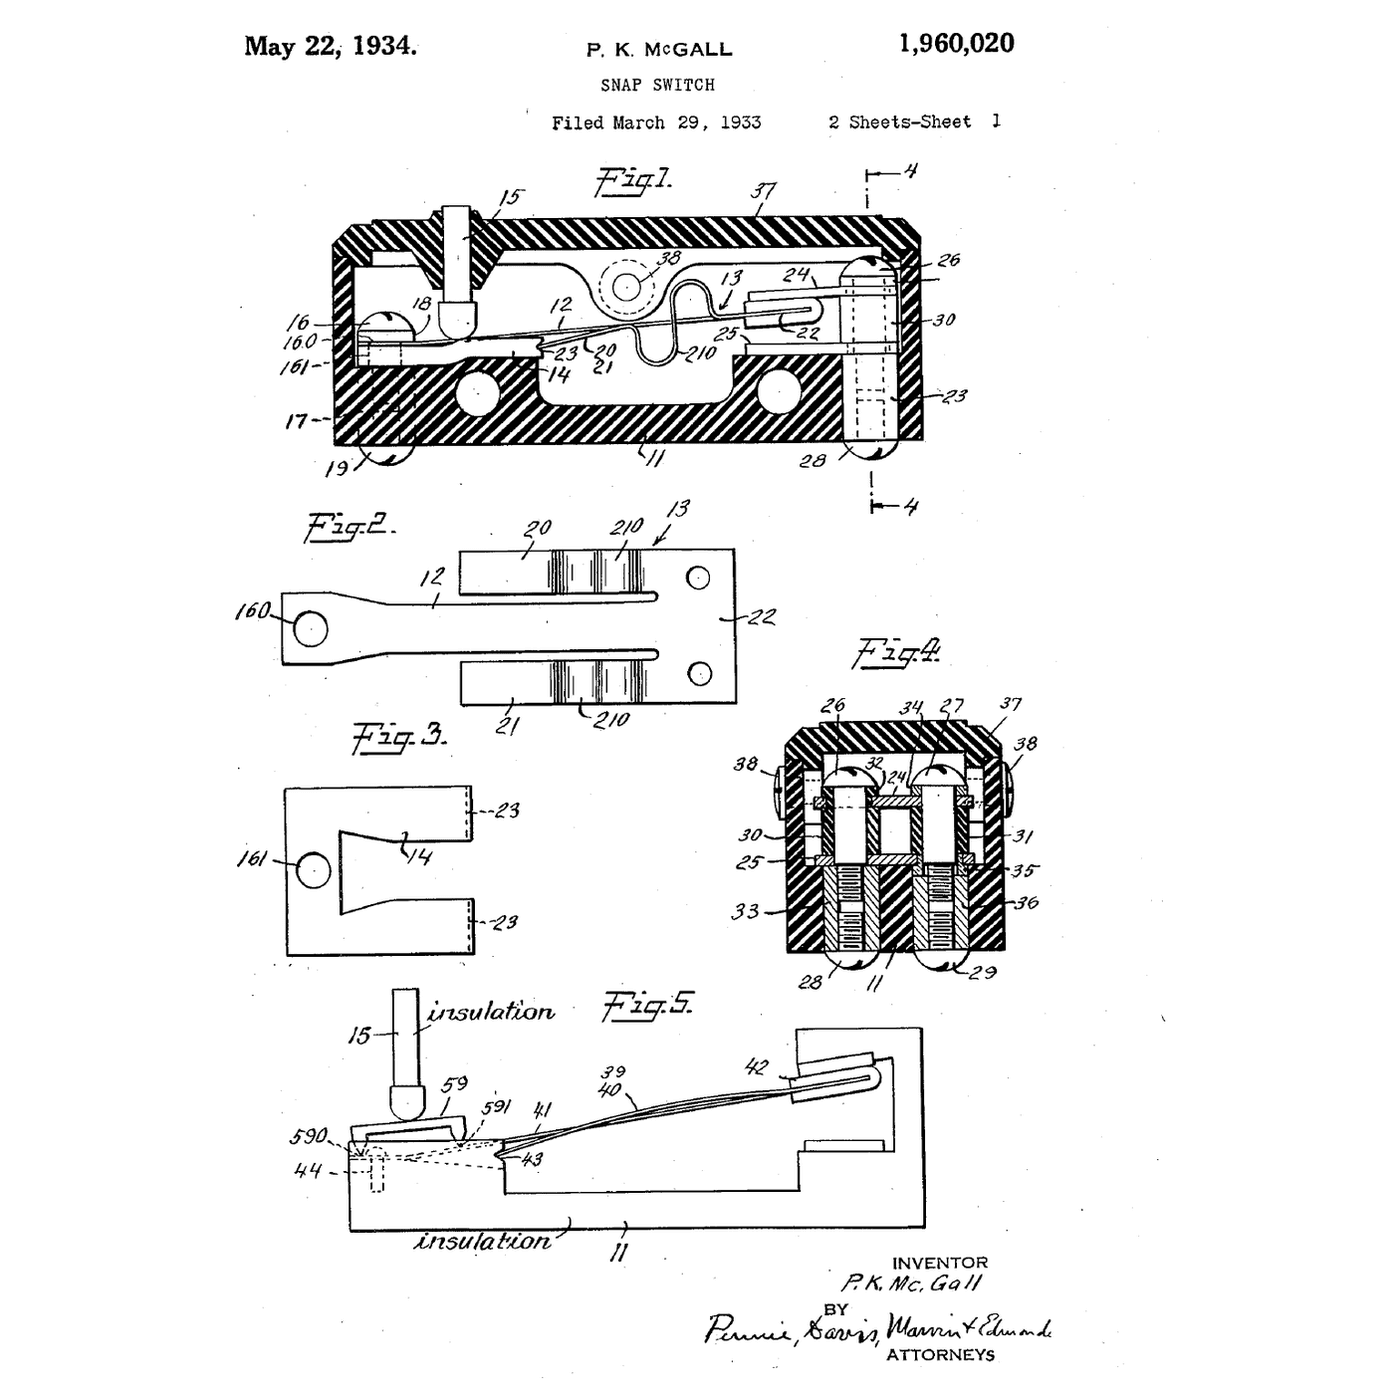
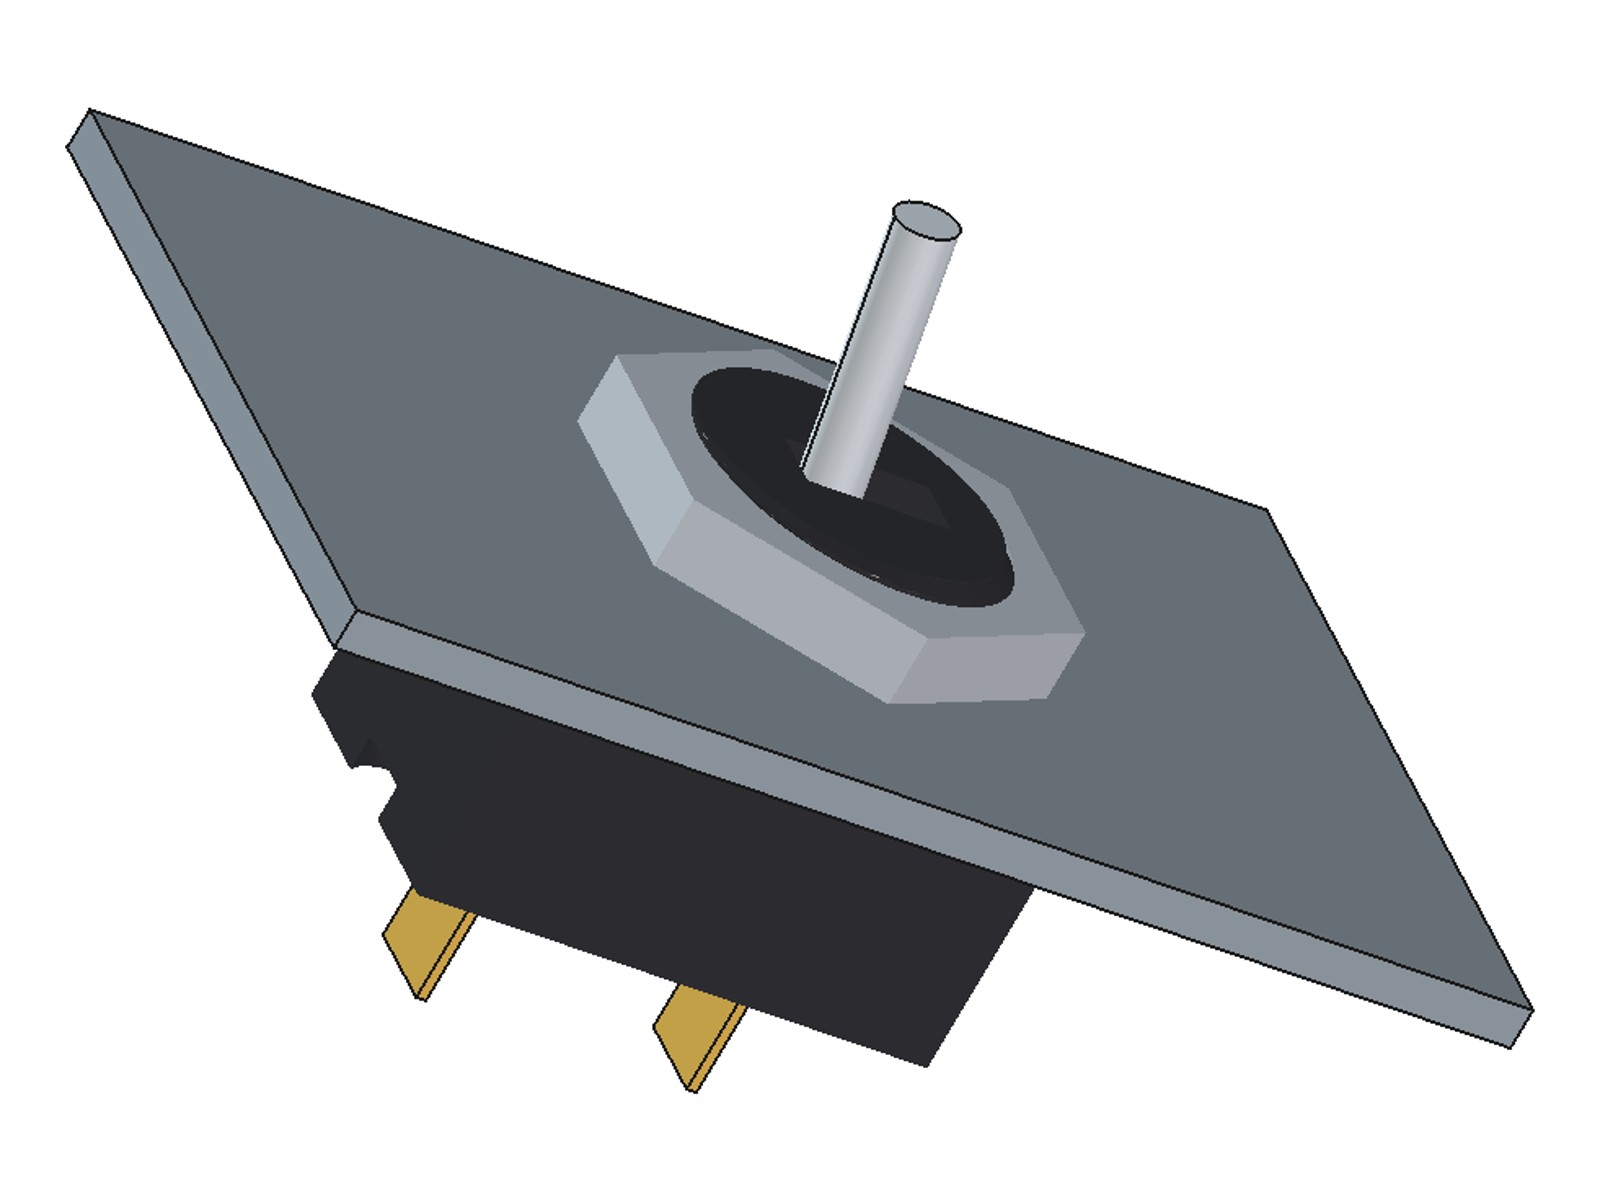
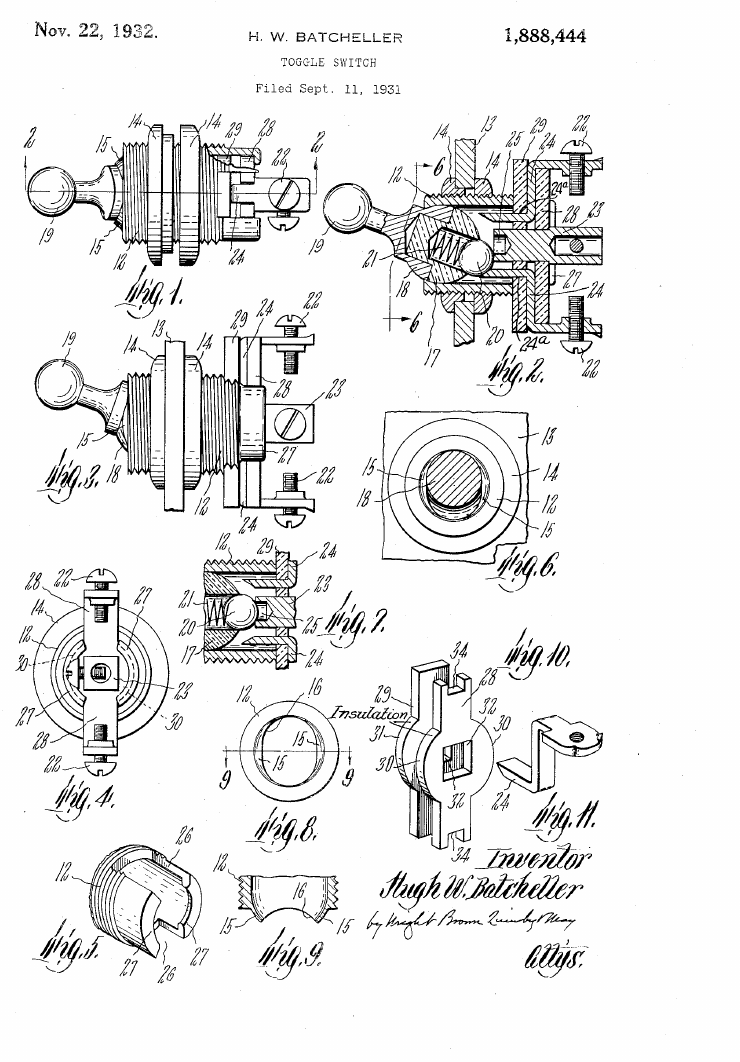
"""Batch 2526 -- panel toggle switch after Batcheller (US 1,888,444, 1932): a hand piece turning in a ball seat at the outer end of
the casing, its handle through an oblong slot; inside, a spring presses a metal ball (the bridging conductor) out of a radial bore
onto two gap-separated terminals: ON = ball on both, OFF = ball on the inner terminal only, held by a detent; the casing is clamped
to the panel by a nut on its threaded outer end. ALL sizes ours. Parts (PETG, no supports):
  ts-body     block with an M16 x 1.5 threaded neck holding the ball seat and the lever slot; two M3 pilots for the base
  ts-hand     10 mm ball with a 7 mm stem; 4.3 mm bore for the spring and the 4 mm steel ball; 2.9 mm hole for the 3 mm lever rod
  ts-base     3 mm plate with two shallow pockets for the brass terminals and slots for their solder tails
  ts-nut      M16 x 1.5 panel nut, 20 mm across the flats, 3.5 mm thick (panels up to 2 mm: thread 0.6 to 6.2 on the neck)
Run: OUT=<dir> freecadcmd build_all.py   (mm, z up, pivot at the origin)."""
import math, os
import FreeCAD as App, Part, MeshPart
OUT = os.environ["OUT"]
V = App.Vector
R_BALL = 5.0                     # hand piece ball
STEM_R, STEM_END = 3.5, -11.0    # stem radius, end of the stem below the pivot
BORE_R = 2.15                    # 4.3 mm bore for the 4 mm steel ball and spring
ZP = -12.0                       # top face of the brass terminals
THETA_OFF, THETA_ON = -20.0, 11.3   # lever angles (deg): OFF in the detent, ON over the gap
NECK_D, PITCH, NECK_Z0, NECK_Z1 = 16.0, 1.5, 0.0, 8.0
TOP_Z = 6.2                      # top of the seat wall over the ball
BX, BY = 13.0, 8.0               # body half-sizes in x, y
SCREW_X, SCREW_Y = 10.5, 3.0   # both screws on the +y side: the base fits one way round only

def save(sh, name):
    sh = sh.removeSplitter()
    bb = sh.BoundBox
    print(name, "valid", sh.isValid(), "solids", len(sh.Solids), "bbox", [round(v, 1) for v in (bb.XLength, bb.YLength, bb.ZLength)],
          "volume_cm3", round(sh.Volume / 1000, 2))
    if not os.environ.get("NOSAVE"):
        MeshPart.meshFromShape(Shape=sh, LinearDeflection=0.02, AngularDeflection=0.1).write(os.path.join(OUT, name + ".stl"))
    return sh

def thread(d_major, pitch, z0, z1, grow=0.0, per_turn=24, n=144):
    """60 degree thread (flat crest P/8, root about P/12) as a lofted solid of turned transverse sections, radius grown by `grow`."""
    r_maj = d_major / 2 + grow
    h = 0.6134 * pitch                      # thread depth, ISO external
    r_min = r_maj - h
    ht = pitch / 16                          # half axial width at the crest
    hr = ht + h * math.tan(math.radians(30)) # ... at the root
    def R(t):
        u = (t * pitch / (2 * math.pi)) % pitch
        u = min(u, pitch - u)
        if u <= ht: return r_maj
        if u >= hr: return r_min
        return r_min + (hr - u) / (hr - ht) * (r_maj - r_min)
    base = [(R(2 * math.pi * i / n), 2 * math.pi * i / n) for i in range(n)]
    zs = [z0]
    while zs[-1] < z1:
        zs.append(zs[-1] + pitch / per_turn)
    wires = []
    for z in zs:
        rot = -2 * math.pi * z / pitch
        P = [V(r * math.cos(t + rot), r * math.sin(t + rot), z) for r, t in base]
        wires.append(Part.makePolygon(P + [P[0]]))
    return Part.makeLoft(wires, True, True), r_min

# ---------------- body
body = Part.makeBox(2 * BX, 2 * BY, -ZP, V(-BX, -BY, ZP))                                   # block from ZP up to z = 0
if os.environ.get("NOTHREAD"):          # clash checks only: the thread does not touch the moving parts
    r_min = NECK_D / 2 - 0.6134 * PITCH
    neck = Part.makeCylinder(NECK_D / 2, NECK_Z1 - NECK_Z0, V(0, 0, NECK_Z0))
else:
    neck, r_min = thread(NECK_D, PITCH, NECK_Z0 + 0.6, NECK_Z1)
neck = neck.fuse(Part.makeCylinder(r_min + 0.01, NECK_Z1 - NECK_Z0, V(0, 0, NECK_Z0)))
neck = neck.common(Part.makeCylinder(NECK_D / 2 + 1, TOP_Z - NECK_Z0, V(0, 0, NECK_Z0)))          # neck ends at the seat's top wall
body = body.fuse(neck)
# inside: the ball seat (open downwards), a slot below it for the swinging stem, the lever slot through the top
body = body.cut(Part.makeSphere(R_BALL + 0.15))
body = body.cut(Part.makeBox(16.4, 8.6, -ZP + 0.1, V(-8.2, -4.3, ZP - 0.05)))                   # stem swing space (x) below the pivot
body = body.cut(Part.makeCylinder(R_BALL + 0.15, -ZP + 0.1, V(0, 0, ZP - 0.05)))
# THETA is the STEM's tilt (ball towards +x for +THETA); the lever above the pivot leans the other way: lever top x = -z tan(THETA)
x_lo = -(TOP_Z) * math.tan(math.radians(THETA_ON + 1.0)) - 1.5 - 0.35
x_hi = -(TOP_Z) * math.tan(math.radians(THETA_OFF - 1.0)) + 1.5 + 0.35
body = body.cut(Part.makeBox(x_hi - x_lo, 3.4, TOP_Z - (R_BALL - 2.0) + 1.0, V(x_lo, -1.7, R_BALL - 2.0)))   # lever slot = the end stops; from z = 3 so the rod clears where it leaves the ball
for x in (-SCREW_X, SCREW_X):
    body = body.cut(Part.makeCylinder(1.4, 10.0, V(x, SCREW_Y, ZP - 0.1)))                            # 2.8 mm pilots, 10 mm deep, for M3 x 12
body = save(body, "ts-body")

# ---------------- hand piece (pivot at the origin; printed lever-hole up)
hand = Part.makeSphere(R_BALL).fuse(Part.makeCylinder(STEM_R, -STEM_END - 3.0, V(0, 0, STEM_END)))
hand = hand.cut(Part.makeCylinder(BORE_R, -STEM_END - 1.0, V(0, 0, STEM_END - 0.1)))            # bore from the stem end up to z = -1
hand = hand.cut(Part.makeCylinder(1.45, 4.5, V(0, 0, R_BALL - 4.0)))                             # 2.9 mm hole for the 3 mm lever rod
hand = save(hand, "ts-hand")

# ---------------- base with the terminal pockets (terminal top face at ZP)
T = 0.5                                                                                          # brass strip thickness
base = Part.makeBox(2 * BX, 2 * BY, 3.0, V(-BX, -BY, ZP - 3.0))
INNER = (-7.5, 1.2)      # inner terminal x range (detent hole at the OFF contact point)
OUTER = (2.8, 7.5)       # outer terminal x range; the 1.6 mm gap between them is the ON position
for (a, b) in (INNER, OUTER):
    base = base.cut(Part.makeBox(b - a, 5.4, T + 0.05, V(a, -2.7, ZP - T)))                      # pocket so the strip is flush
tail_x = {INNER: INNER[0] + 0.6, OUTER: OUTER[1] - 0.6}
for k, x in tail_x.items():
    base = base.cut(Part.makeBox(0.9, 5.4, 4.0, V(x - 0.45, -2.7, ZP - 3.5)))                    # slot for the bent-down solder tail
for x in (-SCREW_X, SCREW_X):
    base = base.cut(Part.makeCylinder(1.7, 4, V(x, SCREW_Y, ZP - 3.5))).cut(Part.makeCylinder(3.2, 1.8, V(x, SCREW_Y, ZP - 3.05)))
base = save(base, "ts-base")

# ---------------- panel nut
th_int = Part.makeCylinder(NECK_D / 2 + 0.25, 5.5, V(0, 0, -1.0)) if os.environ.get("NOTHREAD") else thread(NECK_D, PITCH, -1.0, 4.5, grow=0.25)[0]
nut = Part.makeCylinder(20 / math.sqrt(3), 5.0)
hexp = Part.Face(Part.makePolygon([V(10 / math.cos(math.radians(30)) * math.cos(math.radians(60 * i + 30)), 10 / math.cos(math.radians(30)) * math.sin(math.radians(60 * i + 30)), 0) for i in range(7)])).extrude(V(0, 0, 3.5))
nut = hexp.cut(th_int).cut(Part.makeCylinder(r_min + 0.25, 6, V(0, 0, -1)))
nut = save(nut, "ts-nut")

# ---------------- checks (our numbers)
def contact(theta):
    th = math.radians(theta)
    s = (-ZP - 2.0) / math.cos(th)          # ball centre distance from the pivot along the stem when the ball touches the terminal plane
    return s, s * math.sin(th)
for name, th in (("OFF", THETA_OFF), ("upright", 0.0), ("ON", THETA_ON)):
    s, x = contact(th)
    print(f"{name:7s} lever {th:6.1f} deg: ball centre {s:.2f} mm down the stem (stem end {-STEM_END}), touches the terminals at x = {x:.2f}")
print("ON: ball (4 mm) over the gap", INNER[1], "to", OUTER[0], "-> touches both strips; OFF: in the detent hole at x =", round(contact(THETA_OFF)[1], 2))
print("stem swing at the stem end: x up to", round(-STEM_END * math.sin(math.radians(-THETA_OFF)) + STEM_R, 2), "(space 8.2)")
print("lever slot (lever top x at the top face):", round(x_lo, 2), "to", round(x_hi, 2))
print("seat wall: thread minor radius", round(r_min, 2), "- seat radius", R_BALL + 0.15, "=", round(r_min - R_BALL - 0.15, 2), "mm")
print("panel up to 2 mm: nut on the thread over", round(TOP_Z - 2.0 - 0.6 if False else TOP_Z - 2.0, 1), "mm of neck above the panel (nut 3.5 mm)")


 Filamento PETG6 g
 Impressora 3D de filamento (FDM)
 Paquímetro digital de 6 polegadas
 Chapa de latão1 piece (0.5 mm, 20 x 30 mm)
 Tesoura de chapa
 Lima para metal
 Jogo de brocas
 Alicate de bico chato
 Varão de aço inoxidável1 piece (3 mm x 22 mm)
 Conjunto de molas de compressão1 piece (about 4 mm diameter, 10 mm long)
 Rolamentos de esferas de aço1 piece (4 mm)
 Parafuso de cabeça cilíndrica com sextavado interior2 piece (M3 x 12)
 Fio de ligação0.3 m
 Fio de solda1 g
 Serra de arco para metais
 Jogo de chaves Allen
 Ferro de soldar
 Multímetro