ARTE
BELEZA E BEM-ESTAR
ARTESANATO
CULTURA E HISTÓRIA
ENTRETENIMENTO
MEIO AMBIENTE
COMIDA E BEBIDAS
ENGENHARIA REVERSA
CIÊNCIAS
ESPORTES
TECNOLOGIA
TECNOLOGIA VESTÍVEL
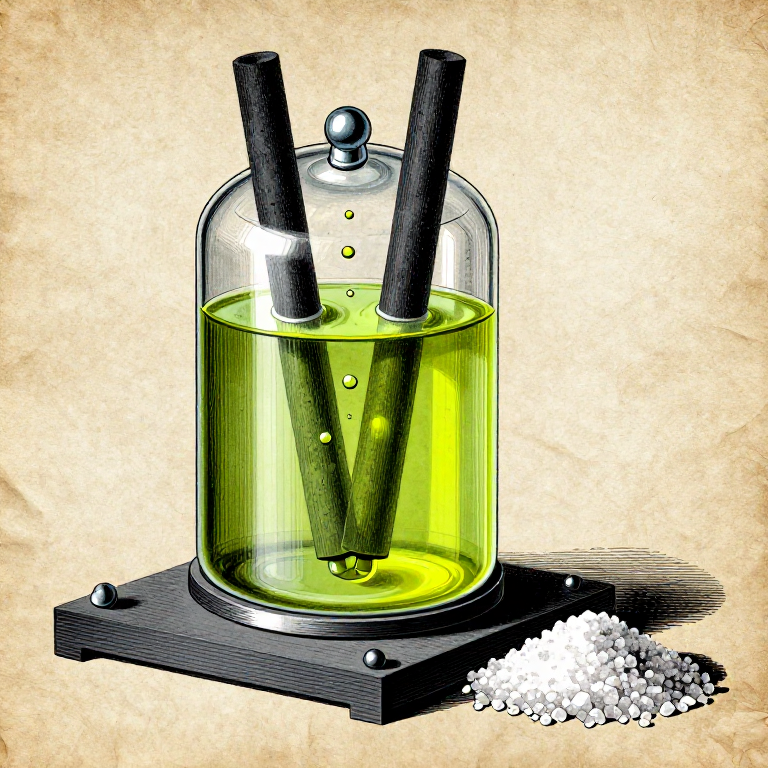

Understanding Chlorine from Salt Electrolysis — The Element That Purifies Water
Intermediário
Instruções
1
1
Prepare Saturated Salt Brine
Prepare Saturated Salt Brine
Dissolve 360 grams of sodium chloride in 1 liter of warm distilled water to create a saturated brine solution. At room temperature, water dissolves about 36% NaCl by weight. Stir until no more salt dissolves and a small amount of undissolved crystals remain at the bottom — this confirms saturation. Filter through paper to remove any insoluble impurities.
Materiais para este passo:
 Água destilada
 Sal de mesa
Ferramentas necessárias:
 Copo de vidro resistente ao calor
 Balança de precisão
 Vareta de vidro borossilicato
 Papel de filtro
2
2
Understand the Chlor-Alkali Principle
Understand the Chlor-Alkali Principle
When electricity passes through brine, three products form simultaneously: chlorine gas (Cl₂) at the anode, hydrogen gas (H₂) at the cathode, and sodium hydroxide (NaOH) in solution. The key reaction: 2NaCl + 2H₂O → Cl₂ + H₂ + 2NaOH. This is the chlor-alkali process — one of the largest industrial electrochemical operations, consuming about 1% of global electricity.
3
3
Set Up a Small Electrolysis Cell
Set Up a Small Electrolysis Cell
Place two carbon (graphite) electrodes in a beaker of saturated brine, spaced 5 cm apart. Carbon is essential — metal electrodes react with chlorine. Connect to a 6-12V DC power supply. The positive terminal (anode) will produce chlorine; the negative terminal (cathode) will produce hydrogen. Use alligator clips for electrode connections.
Materiais para este passo:
 Elétrodo de grafite
Ferramentas necessárias:
Copo de vidro resistente ao calor Fonte de alimentação de corrente contínua
 Óculos de proteção estanques
4
4
Observe Gas Evolution at Both Electrodes
Observe Gas Evolution at Both Electrodes
Apply 6V and watch bubbles form at both electrodes. At the anode (positive), greenish-yellow chlorine gas rises — it has a sharp, pungent odor detectable below 1 ppm. At the cathode, colorless hydrogen bubbles form. DANGER: Perform this ONLY in a well-ventilated fume hood or outdoors. Chlorine gas caused 90,000 casualties in World War I. Even small amounts irritate lungs severely.
Ferramentas necessárias:
 Máscara respiratória com filtro para gases ácidos
 Óculos de proteção química
 Luvas resistentes a produtos químicos
5
5
Test for Chlorine with Litmus Paper
Test for Chlorine with Litmus Paper
Hold damp blue litmus paper near the anode — chlorine first turns it red (acidic), then immediately bleaches it white. This double reaction is chlorine's signature test: Cl₂ + H₂O → HCl + HOCl. The hypochlorous acid (HOCl) is the bleaching agent. No other common gas produces this red-then-white sequence on litmus.
Materiais para este passo:
 Papel de tornassol
6
6
Collect Sodium Hydroxide from the Cathode
Collect Sodium Hydroxide from the Cathode
As electrolysis proceeds, the solution around the cathode becomes strongly alkaline — sodium hydroxide accumulates. Test with pH paper: it reads 13-14. Industrial membrane cells keep the anode and cathode compartments separate to prevent chlorine from reacting with NaOH, which would form sodium hypochlorite (bleach) instead of the desired separate products.
Materiais para este passo:
Papel de tornassolFerramentas necessárias:
Copo de vidro resistente ao calor7
7
Understand Scheele's Discovery
Understand Scheele's Discovery
Carl Wilhelm Scheele first produced chlorine in 1774 by reacting manganese dioxide with hydrochloric acid: MnO₂ + 4HCl → MnCl₂ + 2H₂O + Cl₂. He called it 'dephlogisticated muriatic acid air.' Humphry Davy proved in 1810 that it was an element, naming it 'chlorine' from Greek 'khloros' (pale green). Scheele had unknowingly handled one of the most dangerous elements barehanded.
8
8
Demonstrate Chlorine's Bleaching Power
Demonstrate Chlorine's Bleaching Power
Dissolve a tiny amount of chlorine in cold water to make chlorine water. Dip a strip of colored fabric or a flower petal into the solution — the color disappears within seconds as hypochlorous acid oxidizes the organic pigments. This bleaching action revolutionized textile manufacturing when Charles Tennant patented bleaching powder (calcium hypochlorite) in 1799.
Materiais para este passo:
Água destiladaFerramentas necessárias:
Óculos de proteção químicaLuvas resistentes a produtos químicos9
9
Map Chlorine's Role in Water Treatment
Map Chlorine's Role in Water Treatment
Since 1908, chlorination has been the primary method for making drinking water safe. Adding 0.2-0.5 ppm free chlorine kills bacteria, viruses, and protozoa. This single innovation has saved more lives than any medical advance in history. Chloramines (chlorine + ammonia) provide longer-lasting residual disinfection in distribution systems. Breakpoint chlorination eliminates ammonia contamination.
10
10
Explore PVC and Organochlorine Chemistry
Explore PVC and Organochlorine Chemistry
Chlorine is essential for producing polyvinyl chloride (PVC) — the world's third most-produced plastic. Vinyl chloride monomer (CH₂=CHCl) polymerizes into pipes, window frames, flooring, and medical tubing. About 40% of all chlorine production goes to organic chemicals: solvents, pesticides, pharmaceuticals, and silicones. Hydrochloric acid production consumes another 30%.
11
11
Neutralize and Document Findings
Neutralize and Document Findings
After the experiment, neutralize any remaining chlorine by adding sodium thiosulfate solution to the brine — it converts chlorine to harmless chloride ions. Record observations: color of gas, bleaching effect, litmus test results, and NaOH pH readings. Chlorine's atomic number 17 places it in Group 17 (halogens), and its electronegativity of 3.16 makes it the third most electronegative element after fluorine and oxygen.
Materiais para este passo:
Água destiladaFerramentas necessárias:
Balança de precisãoMateriais
4- 1 peçaReferência
- 1 peçaReferência
- 1 peçaReferência
- 1 peçaReferência
Ferramentas necessárias
9- Referência
- Referência
- Referência
- Referência
- Referência
- Referência
- Referência
Materiais de Blueprints conectados
CC0 Domínio Público
Este blueprint é liberado sob CC0. Você é livre para copiar, modificar, distribuir e usar este trabalho para qualquer finalidade, sem pedir permissão.
Apoie o Maker comprando produtos através do Blueprint, onde ele ganha uma Comissão Maker definida pelos vendedores, ou crie uma nova versão deste Blueprint e inclua-o como conexão no seu próprio Blueprint para compartilhar receita.