Colaboração
ARTE
BELEZA E BEM-ESTAR
ARTESANATO
CULTURA E HISTÓRIA
ENTRETENIMENTO
MEIO AMBIENTE
COMIDA E BEBIDAS
ENGENHARIA REVERSA
CIÊNCIAS
ESPORTES
TECNOLOGIA
TECNOLOGIA VESTÍVEL
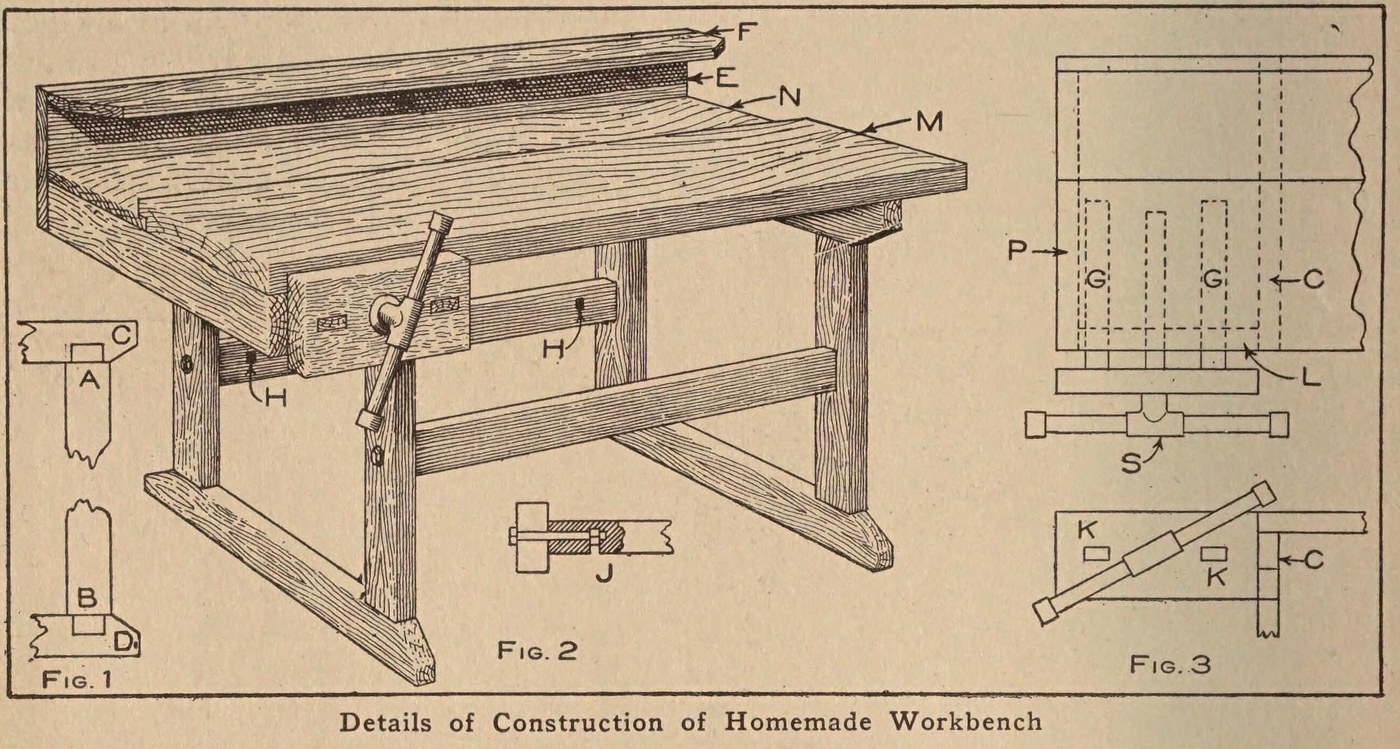


Workbench: a Pine Bench with a Plank Top and Vise (Boy Mechanic, 1913)
A boy's first workshop bench: two mortised pine leg frames bolted to braces, a 3 1/2 ft top of one 2 x 12 in plank with a back board, a tool rack behind, and a wooden vise on an iron bench screw.
Source: C. E. McKinney, Jr., 'Homemade Workbench', The Boy Mechanic, Book 1 (1913), pp. 442-443. Picture: Figs. 1-3 of the book.
Intermediário
Unknown
Instruções
1
1
Make the two leg frames
Make the two leg frames
Cut four 2 x 4 in pine legs 23 in long with a tenon on each end 1/2 in thick, 3 1/2 in wide and 1 1/2 in long (Fig. 1, A and B). Cut four crosspieces of the same stock 20 in long, mortised in the narrow edge 1 1/4 in from each end, and slope their corners from the leg out to the middle. Fit each pair of legs to a pair of crosspieces to make the two supports.
Materiais para este passo:
 Madeira de pinho1 2 x 4 in: legs, crosspieces
Ferramentas necessárias:
 Serrote
 Formão de samblagem
 Martelo
2
2
Brace them together
Brace them together
Join the supports with two 2 x 4 in braces 24 in long, ends sawn square. Bore through each leg and 4 in into the centre of each brace end, bore an intersecting hole on the back of each brace for the nut, and draw each joint tight with a 3/8 x 6 in bolt (Fig. 2, J). A cross brace on the back stops rocking when planing.
Materiais para este passo:
Madeira de pinho1 2 x 4 in: braces Parafuso de carroçaria4 3/8 x 6 in
Ferramentas necessárias:
Serrote Arco de pua e broca
 Chave inglesa ajustável
3
3
Fit the plank top
Fit the plank top
Make the main top M from one 2 x 12 in plank 3 1/2 ft long. Rabbet its back edge 1/2 in to take a back board N of the same length, 8 1/2 in wide and 7/8 in thick. Screw the top to the top crosspieces with long screws.
Materiais para este passo:
 Prancha de madeira dura1 2 x 12 in, 3 1/2 ft
 Tábua de pinho1 back board
 Parafusos para madeira1 long
Ferramentas necessárias:
Serrote Plaina de bloco
 Chave de fendas
4
4
Add the tool rack
Add the tool rack
Nail a board E 10 in wide to the back of the bench and fasten a 2 1/2 in board F on top of it at right angles; both 7/8 in thick and 3 1/2 ft long. Bore holes or cut notches in F to hold tools.
Materiais para este passo:
Tábua de pinho2 7/8 in, 3 1/2 ft Pregos1 peça
Ferramentas necessárias:
Arco de pua e brocaSerroteMartelo5
5
Fit the vise
Fit the vise
Fasten an iron bench screw in a 2 x 6 in block 12 in long. Mortise two guide rails 7/8 x 1 1/2 in and 20 in long into the block; they slide in mortises in a 2 x 4 piece L bolted under the top, which holds the bench-screw nut between the two mortises. Nail L to a top crosspiece and to a 2 x 4 piece P bolted under the top at the end (Fig. 3).
Materiais para este passo:
Madeira de pinho1 2 x 6 block, 2 x 4 pieces, guide rails Parafuso de bancada para entalhe1 peçaParafuso de carroçaria1 for L and PPregos1 peça
Ferramentas necessárias:
SerroteFormão de samblagemArco de pua e brocaChave inglesa ajustávelMarteloMateriais
7- 1 2 x 6 block, 2 x 4 pieces, guide railsReferência
- 1 for L and PReferência
- 1 2 x 12 in, 3 1/2 ftReferência
- 2 7/8 in, 3 1/2 ftReferência
- 1 longReferência
- 2 peçasReferência
- Referência
Este projeto faz

CC0 Domínio Público
Este blueprint é liberado sob CC0. Você é livre para copiar, modificar, distribuir e usar este trabalho para qualquer finalidade, sem pedir permissão.
Apoie o Maker comprando produtos através do Blueprint, onde ele ganha uma Comissão Maker definida pelos vendedores, ou crie uma nova versão deste Blueprint e inclua-o como conexão no seu próprio Blueprint para compartilhar receita.