
Colaboração
ARTE
BELEZA E BEM-ESTAR
ARTESANATO
CULTURA E HISTÓRIA
ENTRETENIMENTO
MEIO AMBIENTE
COMIDA E BEBIDAS
ENGENHARIA REVERSA
CIÊNCIAS
ESPORTES
TECNOLOGIA
TECNOLOGIA VESTÍVEL
Easter Egg Dyeing Stand: a Crank-Turned Rubber Roller Spins the Egg Under the Brush (Young, 1943)
Woody

Criado por

Woody

13. novembro 2026NO
7
0
0
0
0

Easter Egg Dyeing Stand: a Crank-Turned Rubber Roller Spins the Egg Under the Brush (Young, 1943)

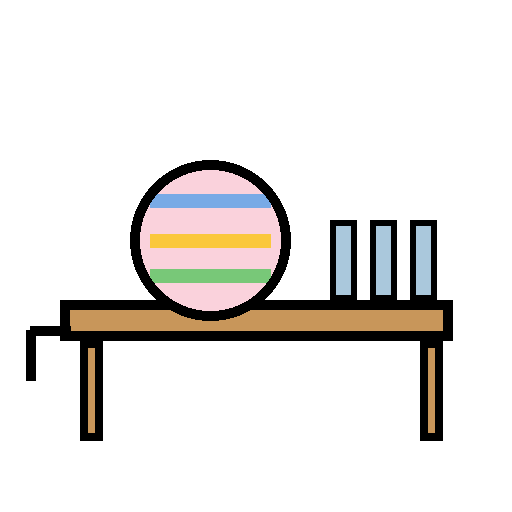
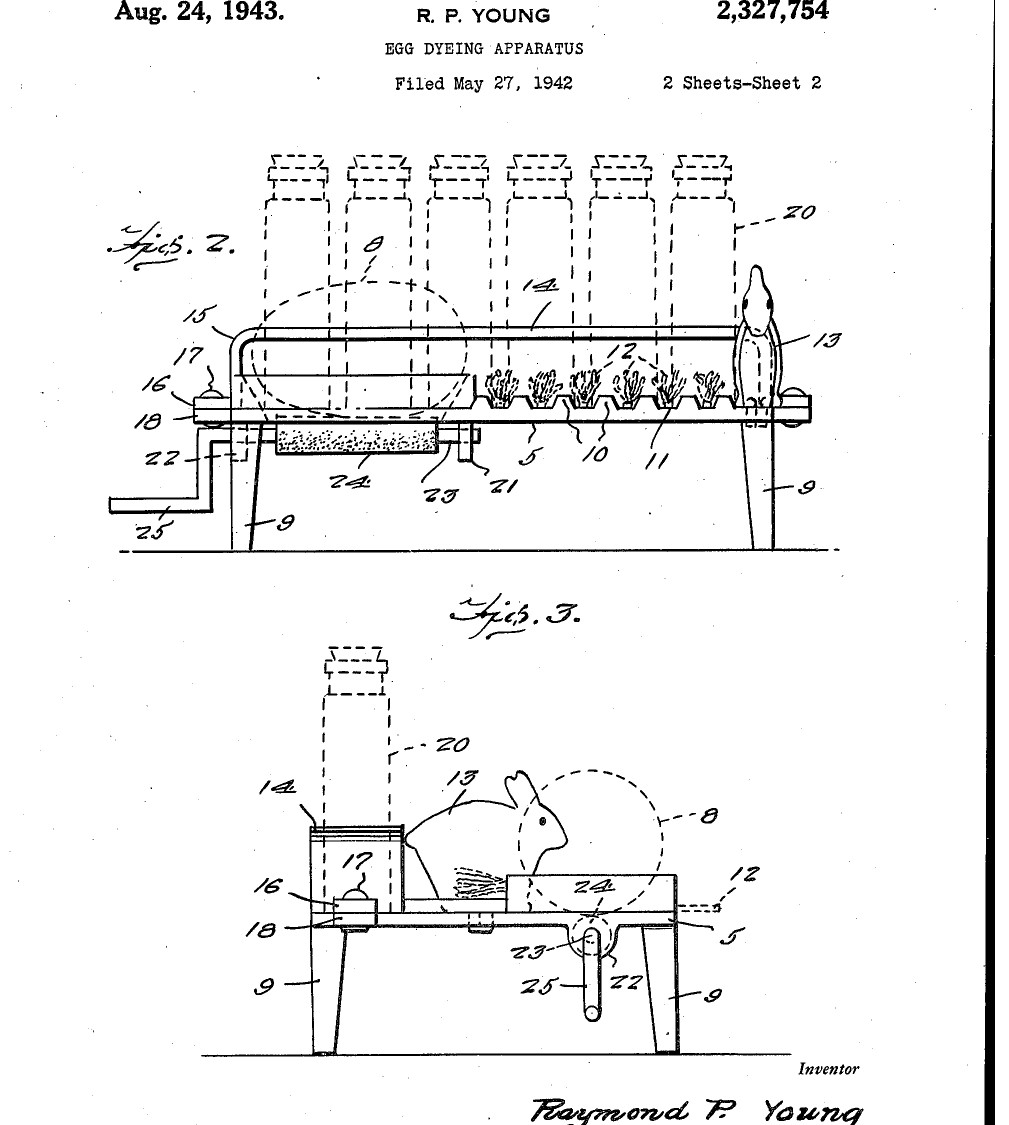
Raymond P. Young of Wrightsville, Pennsylvania, received US 2,327,754, dated 24 August 1943, for a little table for dyeing Easter eggs. The egg sits in an oval opening on a rubber roller turned by a crank; hold a dye brush against it and the colour goes on evenly all round. Grooves hold the brushes, a rack holds the dye bottles, and a rabbit stands at one end. We make it from plywood and dowel. All sizes are ours.
Iniciante
About 4 hours

Instruções

1

Opening and roll

A carregar o notebook Jupyter…
2

Read US 2,327,754

"If a dye containing brush is held against the object 8, application of the dye to the object 8 will take place uniformly and in a convenient manner."
3

Cut the platform

Cut a platform of 12 mm plywood about 300 x 180 mm (ours). Near one corner cut an oval opening 70 x 40 mm with a coping saw, his opening 6. Glue a strip of thin plywood or a ring of dowel round it to make the rise 7, so the egg cannot roll off.

Materiais para este passo:

Placa de contraplacadoPlaca de contraplacado1 peça
Cola de madeiraCola de madeira1 peça

Ferramentas necessárias:

LápisLápis
SerroteSerrote
Berbequim de mãoBerbequim de mão
Serra de recortesSerra de recortes
LixaLixa
4

Make the brush grooves

Glue short dowels across the top of the platform beside the opening, a little apart, so the gaps between them (his ribs 10 and grooves 11) hold the brushes.

Materiais para este passo:

Cavilhas de madeira duraCavilhas de madeira dura1 peça
Cola de madeiraCola de madeira1 peça

Ferramentas necessárias:

SerroteSerrote
LixaLixa
5

Fit the legs

Drill the corners and glue in four dowel legs, his legs 9, long enough to clear the crank below (ours).

Materiais para este passo:

Cavilhas de madeira duraCavilhas de madeira dura1 peça
Cola de madeiraCola de madeira1 peça

Ferramentas necessárias:

Berbequim de mãoBerbequim de mão
SerroteSerrote
6

Make the roller

Slide rubber tubing over a steel rod for the roll 24 (his roll is rubber, "or any other suitable material"). Bend the rod's long end twice at right angles in the vice to make the crank handle 25.

Materiais para este passo:

Tubo de borrachaTubo de borracha1 peça
Varão de aço macioVarão de aço macio1 peça

Ferramentas necessárias:

Torno de bancadaTorno de bancada
Serra de arco para metaisSerra de arco para metais
7

Hang the roller

Cut two bearing brackets from flat bar (ours, his bearings 21 and 22), drill each for the rod at the depth the notebook gives, bend them to hang below the platform and screw them on either side of the opening, so the roll sits under the opening as his Fig. 4. The egg should rest on the roll inside the rise and turn when the crank turns.

Materiais para este passo:

Barra chata de aço macioBarra chata de aço macio1 peça
Parafusos para madeiraParafusos para madeira1 peça

Ferramentas necessárias:

Serra de arco para metaisSerra de arco para metais

Engenho de furarEngenho de furar
Jogo de brocasJogo de brocas
Torno de bancadaTorno de bancada
Conjunto de chaves de fendasConjunto de chaves de fendas
8

Make the bottle rack

Bend a strip of flat bar (his rack bar 14, "preferably strap iron") down and out at each end, drill a row of holes in it to hold the dye bottles, and screw its ends to the back edge of the platform.

Materiais para este passo:

Barra chata de aço macioBarra chata de aço macio1 peça
Parafusos para madeiraParafusos para madeira1 peça

Ferramentas necessárias:

Serra de arco para metaisSerra de arco para metais
Engenho de furarEngenho de furar
Jogo de brocasJogo de brocas
Torno de bancadaTorno de bancada
Conjunto de chaves de fendasConjunto de chaves de fendas
9

Add the rabbit

Cut a rabbit from plywood with the coping saw, sand it and glue it upright at the far end, his figure 13.

Materiais para este passo:

Placa de contraplacadoPlaca de contraplacado1 peça
Cola de madeiraCola de madeira1 peça

Ferramentas necessárias:

Serra de recortesSerra de recortes
LixaLixa
10

Dye an egg

Fill the bottles with food colouring (ours) and put them in the rack. Set a hard-boiled egg in the opening on the roll, turn the crank, and hold a dye-filled brush against the egg: the colour goes on in an even band. Move the brush across to stripe it.

Materiais para este passo:

OvoOvo1 peça
Corante alimentarCorante alimentar1 peça
Garrafas de vidro com tampaGarrafas de vidro com tampa1 peça

Ferramentas necessárias:

Conjunto de pincéisConjunto de pincéis
11

Troubleshooting

Egg dyeing stand troubleshooting.

Flow

Loading...
12

History and honest limits

**Raymond P. Young** of Wrightsville, Pennsylvania, US 2,327,754, dated 24 August 1943, filed 27 May 1942. He claimed "dyeing apparatus comprising a platform having an opening therein, a rotatable roller mounted at the underside of the platform and partly protruding into said opening, means for rotating the roller, and an upstanding article confining wall on the platform surrounding said opening". He gives no sizes or dye: the plywood, dowels, all sizes, the bracket bearings, the rubber tube on a rod, and food colouring are ours.

Materiais

10

Ferramentas necessárias

11

CC0 Domínio Público

Este blueprint é liberado sob CC0. Você é livre para copiar, modificar, distribuir e usar este trabalho para qualquer finalidade, sem pedir permissão.

Apoie o Maker comprando produtos através do Blueprint, onde ele ganha uma Comissão Maker definida pelos vendedores, ou crie uma nova versão deste Blueprint e inclua-o como conexão no seu próprio Blueprint para compartilhar receita.

Discussão

(0)

Entrar para participar da discussão

Carregando comentários...