སྒྱུ་རྩལ
མཛེས་སྡུག་དང་བདེ་ཐང
བཟོ་རིག
རིག་གནས་དང་ལོ་རྒྱུས
དགའ་སྟོན
ཁོར་ཡུག
ཟས་དང་བཏུང་རྫས
ཕྱིར་འཕྲུལ་རིག
ཚན་རིག
རྩེད་འགྲན
རིག་རྩལ
གྱོན་རུང
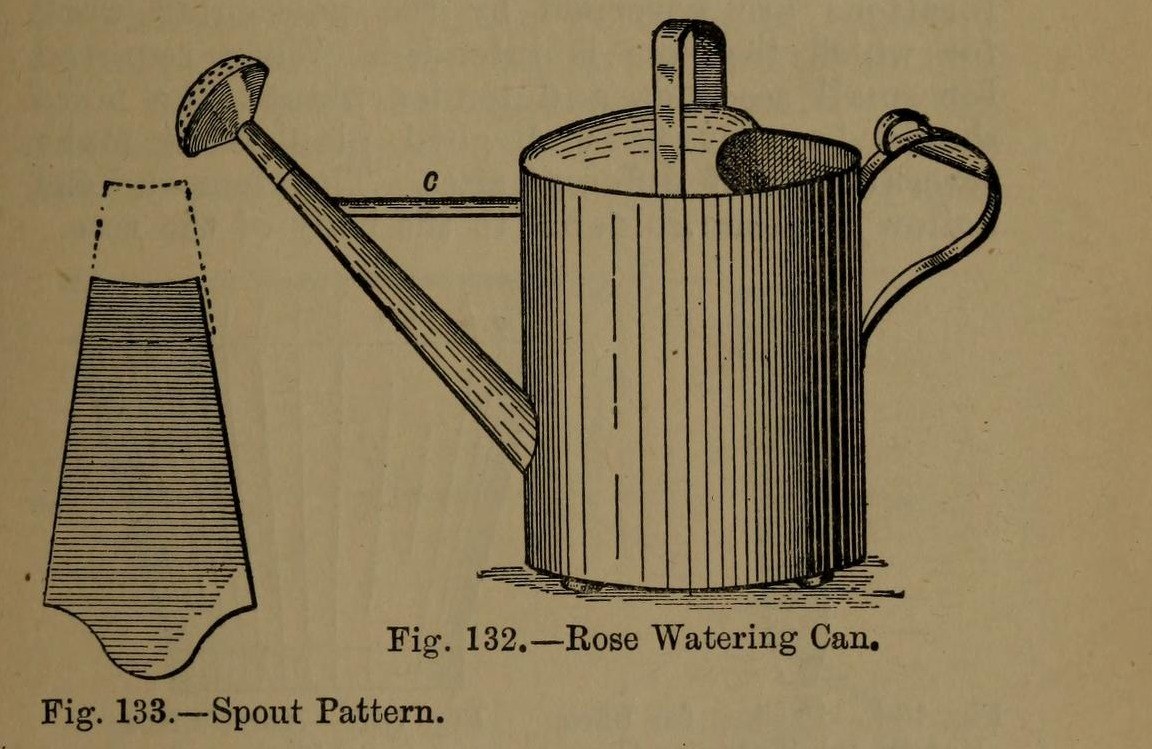


Watering Can: the Tinplate Rose Watering-Can (Hasluck, 1907)
A tinsmith's garden watering can: a round body from one sheet 2 ft 1 in x 8 1/2 in, a two-piece spout with a perforated rose, a hollowed top with a cross handle, and a back handle with a thumb ring. Tinplate or galvanised iron.
Variable: the rose. Its pattern diameter is the rose diameter x 4 / 3; finer holes for seedlings.
Source: Paul N. Hasluck, Tinplate Work (1907), pp. 54-57. Unknown: solder. Picture: Figs. 132-135 of the book.
བར་མ
Unknown
ལམ་སྟོན
1
1
Make the body and bottom
Make the body and bottom
Cut a sheet 2 ft 1 in by 8 1/2 in. Wire one edge, sink it in the crease iron, round it and groove the seam; solder the seam inside. Cut the spout hole opposite the seam, 2 1/2 in from the bottom. Edge the bottom to fit, beat it up and solder it from inside.
གོམ་པ་འདིའི་རྫས་རིགས:
 ཊིན་བྱུགས་ལྕགས་ལེབ།1 body, bottom
 ལྕགས་སྐུད1 edge
 གསའ-ཞ་ཡི་ལྷ་ཡིག1 དུམ་བུ།
ལག་ཆས་དགོས་མཁོ:
 ལྕགས་ལེབ་གཏུབ་ནིའི་ཇེམ་ཙི།
 ཕུར་པ
 ཤིང་གི་ཐོ་བ།
 གློག་གི་ཞ་སྦྱར་ལྕགས
 ཞུ་རོགས་རྫས
2
2
Make and fit the spout
Make and fit the spout
Cut the spout in two pieces (Fig. 133), bend them to shape and solder the seams. Solder the larger piece into the body. Make it longer for plants out of reach, with an elbow for plants up high. Make the stay: a taper strip as long as the gap between can and spout, bent to a half-round section and soldered in.
གོམ་པ་འདིའི་རྫས་རིགས:
ཊིན་བྱུགས་ལྕགས་ལེབ།1 spout, stayགསའ-ཞ་ཡི་ལྷ་ཡིག1 དུམ་བུ།ལག་ཆས་དགོས་མཁོ:
ལྕགས་ལེབ་གཏུབ་ནིའི་ཇེམ་ཙི།ཕུར་པགློག་གི་ཞ་སྦྱར་ལྕགསཞུ་རོགས་རྫས3
3
Make the rose
Make the rose
Set out the rose body (Fig. 135): its diameter is the rose diameter x 4 / 3, so a 3 in rose needs a 4 in pattern, with lines a b at right angles. Bend it over a funnel stake and solder the seam. Hollow a disc for the front, with edges for capping on. Inside the hollow, mark circles and pierce them at intervals with a bradawl over a hard wood block; very fine for seedlings. Solder front and stem to the rose body. Several roses of different sizes are useful.
གོམ་པ་འདིའི་རྫས་རིགས:
ཊིན་བྱུགས་ལྕགས་ལེབ།1 roseགསའ-ཞ་ཡི་ལྷ་ཡིག1 དུམ་བུ།ལག་ཆས་དགོས་མཁོ:
 རྩེ་གཉིས་ཀྱི་སྐོར་ཐིག་ཆས།ལྕགས་ལེབ་གཏུབ་ནིའི་ཇེམ་ཙི།ཕུར་པ
 སྙོམས་བཟོའི་ཐོ་བ།
 ཁབ་ཆེན།
 སྲ་བའི་ཤིང་གི་སྒོ་རྡོགགློག་གི་ཞ་སྦྱར་ལྕགསཞུ་རོགས་རྫས
4
4
Fit the top and handles
Fit the top and handles
Hollow the top (Fig. 134), fit it to the body, wire its inner arc and solder it on. Cross handle: a strip about 1 3/4 in wide, wired with No. 12 B.W.G., bent to shape; cut two holes in the top with a small sharp chisel and solder the ends inside and on top. Back handle (Fig. 136): wire and bend it, solder a small boss under its upper part, and solder it opposite the spout with a thumb ring at the top. Solder three small hollowed studs under the bottom.
གོམ་པ་འདིའི་རྫས་རིགས:
ཊིན་བྱུགས་ལྕགས་ལེབ།1 top, handles, studsལྕགས་སྐུད1 No. 12 B.W.G.གསའ-ཞ་ཡི་ལྷ་ཡིག1 དུམ་བུ།ལག་ཆས་དགོས་མཁོ:
ལྕགས་ལེབ་གཏུབ་ནིའི་ཇེམ་ཙི།སྙོམས་བཟོའི་ཐོ་བ། ལྕགས་ཀྱི་བརྐོ་ཆསགློག་གི་ཞ་སྦྱར་ལྕགསཞུ་རོགས་རྫས
5
5
Clean and paint
Clean and paint
Clean with turpentine and whiting. Give two good coats of paint: red inside and green outside suit it.
གོམ་པ་འདིའི་རྫས་རིགས:
 སྣུམ་ཚོན།2 coats
ལག་ཆས་དགོས་མཁོ:
 ཐང་སྣུམ
 ཀེལ་སིམ་ཀར་བོ་ནེཊ (རྡོ་ཐལ་གྱི་ཕྱེ)
རྫས་རིགས
4- 1 top, handles, studsས་ཆ་འཛིན
- 1 No. 12 B.W.G.ས་ཆ་འཛིན
- 4 དུམ་བུ།ས་ཆ་འཛིན
- 2 coatsས་ཆ་འཛིན
ལག་ཆས་དགོས་མཁོ
12- ས་ཆ་འཛིན
- ས་ཆ་འཛིན
- ས་ཆ་འཛིན
- ས་ཆ་འཛིན
- ས་ཆ་འཛིན
- ས་ཆ་འཛིན
- ས་ཆ་འཛིན
- ས་ཆ་འཛིན
- ས་ཆ་འཛིན
- ས་ཆ་འཛིན
- ས་ཆ་འཛིན
མཐུད་སྦྲེལ་བིལུ་པིརིན་ཊི་རྫས་རིགས



བིལུ་པིརིན་ཊི་འདི་གིས་བཟོ་མི

CC0 སྤྱི་དབང
བིལུ་པིརིན་ཊི་འདི་CC0 འོག་བཀྲམས་ཡོད། ཁྱེད་རང་གིས་ཆོག་མཆན་མ་བཞེས་པར་ཕབ་ལེན་དང་བཟོ་བཅོས། བགོ་བཤའ། དགོས་མཁོ་གང་ལའང་བཀོལ་སྤྱོད་བྱས་ཆོག
བཟོ་མཁན་ལ་རྒྱབ་སྐྱོར་བྱེད་པའི་ཆེད་ཁོང་ཚོའི་བིལུ་པིརིན་ཊི་བརྒྱུད་ཐོན་སྐྱེད་ཉོ། བཟོ་མཁན་གྱིས བཟོ་མཁན་གྱི་ཁེ་ཕོགས ཚོང་པས་གཏན་འཁེལ་བྱས་པ། ཡང་ན་བིལུ་པིརིན་ཊི་འདིའི་པར་གསར་བཟོས་ཏེ་ཁྱེད་རང་གི་བིལུ་པིརིན་ཊི་ནང་མཐུད་སྦྲེལ་བྱས་ཏེ་ཡོང་སྒོ་བགོ་བཤའ་བྱེད།